> ## Documentation Index
> Fetch the complete documentation index at: https://docs.pinata.cloud/llms.txt
> Use this file to discover all available pages before exploring further.
# Hono
[Hono](https://hono.dev) is a lightweight web framework for Deno and Node.js. It is designed to be fast, simple, and easy to use. In this framework guide we'll show you how to create a server that sends [Presigned URLs](/files/presigned-urls) to a client app for a secure client side upload flow. We would highly recommend pairing this guide with the [React framework guide](/frameworks/react)!
## Installation
### Create an API Key and get Gateway URL
To create an API key, visit the [Keys Page](https://app.pinata.cloud/developers/keys) and click the "New Key" button in the top right. Once you do that you can select if you want your key to be admin or if you want to scope the privileges of the keys to certain endpoints or limit the number of uses. Make those selections, then give the key a name at the bottom, and click create key.
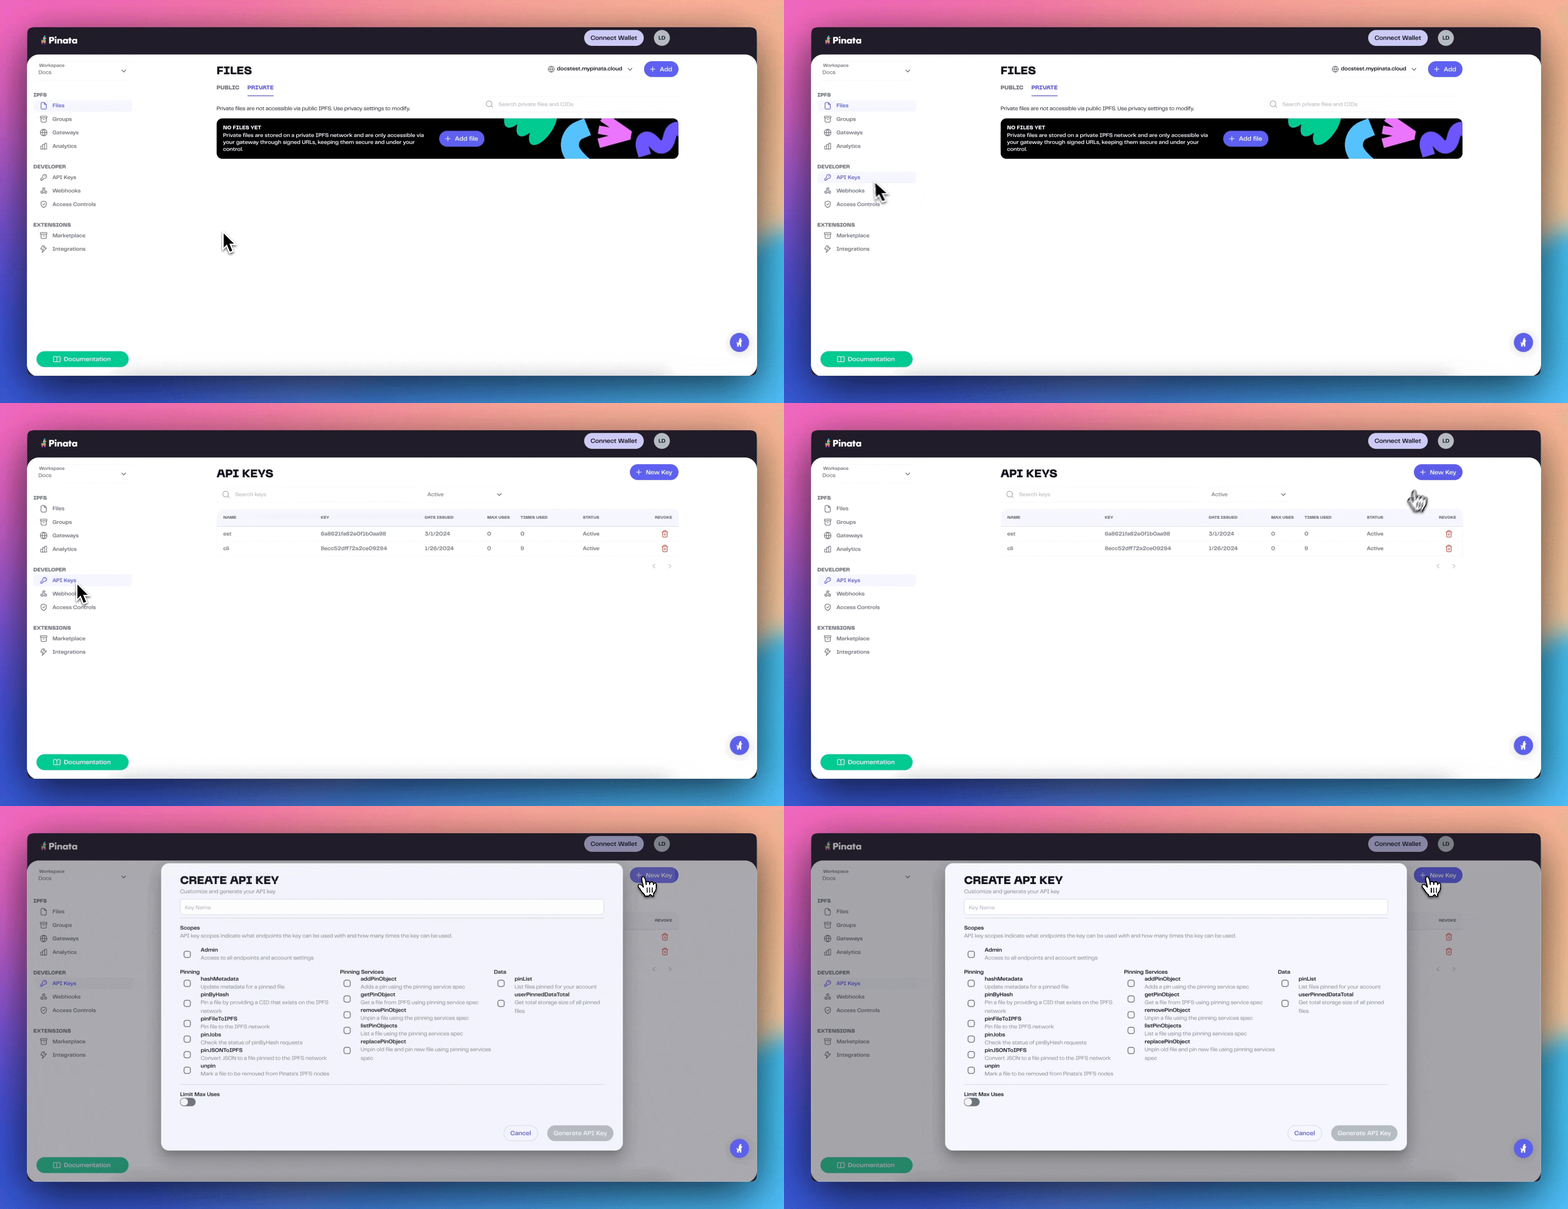 Once you have created the keys, you will be shown your API Key Info. This will contain your **Api Key**, **API Secret**, and your **JWT**. Click "Copy All" and save them somewhere safe!
The API keys are only shown once, so be sure to copy them somewhere safe!
After you have your API key, you will want to get your Gateway domain. When you create a Pinata account, you'll automatically have a Gateway created for you! To see it, simply visit the [Gateways Page](https://app.pinata.cloud/gateway) see it listed there.
Once you have created the keys, you will be shown your API Key Info. This will contain your **Api Key**, **API Secret**, and your **JWT**. Click "Copy All" and save them somewhere safe!
The API keys are only shown once, so be sure to copy them somewhere safe!
After you have your API key, you will want to get your Gateway domain. When you create a Pinata account, you'll automatically have a Gateway created for you! To see it, simply visit the [Gateways Page](https://app.pinata.cloud/gateway) see it listed there.
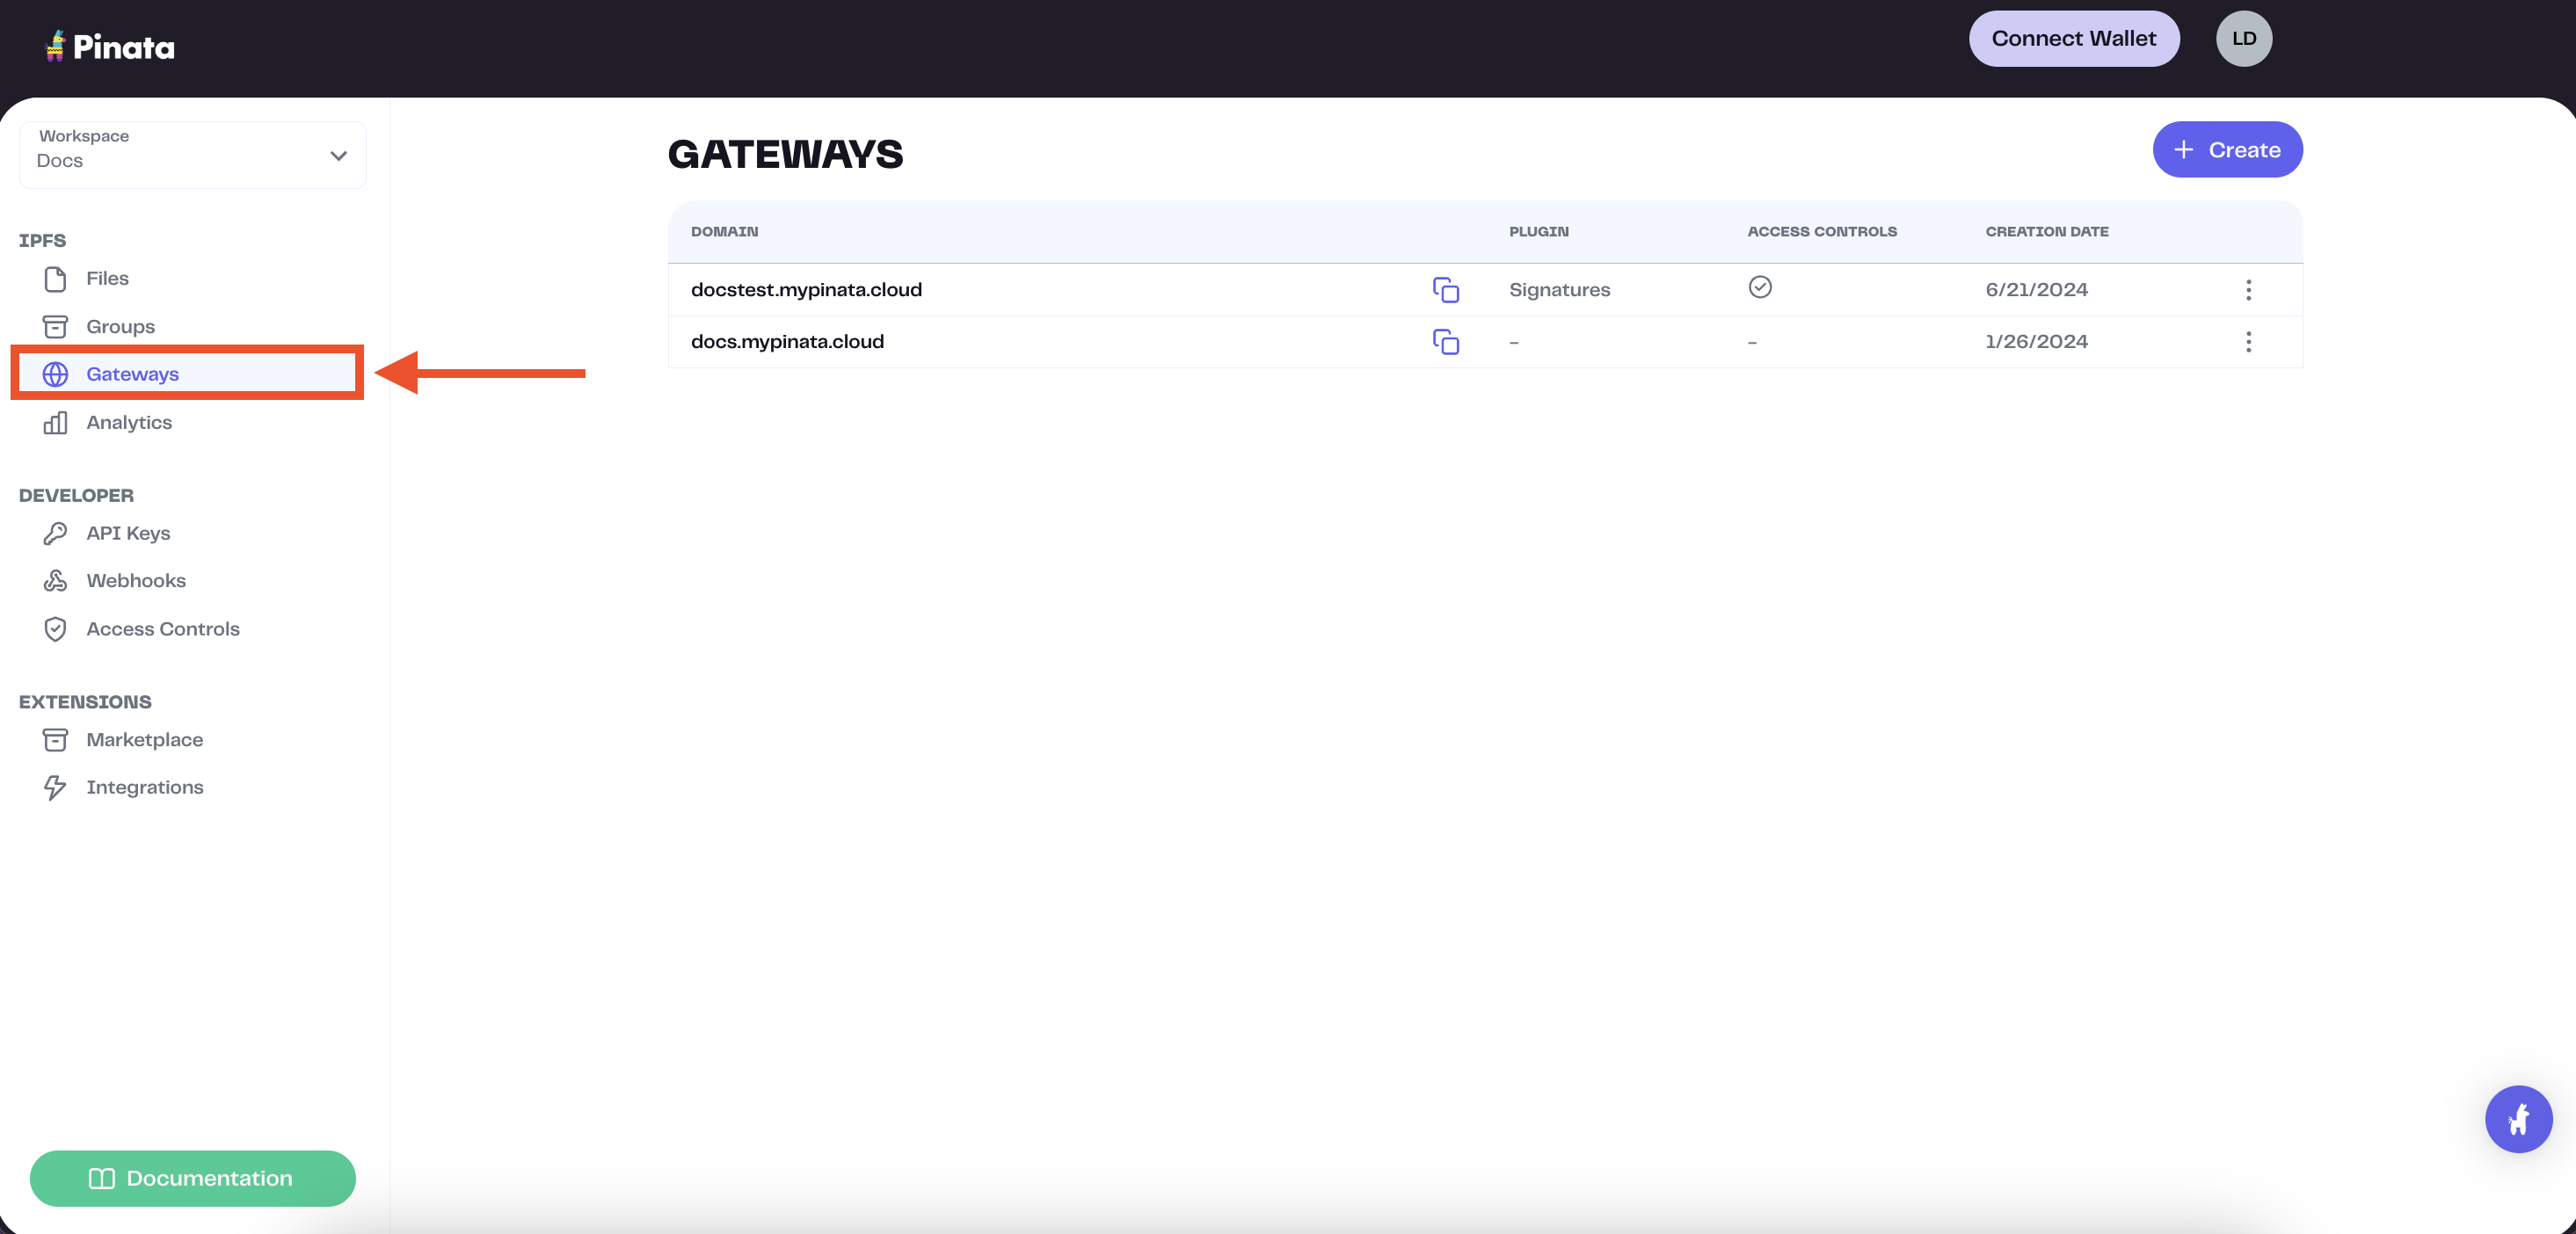 The gateway domains are randomly generated and might look something like this:
```
aquamarine-casual-tarantula-177.mypinata.cloud
```
### Start up Hono Project
Run the command below to make a new Hono project:
```bash theme={null}
npm create hono@latest pinata-server
```
After doing so you should see a list of different deployment templates. We would recommend using `Cloudflare Workers` which is what we'll follow through with in this guide. After selecting that `cd` into the project and install the Pinata SDK.
```bash theme={null}
cd pinata-server
npm i pinata
```
After making the project, create a `.dev.vars` file in the root of the project and put in the following variables:
```
PINATA_JWT=
GATEWAY_URL
```
Use the `JWT` from the API key creation in the previous step as well as the `Gateway Domain`. The format of the Gateway domain should be `mydomain.mypinata.cloud`.
### Implement the Server Code
Inside the `src/index.ts` file paste in the following code:
```typescript src/index.ts theme={null}
import { Hono } from 'hono'
import { cors } from 'hono/cors';
import { PinataSDK } from 'pinata'
interface Bindings {
PINATA_JWT: string;
GATEWAY_URL: string;
}
const app = new Hono<{ Bindings: Bindings }>()
app.use(cors())
app.get('/', (c) => {
return c.text('Hello Hono!')
})
app.get('/presigned_url', async (c) => {
// Handle Auth
const pinata = new PinataSDK({
pinataJwt: c.env.PINATA_JWT,
pinataGateway: c.env.GATEWAY_URL
})
const url = await pinata.upload.public.createSignedURL({
expires: 60 // Last for 60 seconds
})
return c.json({ url }, { status: 200 })
})
export default app
```
This creates just two simple endpoints:
* `/` - A home route that just returns `Hello Hono!`
* `/presigned_url` - A route that will return a Presigned URL that is only valid for 60 seconds which our client can use to upload
As with most server frameworks, you will likely want to protect your API route with an auth layer. You would place there where the comment says `// Handle Auth`
### Usage
Test it out by running the following command in your terminal
```bash theme={null}
npm run dev
```
You should see the console say it's serving at `http://localhost:8787`. While this is running, in a separate terminal window run this curl to test the API endpoint:
```bash theme={null}
curl http://localhost:8787/presigned_url
```
If successful you shoud have a JSON object like the following
```JSON theme={null}
{"url":"https://uploads.pinata.cloud/v3/files/redacted?X-Algorithm=PINATA2&X-Date=1743695529&X-Expires=60&X-Method=%5B%22HEAD%22%2C%22PATCH%22%2C%22POST%22%5D&X-Upload-Option-Network=public&X-User-ID=redacted&X-Signature=redacted"}
```
To see how you can use Presigned URLs with a client side framework check out the React guide
The gateway domains are randomly generated and might look something like this:
```
aquamarine-casual-tarantula-177.mypinata.cloud
```
### Start up Hono Project
Run the command below to make a new Hono project:
```bash theme={null}
npm create hono@latest pinata-server
```
After doing so you should see a list of different deployment templates. We would recommend using `Cloudflare Workers` which is what we'll follow through with in this guide. After selecting that `cd` into the project and install the Pinata SDK.
```bash theme={null}
cd pinata-server
npm i pinata
```
After making the project, create a `.dev.vars` file in the root of the project and put in the following variables:
```
PINATA_JWT=
GATEWAY_URL
```
Use the `JWT` from the API key creation in the previous step as well as the `Gateway Domain`. The format of the Gateway domain should be `mydomain.mypinata.cloud`.
### Implement the Server Code
Inside the `src/index.ts` file paste in the following code:
```typescript src/index.ts theme={null}
import { Hono } from 'hono'
import { cors } from 'hono/cors';
import { PinataSDK } from 'pinata'
interface Bindings {
PINATA_JWT: string;
GATEWAY_URL: string;
}
const app = new Hono<{ Bindings: Bindings }>()
app.use(cors())
app.get('/', (c) => {
return c.text('Hello Hono!')
})
app.get('/presigned_url', async (c) => {
// Handle Auth
const pinata = new PinataSDK({
pinataJwt: c.env.PINATA_JWT,
pinataGateway: c.env.GATEWAY_URL
})
const url = await pinata.upload.public.createSignedURL({
expires: 60 // Last for 60 seconds
})
return c.json({ url }, { status: 200 })
})
export default app
```
This creates just two simple endpoints:
* `/` - A home route that just returns `Hello Hono!`
* `/presigned_url` - A route that will return a Presigned URL that is only valid for 60 seconds which our client can use to upload
As with most server frameworks, you will likely want to protect your API route with an auth layer. You would place there where the comment says `// Handle Auth`
### Usage
Test it out by running the following command in your terminal
```bash theme={null}
npm run dev
```
You should see the console say it's serving at `http://localhost:8787`. While this is running, in a separate terminal window run this curl to test the API endpoint:
```bash theme={null}
curl http://localhost:8787/presigned_url
```
If successful you shoud have a JSON object like the following
```JSON theme={null}
{"url":"https://uploads.pinata.cloud/v3/files/redacted?X-Algorithm=PINATA2&X-Date=1743695529&X-Expires=60&X-Method=%5B%22HEAD%22%2C%22PATCH%22%2C%22POST%22%5D&X-Upload-Option-Network=public&X-User-ID=redacted&X-Signature=redacted"}
```
To see how you can use Presigned URLs with a client side framework check out the React guide