# API Keys
Source: https://docs.pinata.cloud/account-management/api-keys
This page is where you can create, record, and delete API keys for the [Pinata API](/api-reference/introduction). Creating an API key is very simple! Just visit the page to start by click on the API Keys button in the left sidebar, then click "New Key" in the top right.
In the New Key modal you can choose if you want the key to be an Admin key and have full access over every endpoint, or scope the keys by selecting which endpoints you want to use. You can also give it a limited number of uses, and be sure to give it a name to keep track of it. Once you have that filled out click "Create Key" and it will show you the `pinata_api_key`, `pinata_api_secret_key`, and the `JWT`. It's best to click "Copy All" and keep the API key data safe and secure.
Once API keys have been created, you will not be able to see the secret or JWT again
Once you have created your keys you can go ahead and try testing them! You can even use them in our [API Reference section](/api-reference/endpoint/ipfs/test-authentication) :eyes: Or feel free to paste this into your terminal with your `JWT`
```bash cURL theme={null}
curl --request GET \
--url https://api.pinata.cloud/data/testAuthentication \
--header 'accept: application/json' \
--header 'authorization: Bearer YOUR_PINATA_JWT'
```
If successful you should see this!
```shell bash theme={null}
{
"message": "Congratulations! You are communicating with the Pinata API!"
}
```
## Managing Keys
From the Keys Page you can see the name of a key, the public key, when it was issues, how many max uses it has, and what permissions it was given.
At any point you can delete an API key by clicking on the Revoke button
# Billing
Source: https://docs.pinata.cloud/account-management/billing
The billing page is where you can upgrade your account, view your current usage, or make changes to your billing info.
## Usage
Heading over to the "Usage" tab, this is where you can view how much of your plan has been used in the month. Gateway Bandwidth and Requests are reset each month on your billing cycle date.
If you reach 80% percent of your usage available, then you will start to
receive emails and warnings that you are close to running out of space. If you
are on the Free plan, then your account will no longer be able to upload or
use the Dedicated Gateway once your account has gone above the limit by 25%.
## Payment Info
Clicking the 'Manage Billing' button will show you the current card in use and if it's the default. If you want to remove a card, then you will need to add a new one first and set it as default before removing the old one.
Pinata currently only accepts standard debit and credit cards
## Plan Selection
From the plan selection you can choose a plan that fits your need the most, whether that be upgrading or downgrading.
If you upgrade in the middle of a billing cycle, then you will only be charged
the prorated amount
# Limits
Source: https://docs.pinata.cloud/account-management/limits
The Private IPFS API and IPFS API have variying limits that users should be aware of.
## API Limits
API rate limits on both the Private IPFS API and IPFS API are currently determined by plan type:
| Plan | Rate Limit |
| ---------- | ----------------------- |
| Free | 60 requests per minute |
| Picnic | 250 requests per minute |
| Fiesta | 500 requests per minute |
| Enterprise | 100 requests per second |
### Exceptions
The following API calls have increased rate limits:
* Endpoints under `api.pinata.cloud/data/` have a rate limit of 30 requests per minute
* The [Pinning Services API endpoint for listing content](/api-reference/pinning-service-api) has a rate limit of 30 requests per minute
## File Restrictions
HTML files can be uploaded on any plan, but can only be retrieved through a Dedicated Gateway with a [Custom Domain](gateways/dedicated-ipfs-gateways).
Binary files are only allowed on a case by case basis, please contact [team@pinata.cloud](mailto:team@pinata.cloud) for assistance.
## Gateway Rate Limits
At this time there are currently no rate limits for users retrieving content from a dedicated gateway.
## Upload Size Limits
There differing limits on file sizes between the Private IPFS API and IPFS API
### Private IPFS API
Files that are over **100MB** will require using [resumable uploads](/files/uploading-files#resumable-uploads) to complete. If you are using the SDK and the method `upload.file()` this will be handled automatically.
Beyond 100MB the max file size is **25GB** at this time.
### IPFS API
While the upload limit is 25GB we would recommend only uploading up to 15GB per file/folder for reliability reasons. We can try to assist uploads 15GB-25GB but we cannot guarantee success at this time.
There is no aggregate limit for uploads, but each individual upload (whether it is a file or a folder) is limited to **25 GB**.
There is also a file limit size of **10MB** for the pinJSONToIPFS API endpoint.
# Webhooks
Source: https://docs.pinata.cloud/account-management/webhooks
Subscribe to Pinata API events using Webhooks
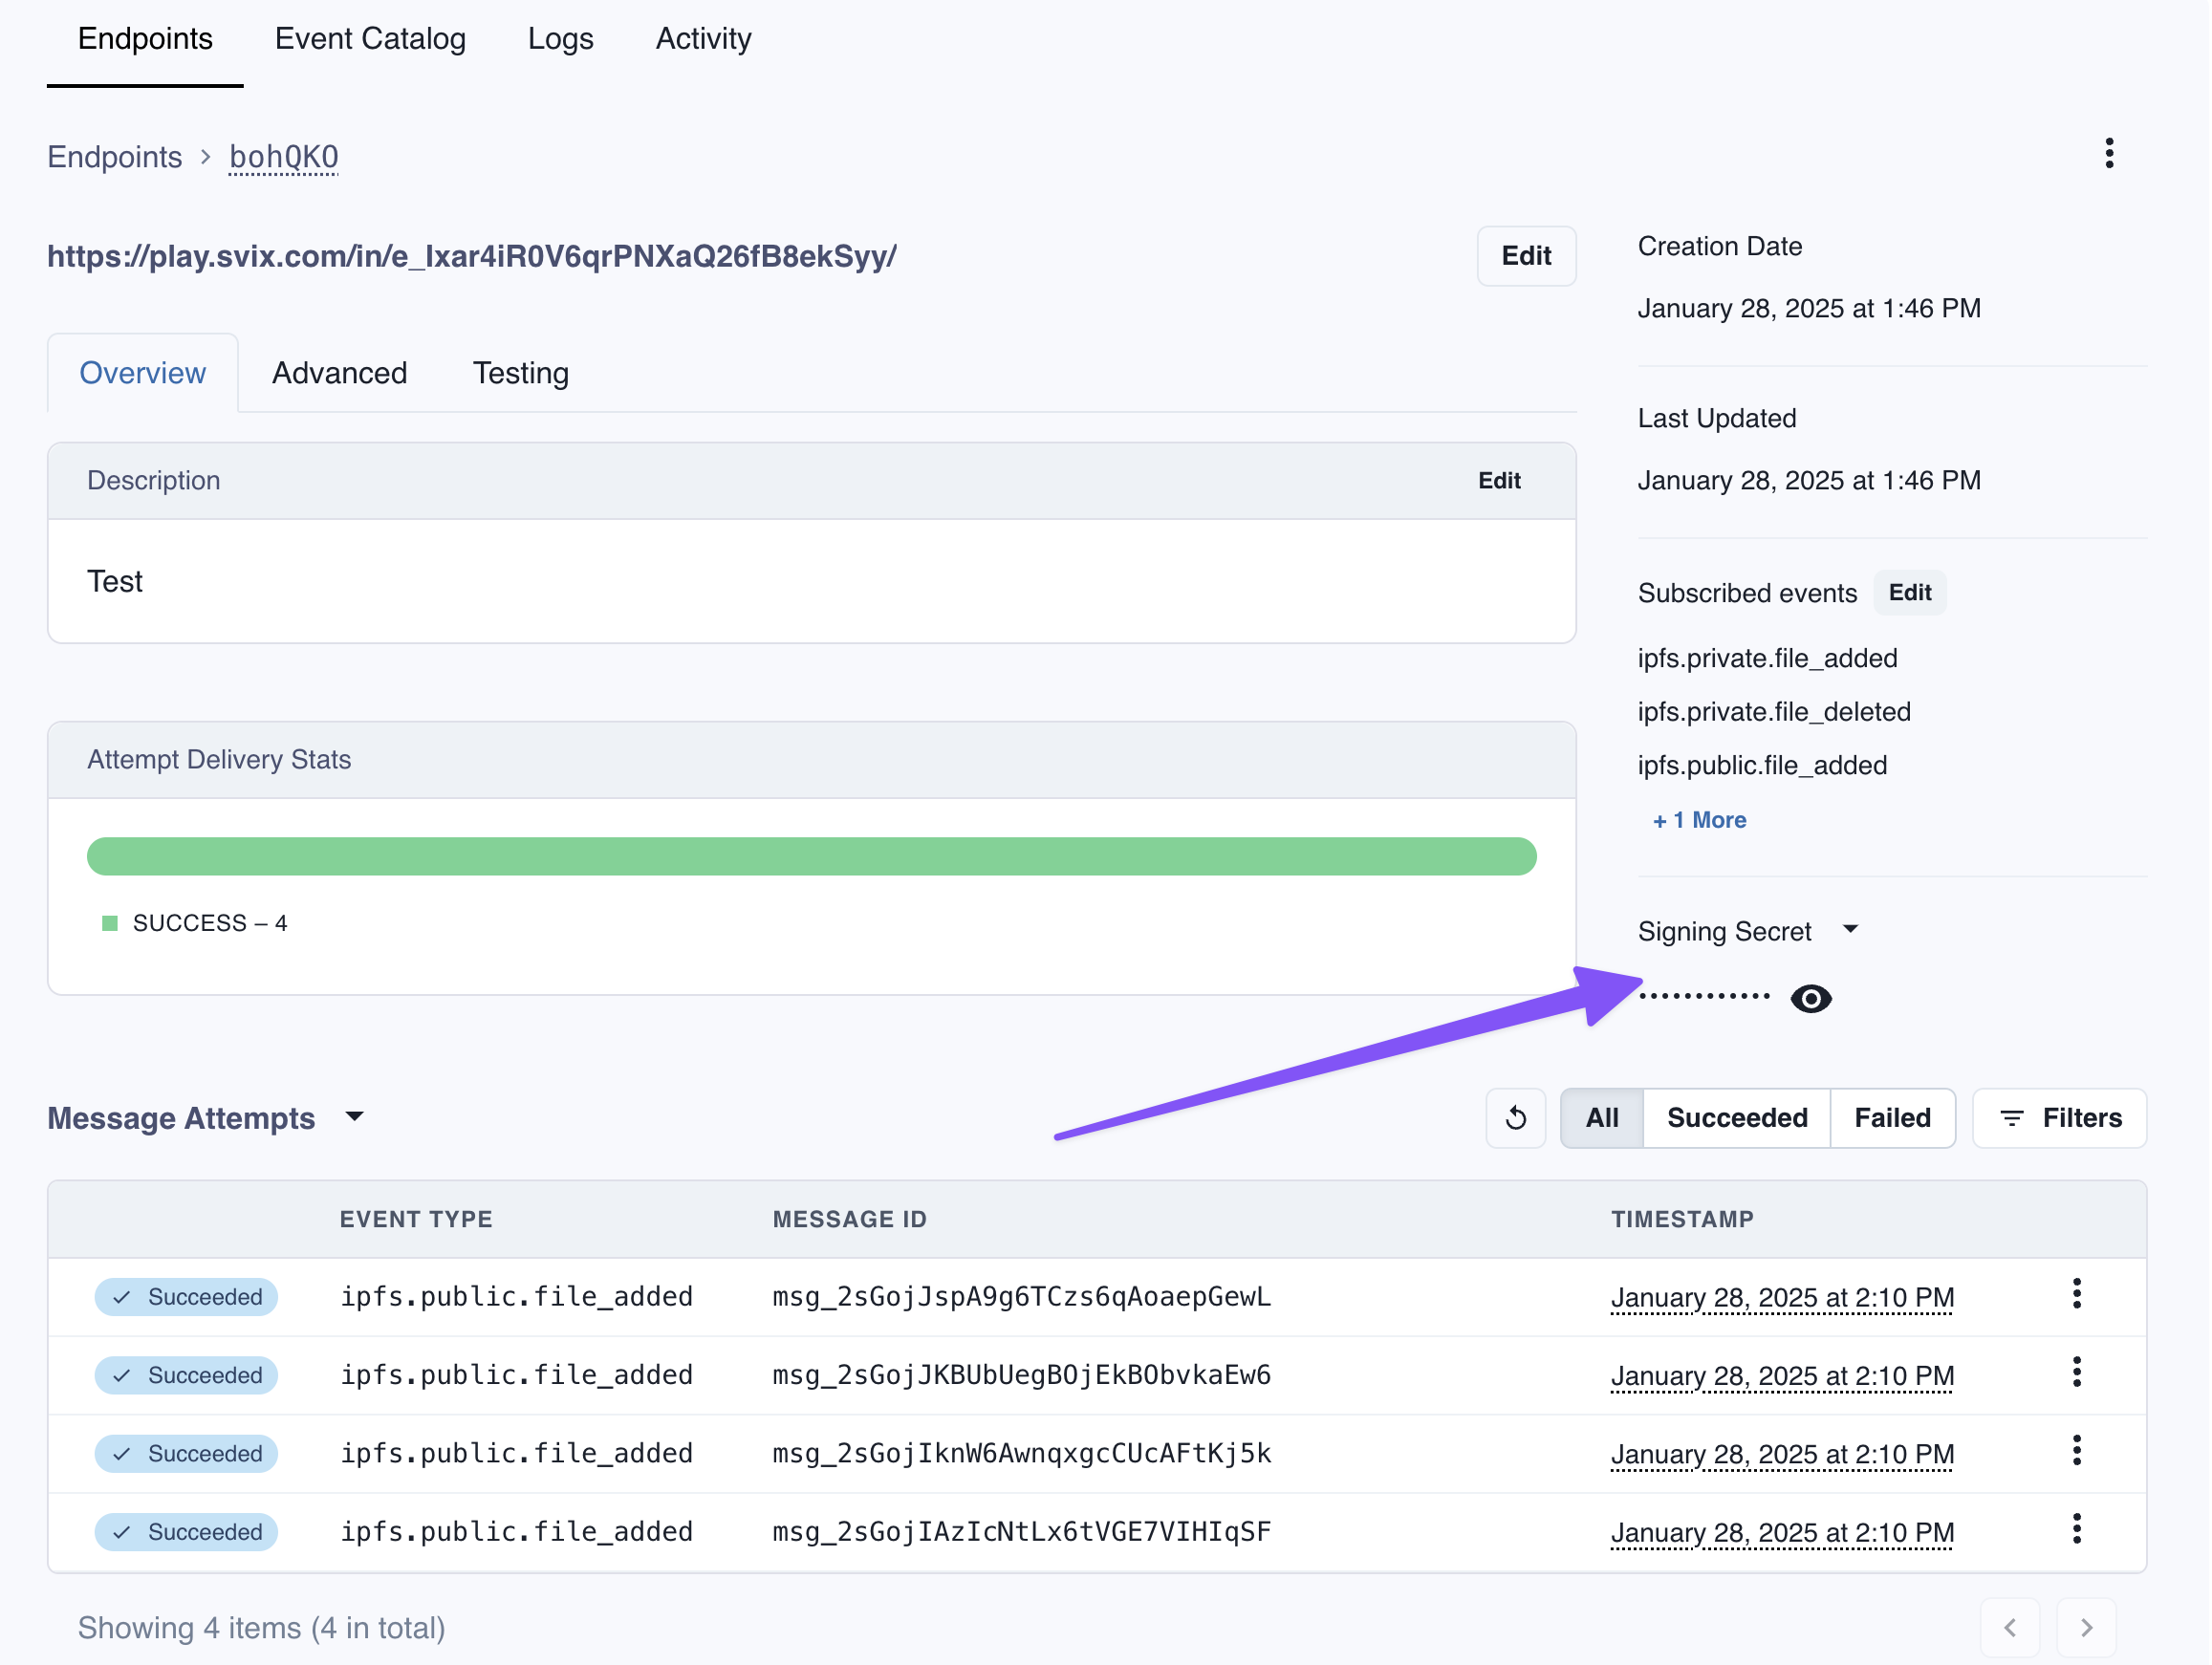
Through the Pinata App you can create Webhooks for particular events fired from the Pinata API for your account specifically, like uploading or deleting a file.
## Setup
Navigate to the [Webhooks Tab]() inside the Pinata App and click "Add Endpoint" in the top right.

On the New Endpoint page you can put in a URL for your server endpoint that will receive the events. Additionally you can give it a description, which events it will subscribe to, and more advance options like rate limiting. Once you have your options selected click "Create" at the bottom.
If you don't have an endpoint for your app or server yet, you can create a test one by clicking on the `Svix Play` link below the URL input.

Once your Webhook is created you will be taken to the dashboard where you can see incoming logs and events that are fired. Try triggering one of the events that you've selected for your webhook either from the Pinata App or from the API. Then come back to the dashboard to see the result!
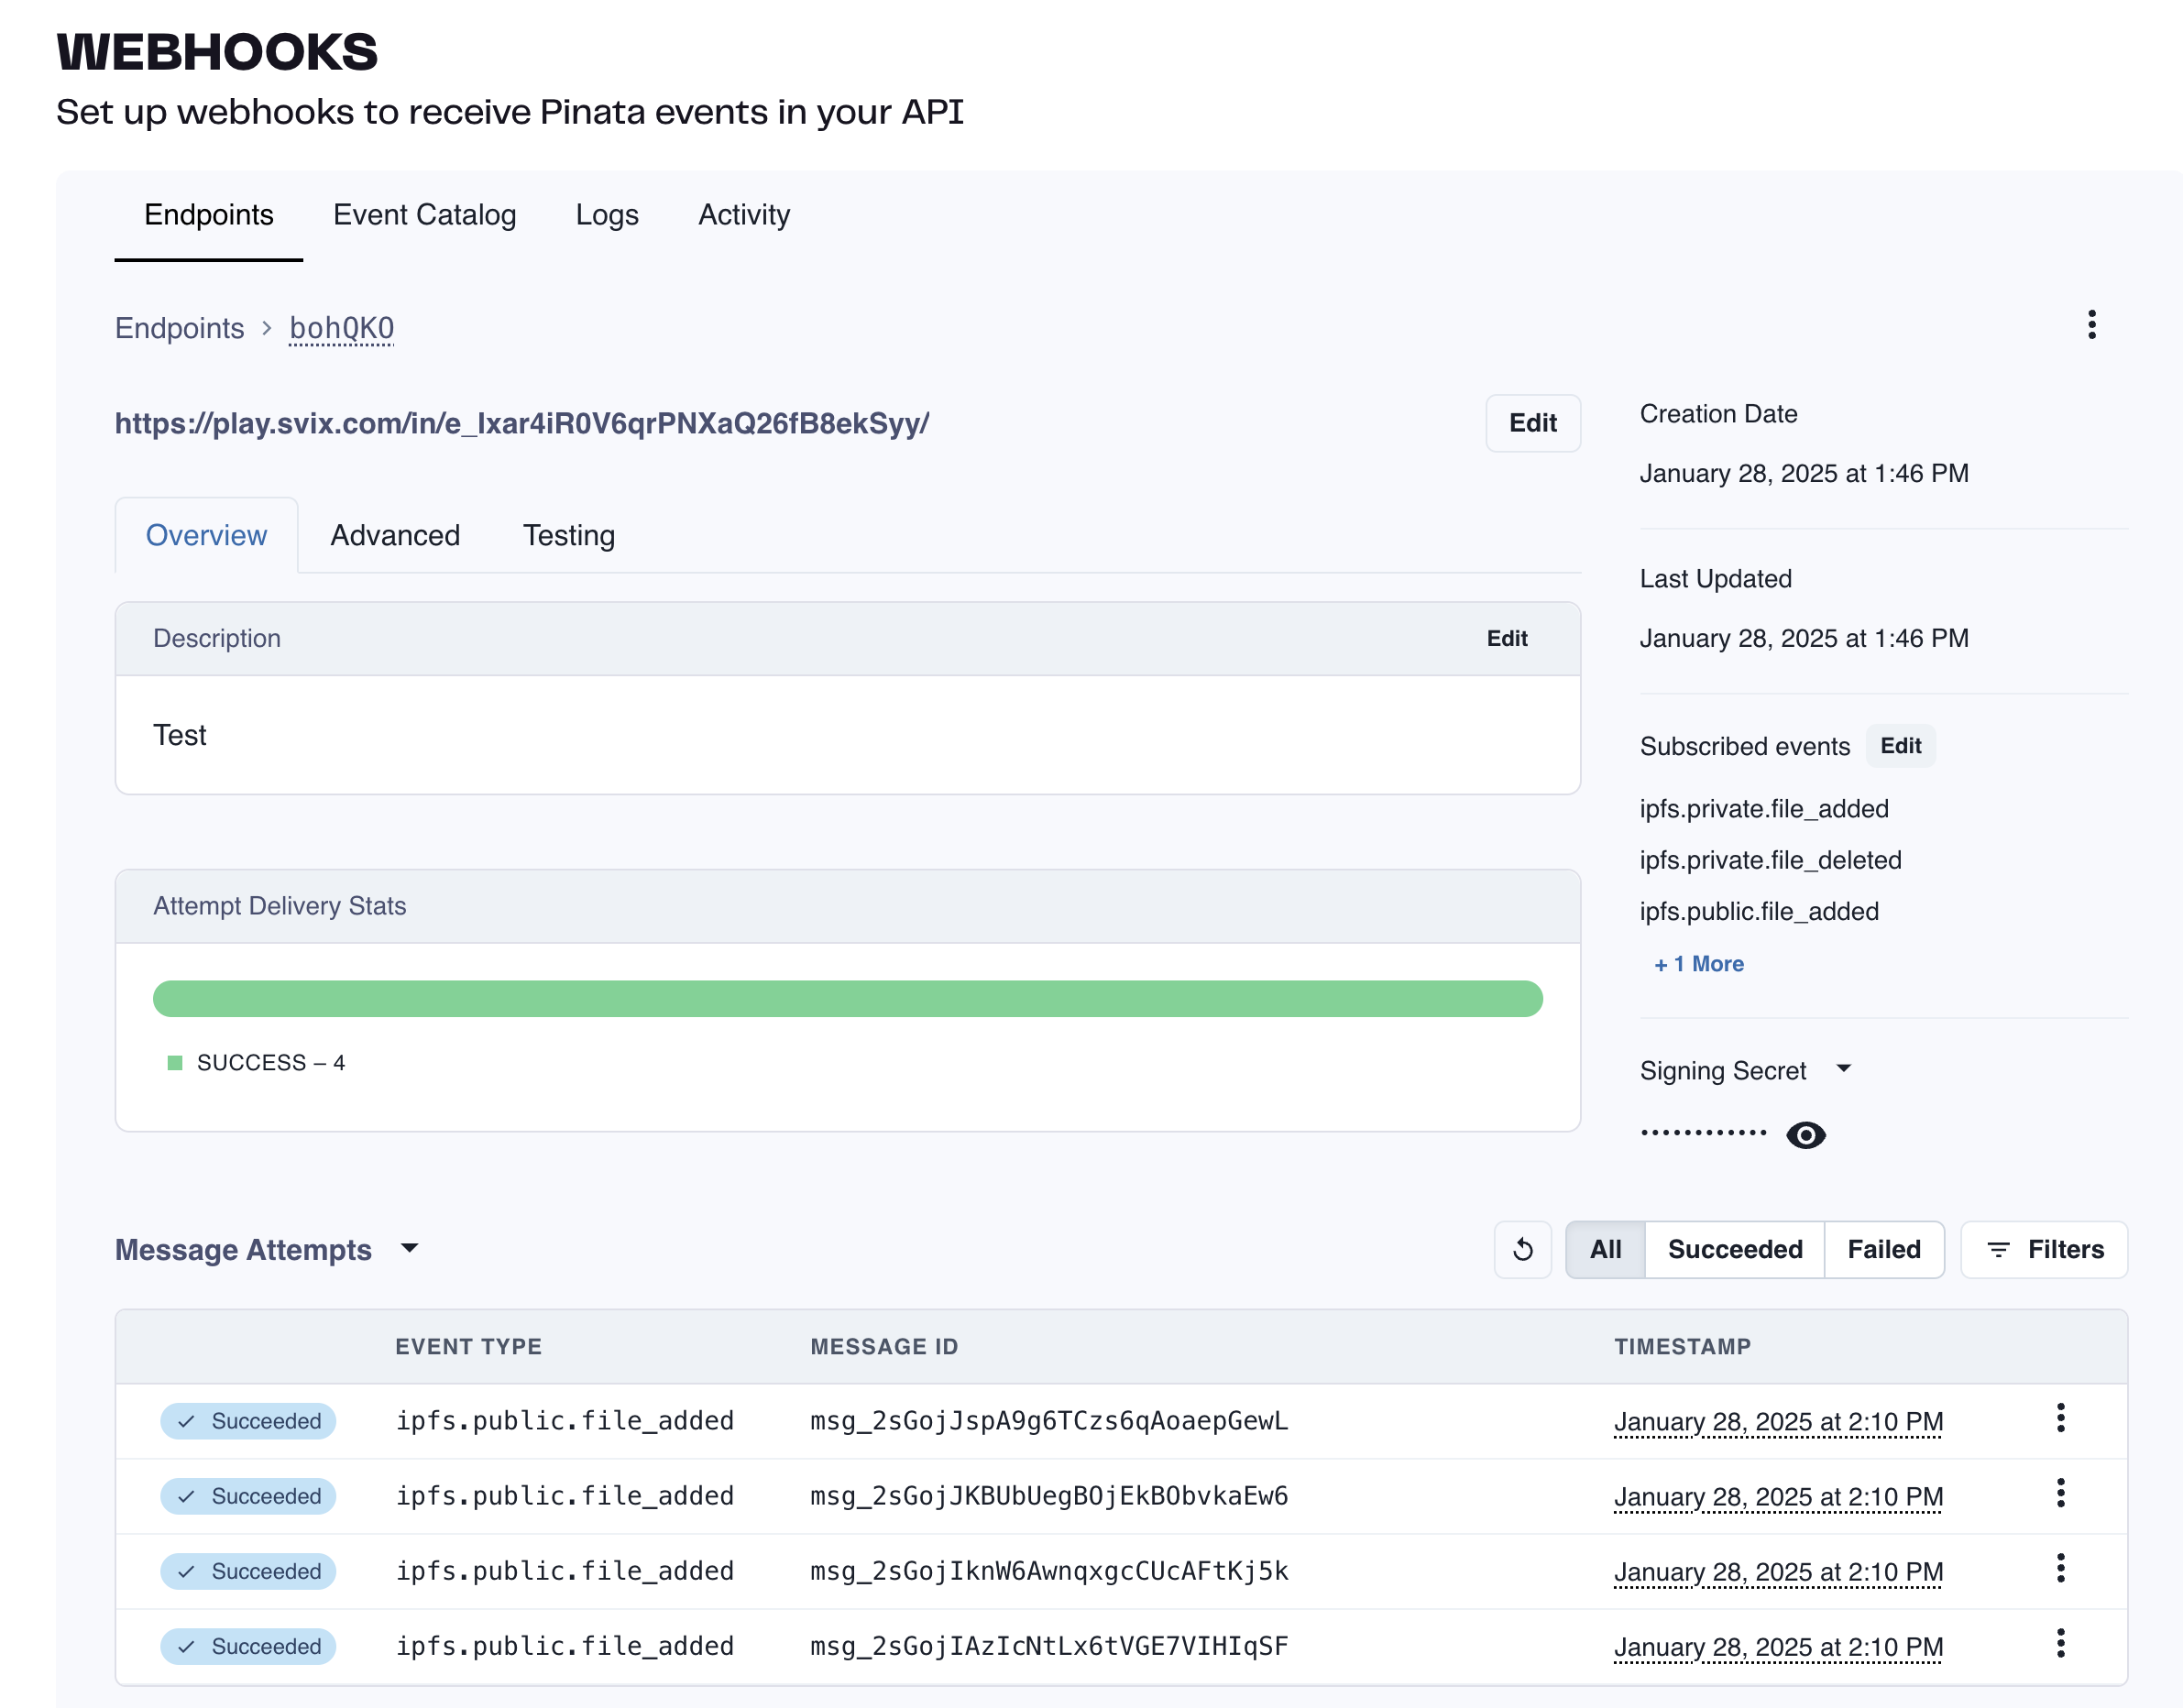
## Event Catalog
Check out the link below to browse all the available webhook events you can subscribe to!
Visit our Svix page for all Pinata Webhook events!
## Signature Verification
Webhook signatures let you verify that webhook messages are actually sent by Pinata and not a malicious actor.
For a more detailed explanation, check out this article on [why you should verify webhooks](https://docs.svix.com/receiving/verifying-payloads/why).
To grab the secret for your Webhook locate it on the Webhook Dashboard on the right sidebar. Click on the reveal icon to view the secret and copy it.
Our webhook partner Svix offers a set of useful libraries that make verifying webhooks very simple. Here is a an example using Javascript:
```typescript theme={null}
import { Webhook } from "svix";
const secret = "whsec_MfKQ9r8GKYqrTwjUPD8ILPZIo2LaLaSw";
// These were all sent from the server
const headers = {
"webhook-id": "msg_p5jXN8AQM9LWM0D4loKWxJek",
"webhook-timestamp": "1614265330",
"webhook-signature": "v1,g0hM9SsE+OTPJTGt/tmIKtSyZlE3uFJELVlNIOLJ1OE=",
};
const payload = '{"test": 2432232314}';
const wh = new Webhook(secret);
// Throws on error, returns the verified content on success
const payload = wh.verify(payload, headers);
```
For more instructions and examples of how to verify signatures, check out their [webhook verification documentation](https://docs.svix.com/receiving/verifying-payloads/how).
# Workspaces
Source: https://docs.pinata.cloud/account-management/workspaces
Workspaces is only available on the [Picnic and Fiesta plans](https://pinata.cloud/pricing)
Workspaces is a feature that allows you to add multiple people to your account and collaborate in a natural way. With the Picnic plan, you'll get 3 seats to invite your teammates, and with Fiesta you'll get 5 seats, plus the ability to add more at an extra fee.
## Inviting Members
At this time only Workspace Owners can invite members
To get started, login with a paid account and click on the profile button in the top right, then select "Workspaces."
Once at the Workspaces screen, you can type in the email for the person you want to invite. They could already have a Pinata account or could be someone who hasn't signed up yet. Once they sign into their account, they will be prompted to accept the invite on the Workspaces page.
## Switching Workspaces
By default, when you login, you will be put in your account with your Workspace, and you can switch to another Workspace you are member of by clicking on the drop-down menu in the top left corner.
## Removing Members
At this time only Workspace Owners can remove members
If you ever need to remove someone from a Workspace, you can do so from the Workspaces page. Click on the three small dots next to the user's email and click "remove member." You can invite them back at any time!
# HTTP API
Source: https://docs.pinata.cloud/agents/api
Authenticate, manage agents, and talk to gateways over HTTP
The Agents API is the same API the dashboard uses. Everything in the UI is exposed at `agents.pinata.cloud` - including agent management, secrets, skills, channels, snapshots, custom domains, devices, and engine runtime config.
Full OpenAPI reference: [agents.pinata.cloud/openapi](https://agents.pinata.cloud/openapi) (also linked from the Support → OpenAPI Docs item in the sidebar).
## Base URLs
There are two surfaces, on purpose:
| Surface | Host | Auth | What it's for |
| -------------- | ------------------------------- | ------------- | ---------------------------------------------------------- |
| **Management** | `agents.pinata.cloud` | Pinata JWT | Creating agents, managing secrets, browsing templates |
| **Per-agent** | `{agentId}.agents.pinata.cloud` | Gateway token | Talking to a specific agent (chat, routes, files, devices) |
The same agent sub-routes (`/v0/agents/{agentId}/...`) are mounted on both. Use the management host when you have the workspace owner's JWT; use the per-agent host when you only have the gateway token.
## Authentication
Three credentials, used in different contexts:
### Pinata JWT
Standard Pinata API key (`bearerAuth` in the OpenAPI spec). Used for all management routes (`/v0/agents`, `/v0/secrets`, `/v0/skills`, `/v0/templates`, etc.).
```http theme={null}
Authorization: Bearer
```
Create one in your [Account → API Keys](/account-management/api-keys).
### Gateway token
Per-agent token (`gatewayToken` in the OpenAPI spec) used for the agent's own subdomain. Read it from the agent's **Danger** page or `GET /v0/agents/{agentId}/gateway-token`. Rotate it from the same page or `POST /v0/agents/{agentId}/gateway-token/rotate`.
Passing the gateway token:
```http theme={null}
Authorization: Bearer
```
```http theme={null}
?token=
```
```http theme={null}
Cookie: gw_token=
```
The gateway token grants full access to the agent's container - console, files, routes, everything. Treat it like a server credential.
### Git Basic auth
Used only by the Git Smart HTTP endpoints (`/v0/agents/{agentId}/git/...`). Sent as HTTP Basic auth - username is ignored, password is the gateway token. The **Copy with Token** button on the Files tab embeds this for you.
### Platform JWT (for skills)
Inside an agent, the `@pinata/platform` skill can exchange the gateway token for a short-lived (1 hour) platform JWT. That JWT then unlocks the management-domain API (create secrets, install skills, etc.) on the agent's behalf - so an agent can self-modify without ever seeing the user's Pinata JWT.
```bash theme={null}
# From inside the agent container:
curl -X POST \
-H "Authorization: Bearer $GATEWAY_TOKEN" \
https://{agentId}.agents.pinata.cloud/v0/platform/token
```
## Quick Examples
All examples below use `PINATA_JWT` (from `https://app.pinata.cloud`) or `GATEWAY_TOKEN` (from the agent's Danger page).
### List your agents
```bash theme={null}
curl -H "Authorization: Bearer $PINATA_JWT" \
https://agents.pinata.cloud/v0/agents
```
### Create an agent
```bash theme={null}
curl -X POST \
-H "Authorization: Bearer $PINATA_JWT" \
-H "Content-Type: application/json" \
-d '{
"name": "My Agent",
"description": "Personal assistant",
"emoji": "🤖",
"engine": "openclaw",
"skillCids": ["@pinata/api"],
"secretIds": ["secret-id-1"]
}' \
https://agents.pinata.cloud/v0/agents
```
`engine` is optional and defaults to `openclaw`. Pass `hermes` for the opinionated engine — see [Concepts → Engine](/agents/concepts#engine). For chat-oriented engines, the dashboard exposes channel setup during create, and engines that support create-time channel bootstrap can accept a `channels` object on this request so Telegram, Slack, or Discord come up with the agent without a post-create gateway restart. Each channel object accepts:
| Field | Type | Required | Notes |
| ----------- | ---------------- | :----------------: | --------------------------------------------------------------------------- |
| `botToken` | string | yes (all channels) | Bot token from the platform. Slack uses the `xoxb-` bot token. |
| `appToken` | string | yes (Slack only) | Slack `xapp-` app-level token for Socket Mode. |
| `dmPolicy` | string | optional | `open` (anyone can DM) or `pairing` (must be approved). Defaults to `open`. |
| `allowFrom` | array of strings | optional | Allow-list of platform user IDs that can DM the bot. |
These are the same fields accepted by the per-channel `POST /v0/agents/{agentId}/channels/{channel}` endpoint and by `channels` in [`manifest.json`](/agents/manifest#channels).
To list engines enabled for the current deployment:
```bash theme={null}
curl -H "Authorization: Bearer $PINATA_JWT" \
https://agents.pinata.cloud/v0/agents/engines
```
Returns `{ "engines": [ { "id": "openclaw", "label": "OpenClaw" }, { "id": "hermes", "label": "Hermes" } ] }`, depending on which engines are enabled for the deployment.
Returns `201` with the created agent. Returns `403` if you're at the agent limit.
### Get agent details
```bash theme={null}
curl -H "Authorization: Bearer $PINATA_JWT" \
https://agents.pinata.cloud/v0/agents/$AGENT_ID
```
Response includes `agent`, `processStatus`, `skills`, `secrets`, `snapshots`, and `portForwarding`.
### Restart the gateway
```bash theme={null}
curl -X POST \
-H "Authorization: Bearer $PINATA_JWT" \
https://agents.pinata.cloud/v0/agents/$AGENT_ID/restart
```
### Run a shell command
```bash theme={null}
curl -X POST \
-H "Authorization: Bearer $PINATA_JWT" \
-H "Content-Type: application/json" \
-d '{"command":"ls workspace","cwd":"/home/node/clawd"}' \
https://agents.pinata.cloud/v0/agents/$AGENT_ID/console/exec
```
Returns `{ stdout, stderr, exitCode, command, timestamp }`.
### Read a file
```bash theme={null}
curl -H "Authorization: Bearer $PINATA_JWT" \
"https://agents.pinata.cloud/v0/agents/$AGENT_ID/files?path=workspace/IDENTITY.md"
```
### Upload a file
```bash theme={null}
curl -X POST \
-H "Authorization: Bearer $PINATA_JWT" \
-H "Content-Type: application/json" \
-d "{\"filename\":\"report.pdf\",\"contentBase64\":\"$(base64 -w0 < report.pdf)\"}" \
https://agents.pinata.cloud/v0/agents/$AGENT_ID/files/upload
```
Returns `{ path, filename, size }`. File limit matches the read endpoint (a few MB).
### Snapshot now
```bash theme={null}
curl -X POST \
-H "Authorization: Bearer $PINATA_JWT" \
https://agents.pinata.cloud/v0/agents/$AGENT_ID/snapshots/sync
```
### Reset to a snapshot
```bash theme={null}
curl -X POST \
-H "Authorization: Bearer $PINATA_JWT" \
-H "Content-Type: application/json" \
-d '{"snapshotCid":"QmXyz..."}' \
https://agents.pinata.cloud/v0/agents/$AGENT_ID/snapshots/reset
```
### Read the latest logs
```bash theme={null}
curl -H "Authorization: Bearer $PINATA_JWT" \
https://agents.pinata.cloud/v0/agents/$AGENT_ID/logs
```
Returns the last 100 lines as a single string.
### Validate manifest / config
```bash theme={null}
curl -X POST \
-H "Authorization: Bearer $PINATA_JWT" \
-H "Content-Type: application/json" \
-d "{\"config\":$(jq -Rs . < manifest.json)}" \
https://agents.pinata.cloud/v0/agents/$AGENT_ID/config/validate
```
## Files
| Endpoint | Method | Notes |
| ---------------------------------------- | -------------- | ----------------------------------------------------------------------------------- |
| `/v0/agents/{agentId}/files?path=` | `GET` | Read any file from the container |
| `/v0/agents/{agentId}/files/upload` | `POST` | Upload a base64 file into `/uploads/` (max \~few MB, `413` if too large) |
| `/v0/agents/{agentId}/snapshots` | `GET` | Latest 10 snapshots |
| `/v0/agents/{agentId}/snapshots/sync` | `GET` / `POST` | Get sync status / take a snapshot now |
| `/v0/agents/{agentId}/snapshots/reset` | `POST` | Reset to a specific snapshot CID |
## Custom Domains
| Endpoint | Method | Notes |
| ------------------------------------------------ | ---------------- | -------------------------------------------------- |
| `/v0/agents/{agentId}/domains` | `GET` | List subdomains and custom domains |
| `/v0/agents/{agentId}/domains` | `POST` | Register a subdomain or custom domain |
| `/v0/agents/{agentId}/domains/challenge` | `POST` | Get the TXT verification value for a custom domain |
| `/v0/agents/{agentId}/domains/{domainId}` | `PUT` / `DELETE` | Update port/protected or remove |
| `/v0/agents/{agentId}/domains/{domainId}/verify` | `POST` | Verify ownership and provision SSL |
See [Routes & Domains](/agents/routes) for the full workflow.
## Devices
| Endpoint | Method | Notes |
| -------------------------------------------------- | ------ | --------------------------------- |
| `/v0/agents/{agentId}/devices` | `GET` | List pending and paired devices |
| `/v0/agents/{agentId}/devices/{requestId}/approve` | `POST` | Approve a specific device |
| `/v0/agents/{agentId}/devices/approve-all` | `POST` | Bulk-approve every pending device |
## Streaming logs
The Logs tab streams over WebSocket on the agent's subdomain:
```
wss://{agentId}.agents.pinata.cloud/v0/logs?token=
```
Each message is a JSON object: `{ timestamp, level, source, message }`. Filter on the client by `level` (`TRACE` ... `FATAL`) and free-text on `message`.
## Error Format
Errors return JSON with a single `error` field:
```json theme={null}
{ "error": "Validation failed: skills exceeds maximum of 10" }
```
Status codes follow HTTP semantics - `400` for validation, `401` for missing auth, `403` for plan/permission issues, `404` for missing resources, `409` for conflicts (duplicate secret name, both subdomain and customDomain provided, etc.), `413` for upload size, `500` for internal failures, `503` when an upstream (Convex, Pinata storage) is unreachable.
See [Errors](/agents/errors) for the full code-by-code reference.
## Endpoint Quick Reference
Compact index of every endpoint, grouped by purpose. `JWT` = Pinata JWT, `GW` = gateway token (per-agent host). All paths under `agents.pinata.cloud`.
### Agents
| Method | Path | Auth | Description |
| -------- | ----------------------------------------------- | :------: | --------------------------------------------------- |
| `GET` | `/v0/agents` | JWT | List your agents |
| `POST` | `/v0/agents` | JWT | Create an agent |
| `GET` | `/v0/agents/{agentId}` | JWT / GW | Agent detail (skills, secrets, snapshots, routes) |
| `DELETE` | `/v0/agents/{agentId}` | JWT | Delete the agent |
| `POST` | `/v0/agents/{agentId}/restart` | JWT / GW | Restart the gateway |
| `GET` | `/v0/agents/{agentId}/logs` | JWT / GW | Last 100 log lines |
| `GET` | `/v0/agents/engines` | JWT | List available engines (`openclaw`, `hermes`, etc.) |
| `GET` | `/v0/agents/{agentId}/available-agent-versions` | JWT / GW | Versions you can upgrade to |
| `POST` | `/v0/agents/{agentId}/scripts/retry` | JWT / GW | Re-run `build` then `start` |
| `GET` | `/v0/agents/{agentId}/update` | JWT / GW | Check for OpenClaw updates |
| `POST` | `/v0/agents/{agentId}/update` | JWT / GW | Apply an OpenClaw update |
### Auth
| Method | Path | Auth | Description |
| ------ | ------------------------------------------- | :--: | -------------------------------------------- |
| `GET` | `/v0/agents/{agentId}/gateway-token` | JWT | Get the current gateway token |
| `POST` | `/v0/agents/{agentId}/gateway-token/rotate` | JWT | Rotate it |
| `POST` | `/v0/agents/{agentId}/platform/token` | GW | Exchange gateway token for a 1h platform JWT |
| `GET` | `/v0/agents/{agentId}/platform/whoami` | GW | Agent's own identity |
### Secrets
| Method | Path | Auth | Description |
| -------- | ----------------------------------------- | :------: | ----------------------------------- |
| `GET` | `/v0/secrets` | JWT | List your secrets |
| `POST` | `/v0/secrets` | JWT | Create a secret |
| `PUT` | `/v0/secrets/{id}` | JWT | Update value |
| `DELETE` | `/v0/secrets/{id}` | JWT | Delete |
| `POST` | `/v0/agents/{agentId}/secrets` | JWT / GW | Attach existing secrets to an agent |
| `DELETE` | `/v0/agents/{agentId}/secrets/{secretId}` | JWT / GW | Detach a secret |
### Skills
| Method | Path | Auth | Description |
| -------- | ---------------------------------------------- | :------: | ---------------------------------- |
| `GET` | `/v0/skills` | JWT | List your installed skills |
| `POST` | `/v0/skills` | JWT | Register a new skill from a folder |
| `GET` | `/v0/skills/{skillId}/versions` | JWT | List versions |
| `POST` | `/v0/skills/{skillId}/versions` | JWT | Publish a new version |
| `DELETE` | `/v0/skills/{skillCid}` | JWT | Remove from library |
| `GET` | `/v0/clawhub` | JWT | Browse the community hub |
| `GET` | `/v0/clawhub/{slug}` | JWT | Hub skill detail |
| `POST` | `/v0/clawhub/{hubSkillId}/install` | JWT | Install a hub skill |
| `GET` | `/v0/agents/{agentId}/skills` | JWT / GW | Skills attached to this agent |
| `POST` | `/v0/agents/{agentId}/skills` | JWT / GW | Attach |
| `DELETE` | `/v0/agents/{agentId}/skills/{skillId}` | JWT / GW | Detach |
| `GET` | `/v0/agents/{agentId}/skills/updates` | JWT / GW | Check for skill updates |
| `POST` | `/v0/agents/{agentId}/skills/{skillId}/update` | JWT / GW | Bump a skill on this agent |
### Channels
| Method | Path | Auth | Description |
| -------- | ----------------------------------------- | :------: | --------------------------------------------------- |
| `GET` | `/v0/agents/{agentId}/channels` | JWT / GW | Status of all channels |
| `POST` | `/v0/agents/{agentId}/channels/{channel}` | JWT / GW | Configure (`telegram`/`slack`/`discord`/`whatsapp`) |
| `DELETE` | `/v0/agents/{agentId}/channels/{channel}` | JWT / GW | Remove |
### Routes & domains
| Method | Path | Auth | Description |
| -------- | ------------------------------------------------ | :------: | ------------------------------------- |
| `GET` | `/v0/agents/{agentId}/port-forwarding` | JWT / GW | List path routes |
| `PUT` | `/v0/agents/{agentId}/port-forwarding` | JWT / GW | Replace path routes |
| `GET` | `/v0/agents/{agentId}/domains` | JWT / GW | List domains and subdomains |
| `POST` | `/v0/agents/{agentId}/domains` | JWT / GW | Register a subdomain or custom domain |
| `POST` | `/v0/agents/{agentId}/domains/challenge` | JWT / GW | Get TXT challenge for a custom domain |
| `PUT` | `/v0/agents/{agentId}/domains/{domainId}` | JWT / GW | Update port/protected |
| `DELETE` | `/v0/agents/{agentId}/domains/{domainId}` | JWT / GW | Remove |
| `POST` | `/v0/agents/{agentId}/domains/{domainId}/verify` | JWT / GW | Verify ownership + provision SSL |
### Tasks
| Method | Path | Auth | Description |
| -------- | ------------------------------------------- | :------: | ---------------- |
| `GET` | `/v0/agents/{agentId}/tasks` | JWT / GW | List cron jobs |
| `POST` | `/v0/agents/{agentId}/tasks` | JWT / GW | Create |
| `GET` | `/v0/agents/{agentId}/tasks/{jobId}` | JWT / GW | Detail |
| `PUT` | `/v0/agents/{agentId}/tasks/{jobId}` | JWT / GW | Update |
| `DELETE` | `/v0/agents/{agentId}/tasks/{jobId}` | JWT / GW | Delete |
| `POST` | `/v0/agents/{agentId}/tasks/{jobId}/run` | JWT / GW | Run now |
| `POST` | `/v0/agents/{agentId}/tasks/{jobId}/toggle` | JWT / GW | Enable / disable |
| `GET` | `/v0/agents/{agentId}/tasks/{jobId}/runs` | JWT / GW | Run history |
### Files & snapshots
| Method | Path | Auth | Description |
| ------ | ---------------------------------------- | :------: | -------------------------------------------- |
| `GET` | `/v0/agents/{agentId}/files?path=` | JWT / GW | Read a file from inside the container |
| `POST` | `/v0/agents/{agentId}/files/upload` | JWT / GW | Upload base64 file to `/uploads/` |
| `GET` | `/v0/agents/{agentId}/snapshots` | JWT / GW | Last 10 snapshots |
| `GET` | `/v0/agents/{agentId}/snapshots/sync` | JWT / GW | Sync status |
| `POST` | `/v0/agents/{agentId}/snapshots/sync` | JWT / GW | Trigger a snapshot now |
| `POST` | `/v0/agents/{agentId}/snapshots/reset` | JWT / GW | Reset to a snapshot CID |
### Console
| Method | Path | Auth | Description |
| ------ | ----------------------------------- | :------: | --------------------------------------------------------- |
| `POST` | `/v0/agents/{agentId}/console/exec` | JWT / GW | Run a shell command, returns `{stdout, stderr, exitCode}` |
### Devices
| Method | Path | Auth | Description |
| ------ | -------------------------------------------------- | :------: | --------------------- |
| `GET` | `/v0/agents/{agentId}/devices` | JWT / GW | List pending + paired |
| `POST` | `/v0/agents/{agentId}/devices/{requestId}/approve` | JWT / GW | Approve one |
| `POST` | `/v0/agents/{agentId}/devices/approve-all` | JWT / GW | Approve every pending |
### Config (engine runtime)
| Method | Path | Auth | Description |
| ------ | -------------------------------------- | :------: | ------------------------------------------------------ |
| `GET` | `/v0/agents/{agentId}/config` | JWT / GW | Read the engine runtime config shown in the Danger tab |
| `PUT` | `/v0/agents/{agentId}/config` | JWT / GW | Write runtime config (validated server-side) |
| `POST` | `/v0/agents/{agentId}/config/validate` | JWT / GW | Validate runtime config without applying |
Note `config/validate` validates runtime config, **not** `manifest.json`. OpenClaw agents use `/home/node/.openclaw/openclaw.json`; Hermes agents use `/home/hermes/data/config.yaml`. To validate a manifest, use `POST /v0/templates/validate` or run `pinata agents templates validate`.
### Templates
| Method | Path | Auth | Description |
| -------- | ------------------------------- | :--: | ------------------------------------------- |
| `GET` | `/v0/templates` | JWT | List your templates |
| `POST` | `/v0/templates` | JWT | Submit a template from a git repo |
| `GET` | `/v0/templates/{slug}` | JWT | Get by slug |
| `GET` | `/v0/templates/id/{templateId}` | JWT | Get by ID |
| `PUT` | `/v0/templates/{templateId}` | JWT | Update / resubmit |
| `DELETE` | `/v0/templates/{templateId}` | JWT | Archive |
| `POST` | `/v0/templates/validate` | JWT | Validate a git repo for template submission |
| `POST` | `/v0/templates/branches` | JWT | List branches on a public repo |
| `POST` | `/v0/templates/refs` | JWT | List branches + tags |
| `GET` | `/v0/public-templates` | none | Public marketplace listing |
### Git Smart HTTP
| Method | Path | Auth | Description |
| ------ | ------------------------------------------- | :------------------------: | ------------------------ |
| `GET` | `/v0/agents/{agentId}/git/info/refs` | Git Basic (GW as password) | Ref advertisement |
| `POST` | `/v0/agents/{agentId}/git/git-upload-pack` | Git Basic (GW as password) | `git clone` / `git pull` |
| `POST` | `/v0/agents/{agentId}/git/git-receive-pack` | Git Basic (GW as password) | `git push` |
## OpenAPI Spec
For everything not covered here:
```
https://agents.pinata.cloud/openapi
```
The OpenAPI spec is the authoritative source - schemas, query parameters, response codes, and per-endpoint descriptions.
# Channels
Source: https://docs.pinata.cloud/agents/channels
Let people talk to your agent on Telegram, Slack, or Discord
By default, the only way to talk to your agent is through the Pinata dashboard. Channels change that — connect Telegram, Slack, or Discord, and your agent shows up wherever you and your team already chat.
WhatsApp is on the roadmap; you'll see its card grayed out as **Coming Soon**.
## How it works
Open your agent → **Channels**. You'll see one card per platform.
* A card with **+ ADD** isn't connected yet. Click it to open the setup dialog.
* A card with **ENABLED** is already connected. The card shows a summary (the DM policy and a masked bot token), and a **RECONFIGURE** button reopens the dialog so you can update settings without losing the connection.
Setup is the same shape for every platform: grab a bot token from the platform, paste it into the dialog, save. Some platforms need an extra token or an OAuth invite to a workspace/server.
Once a channel is enabled, anyone who messages your bot on that platform is talking to your agent. Responses come back through the same channel.
## Telegram
This is the quickest. You need a bot token from Telegram's BotFather.
1. In Telegram, message [@BotFather](https://t.me/botfather)
2. Send `/newbot` and follow the prompts
3. Copy the bot token BotFather gives you
4. In Pinata: agent → **Channels** → **+ ADD** on the Telegram card
5. Paste the token and save
### Controlling who can DM your bot
The Telegram dialog has two access controls:
* **DM policy** — `open` (anyone can message) or `pairing` (users must be approved first)
* **Allow list** — a list of Telegram user IDs that are allowed to message
You can use either or both. Leave both at their defaults if you want anyone to be able to chat.
## Slack
Slack needs a custom app with the right permissions. It's a few more steps but everything happens once.
1. Go to [api.slack.com/apps](https://api.slack.com/apps) and create a new app
2. Enable **Socket Mode**
3. Create an **App-Level Token** with the `connections:write` scope
4. Under **OAuth & Permissions**, add these bot token scopes: `chat:write`, `im:write`, `im:history`, `im:read`, `users:read`, `app_mentions:read`
5. Install the app to your workspace
6. In Pinata: agent → **Channels** → **+ ADD** on the Slack card
7. Paste both tokens — bot token starts with `xoxb-`, app token starts with `xapp-`
Once connected, the bot responds to DMs and to `@mentions` in any channel it's been invited to.
## Discord
Same shape as Telegram — make a bot in Discord's developer portal, copy the token, paste it in.
1. Go to [discord.com/developers](https://discord.com/developers/applications) and create an application
2. Under **Bot**, click **Add Bot** and copy the token (you may need to reset it once to reveal it)
3. Under **OAuth2 → URL Generator**, check the `bot` scope and the permissions your bot needs
4. Open the generated URL to invite the bot to your server
5. In Pinata: agent → **Channels** → **+ ADD** on the Discord card
6. Paste the bot token and save
## Updating or removing a channel
* **Reconfigure** — click **RECONFIGURE** on an enabled channel. You can leave the token fields blank to keep the existing token while changing other settings.
* **Remove** — same dialog, **Remove** action. This deletes the channel config and restarts the agent's gateway.
Channels are available for chat-oriented engines such as OpenClaw and Hermes. Channel changes take effect after the gateway restarts; Configure and Remove handle that automatically. The create wizard can collect channel setup before deployment. If you're creating an agent via the API or CLI, pass a `channels` object on `POST /v0/agents` for engines that support create-time channel bootstrap — see [API → Create an agent](/agents/api#create-an-agent).
Bot tokens are sensitive. Keep them out of source control. They're stored encrypted on Pinata's side; treat them the same way locally.
## When it doesn't work
| Symptom | What's going on | What to do |
| ----------------------------------- | -------------------------------------------------- | -------------------------------------------------------------------------------- |
| Bot doesn't respond | Gateway didn't restart after configure | Open **Danger** → **Restart Gateway** |
| Slack works in DMs but not channels | Missing `app_mentions:read` scope | Reinstall the Slack app with the scopes above |
| Telegram users get no reply | `dmPolicy` is `pairing` and they aren't paired yet | Switch to `open`, or approve them via [Devices](/agents/devtools#device-pairing) |
| `403` when adding a channel | Plan limit or workspace permissions | Check your plan and workspace role |
If none of these match, check [Logs](/agents/logs) for entries from `gateway/reload` and the channel name, or walk through [Troubleshooting](/agents/troubleshooting).
# Chat
Source: https://docs.pinata.cloud/agents/chat
Talk to your agent through the web interface
The Chat tab is your main conversation with the agent. You see your prompts, the agent's responses, any tools it called along the way, and — if you enable it — its thinking.
Open your agent → **Chat**.
## Sending a message
The composer is at the bottom of the page.
* **+** opens an attachment picker. Files you attach land in `/uploads/` inside the container, and the agent gets the path in its context.
* The text input is the message itself. Press Enter to send, Shift+Enter for a newline.
* **MODEL** picks which model handles this turn. It defaults to whatever you set as the agent's default — see [Models](/agents/models).
* The send arrow submits.
## Slash commands
Type `/` at the start of a message to run a command instead of a regular prompt:
| Command | Effect |
| --------- | ----------------------------------------------------------------- |
| `/new` | Starts a fresh session — the agent forgets the prior conversation |
| `/status` | Prints the current model, session info, and key flags |
| `/help` | Shows the commands your agent supports |
The list depends on your agent engine and any skills you've attached, so `/help` is the best way to see what's actually available.
## Reading agent responses
Each turn the agent sends back has a few elements you'll see in the chat:
* **Thinking block** — collapsed by default, labeled `Thinking ▾`. Click it to expand. Only appears for models that expose reasoning.
* **Message text** — the actual reply. Renders markdown, including code blocks and tables.
* **Tool calls** — if the agent called a tool (a shell command, a web search, a skill), you'll see a labeled block with the arguments and result. This is your single best window into *why* the agent answered the way it did.
* **Model badge** — after the response, a small badge shows which model produced it. Useful when you've been switching models mid-conversation.
When you want to debug a bad answer, expand the thinking block and the tool calls before anything else. That's almost always where the answer is.
Response delivery is engine-specific. OpenClaw agents usually stream assistant text token-by-token; Hermes agents can deliver a complete assistant message in one event. The transcript renders the same either way, but the reply may appear to type in for OpenClaw and appear all at once for Hermes.
## Switching models mid-conversation
Use the **MODEL** dropdown in the composer. You can switch between any models you've enabled for this agent — start a turn with a cheap, fast model, then bump up for a hard question. Each turn is tagged with the model that produced it, so the conversation stays readable.
If you want to confirm what the agent is currently using without scrolling, send `/status`.
## Chatting while the agent is stopped or restarting
You don't have to wait for a stopped or restarting agent. The composer stays open ("Agent is starting — type a message and it'll send when ready…") and anything you send is queued:
* Each queued message shows a **QUEUED** clock chip, with an **×** to cancel it before it sends
* A status line tracks the backlog — "3 messages queued · sending when the agent finishes starting…"
* Queued messages **survive a page reload** — refresh or navigate away mid-restart and they're still waiting when you come back
* The moment the agent is back online, messages deliver automatically, **in order, one at a time** — no duplicates, and the agent answers each one individually
## More room for the conversation
Click **Hide navbar** in the top-right corner to collapse the left sidebar — the conversation gets the full width of the screen. Click it again to bring the sidebar back.
## Tips
* Long-running tool calls show a progress indicator. Wait for it before assuming the agent is stuck.
* If the chat looks disconnected and stays that way, the gateway probably needs a kick. Open **Danger** → **Restart Gateway**. Messages you send during the restart queue up and deliver when it's back.
* If you change a secret, attach a new skill, or add a channel, restart the gateway so the agent picks up the change. Attaching a new LLM provider restarts the agent with a fresh environment automatically.
For deeper debugging, the [Logs](/agents/logs) tab streams what the agent engine is doing under the hood. See [Troubleshooting](/agents/troubleshooting) for common failure modes.
# Concepts
Source: https://docs.pinata.cloud/agents/concepts
Terms, file layout, and how the pieces fit together
The agent platform has a handful of moving parts, and they don't always have obvious names. This page is your reference: every term, every standard file path, every reserved port. Skim it now to get the lay of the land; come back later when something in the docs reads like jargon.
## The shape of things
```text theme={null}
Workspace (your team) ──► Agent (container) ──► Channels / Routes / Tasks
│ │
│ ├─ Skills (capabilities)
│ ├─ Secrets (env vars)
│ ├─ Models (LLMs it can call)
│ └─ Workspace files + snapshots
▼
Pinata IPFS + R2 (storage)
```
A **workspace** is a Pinata team. Inside it you create one or more **agents** — each is an isolated container running an agent engine, with its own files, gateway, and per-agent subdomain.
## Glossary
### Agent
A single isolated container with a persistent workspace, gateway, and `{agentId}.agents.pinata.cloud` subdomain. Created via `POST /v0/agents` or the Create Agent button. Identified by `agentId` (a short slug like `x0i33jye`).
### Engine
The runtime that powers the agent. Engines are enabled per deployment:
| Engine | Tagline | When to pick it |
| ---------------------- | ----------------------------------------------------------- | ----------------------------------------------------------------------------------------------------------------------------------------------------------------------------------- |
| `openclaw` (default) | Configurable agent for custom workflows and power users | You want full control over manifest fields, scripts, routes, and skills |
| `hermes` | Opinionated agent with a smoother out-of-the-box experience | You want fewer knobs and first-run channel setup to feel more direct |
| `super-builder` (beta) | Headless coding agent optimized for issue-board work | You're assigning work through [Issues & Boards](/agents/issues) and want longer runs (200-turn default cap) over chat features. Chat-first surfaces like Channels aren't available. |
Pick the engine when creating the agent — either in the **Agent Engine** card on the Create Agent wizard, or by passing `engine` in `POST /v0/agents`, or by setting `engine` in [`manifest.json`](/agents/manifest) for a template. Available engines per deployment are listed at `GET /v0/agents/engines`.
### Gateway
The long-running process inside each agent container that:
* Terminates WebSocket connections from the dashboard, channels, and CLI
* Routes path/domain traffic to user-defined ports
* Brokers HTTP API calls for the per-agent subdomain
* Restarts on **Restart Gateway** in the [Danger](/agents/devtools) tab
Listens on the reserved port `18789`.
### Gateway token
Per-agent credential used to authenticate against the agent's own subdomain (`{agentId}.agents.pinata.cloud/...`). See [API → Gateway token](/agents/api#gateway-token). Distinct from the **Pinata JWT** (workspace-wide API key) and from the **platform JWT** (1h token an agent gets from itself via `POST /v0/platform/token`).
| Token | Where it works | What it's for |
| ------------- | ------------------------------- | ------------------------------------------------------------------------------------------------- |
| Pinata JWT | `agents.pinata.cloud` | Workspace-wide management - create/list/delete agents, manage secrets, browse templates |
| Gateway token | `{agentId}.agents.pinata.cloud` | Talk to one specific agent (chat, files, routes, console, git) |
| Platform JWT | `agents.pinata.cloud` | A short-lived JWT the agent gets *for itself* - lets the agent self-modify via `@pinata/platform` |
### Workspace
Two meanings - context disambiguates:
1. **Team workspace** - your Pinata account or shared team. Switch under **Account → Workspaces**.
2. **Agent workspace** - the per-agent file tree inside the container. OpenClaw agents use `/home/node/clawd/workspace/`; Hermes agents use `/home/hermes/data/workspace/`. The workspace includes [`manifest.json`](/agents/manifest), `SOUL.md`, attached skills under `skills/`, file uploads under `uploads/`, and anything else your agent has written.
### Workspace anatomy
The default file layout inside `workspace/`:
| File | Purpose |
| ---------------- | ---------------------------------------------------------------------------------------------------------- |
| `manifest.json` | Agent configuration - identity, secrets, skills, scripts, routes, channels, tasks. Single source of truth. |
| `SOUL.md` | Agent personality and principles - customize freely |
| `AGENTS.md` | Conventions the agent follows when working in the repo (memory system, safety rules, file layout) |
| `IDENTITY.md` | Name, vibe, emoji, owner identity - written at deploy time |
| `USER.md` | Notes about the human user, learned over time |
| `TOOLS.md` | Environment notes (what tools exist in the container) |
| `BOOTSTRAP.md` | First-run conversation guide. Self-deletes after setup. |
| `HEARTBEAT.md` | Periodic-task notes (empty by default) |
| `skills//` | Files for each attached skill |
| `uploads/` | Files uploaded via the chat attachment button or `POST /v0/agents/{agentId}/files/upload` |
You can commit and push anything else (`projects/`, `scripts/`, etc.) - the agent treats the whole tree as fair game.
### `manifest.json` vs runtime config
These are different files. They live in different places and have different schemas.
| File | Path | Schema | Edited by |
| ----------------------- | ------------------------------------ | -------------------------------------- | ------------------------------------------------------------------------------- |
| `manifest.json` | `/manifest.json` | [`manifest.v1.json`](/agents/manifest) | You (committed to git, validated via `POST /v0/templates/validate`) |
| OpenClaw runtime config | `/home/node/.openclaw/openclaw.json` | OpenClaw runtime schema | OpenClaw at runtime (validated via `POST /v0/agents/{agentId}/config/validate`) |
| Hermes runtime config | `/home/hermes/data/config.yaml` | Hermes runtime schema | Hermes at runtime (edited from the Danger tab's Config row) |
Day-to-day, edit `manifest.json`. Runtime config is the engine's own view of that configuration and is usually only touched from the [Danger](/agents/devtools) tab when you're debugging the engine itself.
### Skill
A reusable package of files and instructions that extends an agent's capabilities. Pinned to IPFS, addressed by **slug** (`@pinata/api`) or **CID**. Installed into your Skills Library, then attached per-agent. Up to 10 attached per agent. See [Skills](/agents/skills).
The platform ships with `@pinata/platform` bundled - it lets the agent perform self-service operations (install skills, set secrets, manage tasks).
### Secret vs variable
Both are environment variables injected at container start. The difference:
| Kind | Storage | Visible in API? | Use for |
| ------------ | ------------------------------------- | -------------------- | --------------------------- |
| **Secret** | AES-GCM encrypted with a per-user key | Never returned | API keys, tokens, passwords |
| **Variable** | Plaintext | Returned in listings | Public URLs, feature flags |
See [Secrets](/agents/secrets).
### Channel
A messaging surface the agent can be reached on - Telegram, Slack, Discord (WhatsApp coming). Configured per-agent. See [Channels](/agents/channels).
### Route
A mapping from an external URL prefix or domain to a container port. Lets you expose web apps and APIs running inside the agent. See [Routes & Domains](/agents/routes).
### Task
A scheduled prompt or system event. Three schedule kinds: `at` (one-shot), `every` (interval), `cron`. See [Tasks](/agents/tasks).
### Lifecycle script
Shell commands run by the agent runner at well-defined points:
| Script | When | Working dir | Log file | Timeout |
| ------- | ----------------------------------------------------- | ------------------ | --------------------- | --------------- |
| `build` | After deploy, after each `git push`, on Retry Scripts | `/home/node/clawd` | `/tmp/user-build.log` | 5 min |
| `start` | After successful `build`, on agent boot | `/home/node/clawd` | `/tmp/user-start.log` | None (detached) |
Defined in `scripts` in [`manifest.json`](/agents/manifest#scripts).
### Snapshot
A capture of the agent's workspace pinned to IPFS as a single CID. Created automatically every minute when changes are detected, plus on demand via `POST /v0/agents/{agentId}/snapshots/sync`. Reset to any historical snapshot via `POST /v0/agents/{agentId}/snapshots/reset`. See [Files & Snapshots](/agents/snapshots).
### Device
A client paired with an agent (CLI, mobile, browser session) - approval-gated for security. Listed at `GET /v0/agents/{agentId}/devices`. See [Danger → Devices](/agents/devtools#device-pairing).
### Template
A pre-configured agent (manifest + workspace files + skill list) packaged for one-click deployment. Published on the [Marketplace](https://agents.pinata.cloud/marketplace) or kept private in [My Templates](https://agents.pinata.cloud/templates). See [Templates](/agents/templates/overview).
### Issue
Kanban-style work item assigned to an agent - title + prompt + optional repo. The agent runs it in an isolated `/runs//` directory (its own git history; ignored by snapshots), you review the diff, then accept, revise, or open a PR. Boards carry per-board instructions, model overrides, and turn/cost caps. See [Issues & Boards](/agents/issues).
## Filesystem reference
Paths agents and developers reach for most often inside the container:
| Path | What's there |
| --------------------------------------- | ----------------------------------------------------------------------------------------------- |
| `/home/node/clawd/` | OpenClaw runner root - where `build`/`start` execute |
| `/home/node/clawd/workspace/` | OpenClaw workspace |
| `/home/hermes/data/workspace/` | Hermes workspace |
| `/skills//` | Attached skill files |
| `/uploads/` | Uploaded files |
| `/runs//` | Isolated working dir for each [issue](/agents/issues) run (gitignored, excluded from snapshots) |
| `/home/node/.openclaw/openclaw.json` | OpenClaw runtime config |
| `/home/hermes/data/config.yaml` | Hermes runtime config |
| `/tmp/openclaw/openclaw-YYYY-MM-DD.log` | Daily OpenClaw log file |
| `/tmp/user-build.log` | `build` script output |
| `/tmp/user-start.log` | `start` script output |
## Reserved ports & names
| Reserved | Why |
| --------------------------------- | ---------------------------- |
| Port `18789` | Gateway listens here |
| Subdomains containing `pinata` | Reserved for first-party use |
| Specific reserved domain suffixes | Reserved for the platform |
Path routes must use ports between `1025` and `65535`, excluding `18789`. See [Routes](/agents/routes).
## Identifier formats
Quick reference for the IDs you'll see in URLs and API responses:
| Identifier | Format | Example |
| ---------------- | -------------------------------------- | -------------------------------------- |
| Agent ID | Random short slug | `x0i33jye` |
| Snapshot CID | IPFS CIDv1, `bafy...` or `Qm...` | `QmUMfo19uXMdBSXLiZAz7w...` |
| Skill CID | IPFS CIDv1, `bafy...` | `bafybeicglyjdb6w...` |
| Skill slug | `@/` (lowercase, hyphens) | `@pinata/api` |
| Custom domain ID | UUID | `2fcd2a0b-aa70-432d-a310-678e01570e65` |
| Secret ID | Random opaque string | (server-assigned) |
## Where to go next
Every field in `manifest.json`
Auth, endpoints, and examples
Debug a stuck agent
Look up an API error
# Console
Source: https://docs.pinata.cloud/agents/console
A real terminal inside your agent's container
The Console tab is a shell. You get an interactive prompt inside your agent's container, with the same workspace your agent reads and writes.
```text theme={null}
--- Agent Console ---
Working directory: /home/node/clawd/workspace
~/clawd/workspace $
```
That example is an OpenClaw agent. Hermes agents use `/home/hermes/data/workspace`. The current path is also shown on the agent's [Danger](/agents/devtools) tab.
Anything you can do with a shell, you can do here:
* Run `bash`, `python`, `node`, `git`, `curl`, `jq`
* Tail log files: `tail -f /tmp/user-build.log`
* Check what the agent sees: `env | sort`
* Confirm a service is listening: `ss -tlnp`
* Edit a file with `vi` or `nano`
The session starts in the engine's workspace directory — the same workspace shown on the Files and Danger tabs. Skills live under `skills/`, uploaded files under `uploads/`.
The button in the top-right of the panel switches to fullscreen mode, which is much more pleasant for anything beyond a one-liner.
## When to reach for the Console
The Console is the second-best debugging tool, after Logs. Use it when:
* Logs show an error and you need to look at a file to understand it
* A lifecycle script failed and you want to read `/tmp/user-build.log` or `/tmp/user-start.log`
* You want to confirm a process is actually running (`ps aux | grep `)
* You want to reproduce a one-off command the agent ran
Quick checks worth knowing:
```bash theme={null}
# What did the build script say?
tail -n 200 /tmp/user-build.log
# What did the start script say?
tail -n 200 /tmp/user-start.log
# Latest OpenClaw log (OpenClaw agents)
ls -la /tmp/openclaw/
# OpenClaw runtime config
cat /home/node/.openclaw/openclaw.json
# Hermes runtime config
cat /home/hermes/data/config.yaml
# Manifest the agent is using
cat manifest.json
# Is anything listening on common dev ports?
ss -tlnp
```
For workflows by symptom, see [Troubleshooting](/agents/troubleshooting).
## Running a command from outside the UI
If you're scripting against an agent, hit the API:
Set `cwd` to the workspace path for that engine. For OpenClaw that's `/home/node/clawd/workspace`; for Hermes that's `/home/hermes/data/workspace`.
```bash theme={null}
curl -X POST \
-H "Authorization: Bearer $PINATA_JWT" \
-H "Content-Type: application/json" \
-d '{"command":"ls -la","cwd":"/home/node/clawd/workspace"}' \
https://agents.pinata.cloud/v0/agents/$AGENT_ID/console/exec
```
The response is JSON: `{ stdout, stderr, exitCode, command, timestamp }`.
Console access is full shell access. Anyone with the gateway token has it. Treat the token like a server credential.
# Danger
Source: https://docs.pinata.cloud/agents/devtools
Full agent inventory, plus restart and delete
The Danger tab does two things. First, it's the single place where you can see *everything* about an agent — every secret attached, every skill installed, every channel configured, every snapshot CID. It's also where you'll find restart, runtime config edit, and delete.
The name is mostly about the buttons at the bottom — Restart Gateway is disruptive, Delete is permanent. But it's also the page you'll open most often when you're answering "how is this agent actually configured?"
## Layout
Two big sections.
* **General** — agent details, workspace state, lifecycle scripts, channels where supported, skills, devices, secrets. One row at a time.
* **Actions** — engine-specific controls such as Restart Gateway, OpenClaw Settings UI, and Delete This Agent.
## Agent details
The first block in **General** is the agent itself:
| Field | What it is |
| ----------------- | ------------------------------------------------------------------------------------------------------------------------------------------------------------- |
| **Agent ID** | The unique slug used in URLs and API calls (e.g. `x0i33jye`) |
| **Status** | `starting`, `running`, or `not_running` |
| **Name** | What you named it |
| **Engine** | The container engine — `openclaw` (default), `hermes`, or another enabled engine |
| **Version** | Engine version, when the engine exposes one. OpenClaw agents show **Change** for version updates. |
| **Config** | Path to the engine runtime config. OpenClaw uses `/home/node/.openclaw/openclaw.json`; Hermes uses `/home/hermes/data/config.yaml`. **Edit** opens an editor. |
| **Gateway Token** | The credential used to authenticate against the agent's own subdomain. See [API → Gateway token](/agents/api#gateway-token). |
| **Created** | When the agent was created |
| **Base URL** | `https://{agentId}.agents.pinata.cloud` |
The **manifest.json schema** link at the top of this section jumps to the [full field reference](/agents/manifest).
While a new agent is still `starting`, Chat and most settings tabs are disabled. The Danger tab stays available so you can check the current status, engine, config path, workspace path, and delete the agent if provisioning went wrong.
## Workspace
| Field | What it shows |
| ---------------- | ------------------------------------------------------------------------------------------------------------------------------------ |
| **Path** | The workspace directory inside the container. OpenClaw uses `/home/node/clawd/workspace`; Hermes uses `/home/hermes/data/workspace`. |
| **Snapshot CID** | IPFS CID of the most recent synced snapshot |
| **Last Sync** | How recently the workspace was captured |
For diffs and restore, use the [Files](/agents/snapshots) tab.
## Lifecycle Scripts
Whether your `build` and `start` scripts are configured, and their current status. The states are self-explanatory: `Not configured`, `pending`, `running`, `success`, `failed`.
If something failed, use `POST /v0/agents/{agentId}/scripts/retry` to re-run the lifecycle. OpenClaw agents also expose the **OpenClaw Settings UI** action for low-level runtime debugging. Logs end up in `/tmp/user-build.log` and `/tmp/user-start.log` — see [Manifest → Scripts](/agents/manifest#scripts) for the details.
## Scheduled Tasks
Just a status summary. Manage them on the [Tasks](/agents/tasks) tab.
## Channels
A quick rollup for engines that support messaging channels. For each of Telegram, Slack, Discord, and WhatsApp, you'll see either `Enabled` or `Not configured`.
## Skills
Every attached skill, its installed version, and its IPFS CID. The same info as the [Skills](/agents/skills) tab, in a flat-list format.
## Devices
Clients paired with the agent — mobile, the CLI, browser sessions. Each is listed with its status (`paired`, `pending`) and last activity.
### Device pairing
Some clients (the CLI in particular) need to be approved before they can talk to the agent. The flow:
1. The client asks to pair. A pending entry appears in this list.
2. You approve it — either click **Approve** here or hit `POST /v0/agents/{agentId}/devices/{requestId}/approve`.
3. To approve everything pending at once: `POST /v0/agents/{agentId}/devices/approve-all`.
## Secrets
Every attached secret, with a **Synced** indicator that tells you whether the *running* gateway has picked up the latest value. If you updated a secret and the indicator says out of sync, restart the gateway.
## Actions
### Restart Gateway
Restarts the gateway process inside the container. Use it when:
* You changed a secret, skill, or channel and want the agent to actually pick it up
* The agent is misbehaving
* WebSocket connections look stuck
Restarting disconnects all clients (chat, channel bots, custom domain traffic) for a minute or two.
From the API:
```bash theme={null}
curl -X POST \
-H "Authorization: Bearer $PINATA_JWT" \
https://agents.pinata.cloud/v0/agents/$AGENT_ID/restart
```
### OpenClaw Settings UI
OpenClaw agents show an **Open Settings UI** action. It opens OpenClaw's internal settings panel, a low-level config editor for the engine itself — useful for advanced debugging.
Misconfiguration here can break the agent. For day-to-day config, edit `manifest.json` instead. See the [manifest reference](/agents/manifest).
Hermes agents do not show this action. Use the **Config** row's **Edit** button for Hermes runtime config.
### Edit config
The **Edit** button next to the **Config** row opens the engine runtime config directly. For OpenClaw this is `openclaw.json`; for Hermes it is `config.yaml`. Changes are validated server-side before they're written.
You can also validate any config string without applying it:
```bash theme={null}
curl -X POST \
-H "Authorization: Bearer $PINATA_JWT" \
-H "Content-Type: application/json" \
-d '{"config":"{...}"}' \
https://agents.pinata.cloud/v0/agents/$AGENT_ID/config/validate
```
This validates the runtime config, not `manifest.json`. For manifest validation, see [Manifest → Validation](/agents/manifest#validation).
### Update OpenClaw
OpenClaw agents show a **Change** button next to the Version field. It checks for updates and applies them. Equivalent CLI calls:
```bash theme={null}
# Check
curl -H "Authorization: Bearer $PINATA_JWT" \
https://agents.pinata.cloud/v0/agents/$AGENT_ID/update
# Apply
curl -X POST \
-H "Authorization: Bearer $PINATA_JWT" \
-H "Content-Type: application/json" \
-d '{"tag":"latest"}' \
https://agents.pinata.cloud/v0/agents/$AGENT_ID/update
```
### Delete Agent
Permanent. Removes:
* The container
* All workspace files and snapshots
* All R2 storage tied to the agent
* Channel configurations
* Custom domains
There's no undo. The agent ID is gone — it won't be reissued.
# Error Reference
Source: https://docs.pinata.cloud/agents/errors
Look up an API error code and how to resolve it
Every API error comes back as JSON with a single `error` field and an HTTP status code:
```json theme={null}
{ "error": "Validation failed: skills exceeds maximum of 10" }
```
This page maps the codes you'll actually see in the wild to a cause and a fix. For step-by-step debugging, see [Troubleshooting](/agents/troubleshooting).
## By HTTP status
### `400 Bad Request`
The request shape or content is invalid.
| When you'll see it | Likely cause | Fix |
| ---------------------------------------- | --------------------------------------------------------------------------- | ------------------------------------------------------------ |
| `POST /v0/agents` | `name` missing, too long, or contains banned characters | Trim or rename. Max 100 chars. |
| `POST /v0/secrets` | `name` or `value` empty | Provide both |
| `POST /v0/agents/.../skills` | More than 10 skills attached | Detach skills first |
| `POST /v0/agents/.../console/exec` | Empty `command` | Provide the command string |
| `POST /v0/agents/.../snapshots/sync` | Storage not configured for this workspace | Pinata storage isn't provisioned - contact support |
| `POST /v0/agents/.../config/validate` | `config` field isn't valid JSON | Fix syntax |
| `POST /v0/agents/.../domains` | Both `subdomain` and `customDomain` provided, banned name, or limit reached | Pick one. Avoid names containing "pinata". Max 5 domains. |
| `POST /v0/agents/.../snapshots/reset` | `snapshotCid` missing or malformed | Use a CID from the snapshot list |
| `POST /v0/agents/.../channels/{channel}` | Token missing on initial setup, or unsupported channel name | Provide `botToken` (and `appToken` for Slack) |
| `POST /v0/agents/.../files/upload` | `filename` empty or `contentBase64` malformed | Sanitize filename, base64-encode without the data URL prefix |
### `401 Unauthorized`
No credential, or the credential was rejected before reaching authorization.
| Cause | Fix |
| -------------------------------- | ----------------------------------------------------------------------------------- |
| Missing `Authorization` header | Add `Authorization: Bearer ` |
| Pinata JWT expired or revoked | Generate a new key in [Account → API Keys](/account-management/api-keys) |
| Gateway token rotated | Copy the current value from Danger → Agent → Gateway Token |
| Token from a different workspace | Switch workspaces in **Account → Workspaces** or use a key from the right workspace |
### `403 Forbidden`
Authenticated, but the action isn't allowed.
| Cause | Fix |
| ----------------------------------------------------------------------------- | --------------------------------------------- |
| Agent limit reached on `POST /v0/agents` | Upgrade your plan or delete an unused agent |
| Free plan trying to use a paid feature (channels, custom domains) | Upgrade plan |
| Workspace permission denied | Ask the workspace admin for access |
| `404` returned where you expected `403` (Issues API on non-internal accounts) | Issues is closed beta to `@pinata.cloud` only |
### `404 Not Found`
The resource doesn't exist (or you're not allowed to know it exists).
| Cause | Fix |
| ---------------------------------------------- | --------------------------------------------------------------- |
| Wrong `agentId` | Check the ID from the Danger page or `GET /v0/agents` |
| `snapshotCid` not in this agent's history | Use one from `GET /v0/agents/{agentId}/snapshots` |
| Skill CID/slug not installed in your library | Install via Skills Library or `POST /v0/clawhub/{slug}/install` |
| Template slug/ID doesn't exist or was archived | List `GET /v0/templates` |
| Custom domain ID not on this agent | List `GET /v0/agents/{agentId}/domains` |
| Issues endpoint hit by a non-internal account | Closed beta - returns `404` by design |
### `409 Conflict`
Resource state is incompatible with the request.
| Cause | Fix |
| ------------------------------------------------------------------------------------------- | --------------------------------------------------------------- |
| Duplicate secret name on `POST /v0/secrets` | Use a different name or update the existing one |
| Two credentials for the same provider attached (e.g. `OPENAI_API_KEY` + Codex subscription) | Detach one |
| Custom domain already registered (verified) | Pick a different name or delete the existing registration |
| Subdomain collides with another tenant | Generate a new one or pick a different name |
| Trying to delete a secret still attached to an agent | Detach from agents first |
| Skill version conflict during update | Resolve via `POST /v0/agents/{agentId}/skills/{skillId}/update` |
### `413 Payload Too Large`
File upload exceeded the per-request limit.
| Cause | Fix |
| ----------------------------------------------------- | ---------------------------------------------------------------------------------- |
| `POST /v0/agents/{agentId}/files/upload` body too big | Chunk the upload, or push the file via git, or stream it from inside the container |
### `500 Internal Server Error`
Something blew up on the server. The `error` field usually has the underlying message.
Common variants:
| Message hint | Cause | Fix |
| ------------------------------------------------- | ----------------------------------------------- | --------------------------------------------------------- |
| `Gateway failed to start` after agent create | Provisioning succeeded but the gateway crashed | Wait 30s and retry, or check Logs |
| `Sync failed` | Workspace snapshot upload to Pinata IPFS failed | Retry; if persistent, check Pinata status |
| `CLI error` on `GET /v0/agents/{agentId}/devices` | Underlying engine CLI returned non-zero | Check Logs for engine errors; restart gateway |
| `Reset failed` | Git reset to the snapshot commit failed | The commit hash may be missing - try a different snapshot |
| `Configuration failed` on channel configure | The engine rejected the channel config | Validate token format (e.g. Slack `xoxb-` / `xapp-`) |
| `Execution failed` on console exec | Command shell terminated unexpectedly | Inspect the command; if hung, restart gateway |
### `503 Service Unavailable`
A dependency the server needs is down.
| Cause | Fix |
| ------------------------------------------------------------ | ------------------------------------------------------------ |
| `POST /v0/secrets` returns 503 with "Secrets not configured" | Server-side encryption key not provisioned. Contact support. |
| Snapshot/IPFS backend unreachable | Retry; check Pinata status page |
## By symptom
### "I just created the agent and the chat shows offline"
The container takes \~30 seconds to provision. A `500` with the agent body in the response means provisioning succeeded but the gateway didn't start cleanly - the agent will appear in your list and you can restart it.
### "My push to the workspace returns auth errors"
Re-grab the URL with **Copy with Token** on the Files tab. The gateway token may have been rotated.
### "Tasks return 500 from `GET /v0/agents/.../tasks`"
This usually means the engine CLI inside the container failed. Restart the gateway; if it keeps failing, check the Logs filtered to `cron/runner`.
### "Channel configure returns 500"
The engine could not write the channel config or restart. Almost always a malformed token or a channel that's already enabled. Re-check the token, then **Reconfigure**.
### "Domain stuck `pending_ownership`"
Your `_pinata-verify.` TXT record isn't visible. Confirm with `dig TXT _pinata-verify. +short` and wait for propagation.
### "Issues endpoints all return 404"
Issues is closed beta and restricted to `@pinata.cloud` accounts today.
## Common error responses
Errors documented in the API spec, grouped by where they appear. Use this as a starting point when you're trying to interpret an error response — the exact string returned by the API is the source of truth.
| Response | Where it appears | What it means |
| ------------------------------- | -------------------------------------------------------- | ----------------------------------------------------------------------- |
| `Missing userId` | Several JWT-protected endpoints | Pinata JWT couldn't be resolved to a user — regenerate the key |
| `Agent limit reached` | `POST /v0/agents` (`403`) | Workspace at its agent quota — upgrade or delete an unused agent |
| `Storage not configured` | `POST /v0/agents/{agentId}/snapshots/sync` (`400`) | Workspace has no backing storage; contact support |
| `Sync failed` | Snapshot sync (`500`) | IPFS pin or workspace serialization failed — retry |
| `Snapshot not found` | `POST /v0/agents/{agentId}/snapshots/reset` (`404`) | Snapshot CID isn't in this agent's history |
| `Invalid snapshot CID` | Snapshot reset (`400`) | The provided CID didn't parse |
| `Unsupported channel` | `DELETE /v0/agents/{agentId}/channels/{channel}` (`400`) | Channel must be `telegram` / `slack` / `discord` / `whatsapp` |
| `Configuration failed` | Channel configure (`500`) | Engine rejected the token/config |
| `Removal failed` | Channel delete (`500`) | Engine failed to remove and restart |
| `Invalid command` | Console exec (`400`) | `command` field empty or invalid `cwd` |
| `Execution failed` | Console exec (`500`) | Shell exited unexpectedly |
| `Invalid JSON` / invalid config | Config validate / write (`400`) | The `config` field isn't valid for this engine |
| `Validation command failed` | `POST /v0/agents/{agentId}/config/validate` (`500`) | Engine validator returned non-zero |
| `Failed to read config` | `GET /v0/agents/{agentId}/config` (`500`) | Couldn't read runtime config |
| `Failed to write config` | `PUT /v0/agents/{agentId}/config` (`500`) | Couldn't write runtime config |
| `Invalid version` | `POST /v0/agents/{agentId}/restart` (`400`) | Requested engine version doesn't exist |
| `Restart failed` | Restart (`500`) | Gateway didn't come back up — check Logs |
| `Script launch failed` | `POST /v0/agents/{agentId}/scripts/retry` (`500`) | Build or start couldn't be launched |
| `File too large` | `POST /v0/agents/{agentId}/files/upload` (`413`) | Body over the upload limit — chunk or push via git |
| `CLI error` | Several engine-backed endpoints (`500`) | Underlying engine CLI returned non-zero — check Logs |
| `Token generation failed` | `POST /v0/agents/{agentId}/platform/token` (`500`) | Platform JWT couldn't be minted — rotate gateway token |
| `Secrets not configured` | `POST /v0/secrets` (`503`) | Server-side encryption key not provisioned — contact support |
| `Duplicate secret name` | `POST /v0/secrets` (`409`) | Secret name is already taken |
| `Conflicting secrets` | `POST /v0/agents/{agentId}/secrets` (`409`) | Attaching two creds for the same provider (e.g. API key + subscription) |
| `Invalid parameters` | Tasks create (`400`) | One of `name`, `schedule`, or `payload` is missing or malformed |
| `Failed to create cron job` | Tasks create (`500`) | Engine rejected the cron config |
| `Failed to list cron jobs` | Tasks list (`500`) | Engine CLI failed |
## See also
* [Concepts](/agents/concepts) - terminology and how the pieces fit
* [Troubleshooting](/agents/troubleshooting) - step-by-step debugging by symptom
* [HTTP API](/agents/api) - auth and base URLs
* [Manifest reference](/agents/manifest) - manifest schema details
# Issues & Boards
Source: https://docs.pinata.cloud/agents/issues
Assign work to agents on a kanban board, review the diff, ship it
**My Issues** is a kanban board for handing work to your agents. You file an issue — a title plus a prompt — assign it to an agent, and the agent runs it in an isolated copy of its workspace. When it finishes, the card lands in Review with a full diff for you to accept, revise, or turn into a pull request.
Open **My Issues** in the sidebar. Each workspace can have multiple boards — the **+** next to the board name creates another one.
## The board
Four columns plus an archive:
| Column | What's in it |
| --------------- | ------------------------------------------------------------------ |
| **Backlog** | Drafted or unassigned issues. This is where new issues start. |
| **In Progress** | Queued or running. Dragging a backlog card here kicks off the run. |
| **Review** | Finished runs waiting on you. Check the diff and decide. |
| **Done** | Accepted work. |
The **Archive** strip at the bottom takes backlog or review cards you're finished with. Cards can also be reordered within a column — ordering is scoped per board.
Above the columns: search, sort, and filters for priority, agent, owner, and tags.
## File an issue
Click **New Issue**. The composer asks for:
* **Who does the work** — **An Agent** (hand the prompt to an agent and review the result) or **I'll do it myself** (no agent; the card just tracks work as you drag it across the board).
* **Title and prompt** — the prompt is what the agent actually receives. Markdown supported, attachments and checklists too.
* **Assign** — the agent, an optional **repository**, and tags. Owner, reviewer, priority, and due date live on the card after creation.
Issues start in Backlog. **Start issue** (or dragging the card to In Progress) queues it; the agent picks it up as soon as a slot frees up.
## How a run works
Each run executes in an isolated directory inside the agent's workspace — `/runs//` — with its own git history, so concurrent runs don't trample each other and the agent's main workspace stays clean. A `.gitignore` entry for `/runs` is added automatically so run directories stay out of workspace snapshots.
While the run is going, the card and the issue drawer both update live:
* The drawer hero shows elapsed time and a **live token count**
* The conversation pane streams the agent's tool calls and output token count as they happen
* **Files Changed** renders the diff in real time — you can watch the work land
When the agent finishes it marks the issue **Ready for Review** and the card moves to the Review column on its own.
## Reviewing
Open a Review card. The drawer splits into **Conversation** (the full exchange, including tool calls and the commit the agent made) and **Files Changed** (per-file diffs, unified or split view, expandable to full screen).
From here you can:
* **Accept & Done** — approve the work and mark the issue done. The run's changes stay as-is.
* **Send revision** — reply with feedback; the agent picks the issue back up and continues in the same run.
* **Create a PR** — open a pull request from the drawer with a custom title and description (requires a connected repository — see below).
* **Add comment** — discussion without triggering a run.
## Working against a GitHub repo
Connect GitHub under **Account → Integrations**, then save repositories from the issue composer's repository picker (**Manage repositories**). With a repo attached to an issue:
* **Self-driving issues** spin up a branch and a **draft PR** automatically when the run starts, and the agent continues its work on that branch.
* **Create PR from the drawer** turns a finished run into a pull request with the title and description you give it.
* The board tracks PR state — when a PR merges, the card reflects it. GitHub syncing is rate-limit-aware, so large orgs don't get throttled mid-sweep.
## Board settings
Board options (the **⋯** next to the board name) → **Board settings**:
| Setting | What it does | Default |
| ------------------ | --------------------------------------------------------------------------------------------------------------------------------------- | ------------- |
| **Instructions** | Markdown prepended to *every* run on this board — coding conventions, commit-message rules, test requirements. Up to 20,000 characters. | empty |
| **Model override** | Force a specific model for every run on the board. Blank = each agent's own default. | agent default |
| **Max turns** | Per-run conversation-turn cap (1–1000). The run stops when it hits the limit. | 200 |
| **Max cost (USD)** | Per-run spend ceiling — the run stops when estimated spend exceeds it. | \$25 |
Board instructions are genuinely injected into runs — if your instructions say "prefix commits with `[bot]`", the commits come back prefixed.
## Cost & token tracking
Spend is tracked at three levels:
* **Cards** show the run's cost next to the diffstat (e.g. `$0.13 +5 -0`).
* **The drawer hero** shows duration and total tokens; hovering it reveals the full **Agent Usage** breakdown — total spend, input/output tokens, and **cached tokens** accounted separately.
* **The board-level chip** (top right) opens a rollup panel with a **Cost | Tokens** toggle: totals by agent, by model, and a token table splitting input, output, cache reads, and cache writes.
Live cost during a run is an estimate and can settle to a lower final number once cache pricing is reconciled. Usage reporting depends on the engine — Super Builder runs report the richest data.
## Which engine should issue agents use?
Any agent can take issues, but the **Super Builder** engine exists for exactly this: a headless coding agent optimized for issue-board work, with a higher default turn cap (200) for longer-running jobs. It skips chat-first surfaces like Channels in favor of doing the work and reporting back. See [Concepts → Engine](/agents/concepts#engine).
## Tips
* Use board instructions for anything you'd otherwise paste into every prompt — conventions compound.
* Set a reviewer on cards that need a second pair of eyes; filter the board by owner when triaging.
* Run history on a card is ordered by actual run time, so the latest attempt is always what you're reviewing.
# Logs
Source: https://docs.pinata.cloud/agents/logs
Stream your agent engine's output in real time
The Logs tab is a live stream of what the agent engine is doing inside your agent. New entries appear without refreshing — the tab uses a WebSocket under the hood. If the small status badge in the header reads **Connected**, you're streaming. If it reads **WebSocket not connected**, either the agent isn't running, the connection dropped, or there are no gateway log lines yet — hit the refresh button or check the agent's status.
## Reading the stream
Each log line has four parts:
* **Timestamp** — when it happened
* **Level** — severity (`TRACE`, `DEBUG`, `INFO`, `WARN`, `ERROR`, `FATAL`)
* **Source** — which component generated the line (e.g. `gateway/reload`, `cron/runner`)
* **Message** — the content
Click the **+** on the left of any row to expand it. Useful for stack traces and structured fields that don't fit on a single line.
## Filtering
The six colored checkboxes — TRACE, DEBUG, INFO, WARN, ERROR, FATAL — toggle log levels on and off. When you're hunting a problem, uncheck everything except WARN and above to cut the noise.
The **Search logs** box does a substring match against the message. Combine with level filters: "show me ERROR lines mentioning `telegram`."
The **AUTO-FOLLOW** checkbox keeps the view pinned to the latest entry. Uncheck it when you want to scroll back without the view jumping.
## Exporting
**EXPORT VISIBLE** downloads whatever the current filters are showing — useful for sharing with support or filing an issue. It's only what you see; the export respects your filters.
## Where the logs live on disk
Inside an OpenClaw container, daily log files live at `/tmp/openclaw/openclaw-{date}.log`. From the [Console](/agents/console):
```bash theme={null}
ls /tmp/openclaw/
tail -f /tmp/openclaw/openclaw-$(date +%Y-%m-%d).log
```
For other engines, use the Logs tab or the logs API as the stable interface; on-disk log paths are engine-specific. The API keeps the latest 100 lines when the gateway restarts. If you need long-term retention, export periodically.
## Reading logs over the API
For scripts and incident response:
```bash theme={null}
curl -H "Authorization: Bearer $PINATA_JWT" \
https://agents.pinata.cloud/v0/agents/$AGENT_ID/logs
```
Returns the latest 100 lines as a single string. For full streaming, the UI uses a WebSocket on the agent's subdomain — see [API → Streaming logs](/agents/api#streaming-logs).
## Common sources, and what they tell you
| Source | What it means |
| ------------------------------ | --------------------------------------------------------------------------------------- |
| `gateway/reload` | Gateway reloaded its configuration — usually after a secret, skill, or channel change |
| `gateway/ws` | WebSocket lifecycle (connect, disconnect, reconnect) |
| `cron/runner` | A scheduled task fired — which one, and what happened |
| `agent/turn` | One conversation turn — request in, response out |
| `skill/` | Output from a specific skill |
| `script/build`, `script/start` | Lifecycle script output (also tee'd to `/tmp/user-build.log` and `/tmp/user-start.log`) |
If something's broken, start at ERROR. If you see ERROR lines and can't make sense of them, [Troubleshooting](/agents/troubleshooting) maps symptoms to fixes, and the [Error reference](/agents/errors) covers common API error responses.
# Manifest Reference
Source: https://docs.pinata.cloud/agents/manifest
Every field in manifest.json, the source of truth for an agent's configuration
`manifest.json` lives at the root of every agent's workspace. It controls identity, lifecycle scripts, secrets, skills, routes, channels, scheduled tasks, and (for templates) marketplace metadata. This page documents every field at the version 1 schema.
The schema is published at:
```
https://agents.pinata.cloud/schemas/manifest.v1.json
```
Add a `$schema` line so editors can autocomplete and validate:
```json theme={null}
{
"$schema": "https://agents.pinata.cloud/schemas/manifest.v1.json",
"version": 1,
"engine": "openclaw",
"agent": { "name": "My Agent" }
}
```
## Top-level fields
| Field | Type | Required | Description |
| ---------- | ------- | :------: | --------------------------------------------------- |
| `$schema` | string | optional | Schema URL for editor support |
| `version` | integer | yes | Manifest version - currently `1` |
| `engine` | string | optional | Container engine - `openclaw` (default) or `hermes` |
| `agent` | object | yes | Agent identity (see below) |
| `model` | string | optional | Default model in `/` form |
| `secrets` | array | optional | Encrypted credentials this agent requires |
| `skills` | array | optional | Up to 10 skill slugs or CIDs |
| `tasks` | array | optional | Up to 20 scheduled tasks |
| `scripts` | object | optional | Lifecycle hooks (`build`, `start`) |
| `routes` | array | optional | Up to 10 port-forwarding rules |
| `channels` | object | optional | Messaging channel configuration |
| `template` | object | optional | Marketplace listing metadata (only for templates) |
## `agent`
Defines the agent's identity. All fields are written into the workspace (mostly `IDENTITY.md`) at deploy time.
```json theme={null}
"agent": {
"name": "Social Bot",
"description": "You manage Socials",
"vibe": "Resourceful and opinionated",
"emoji": "🤖"
}
```
| Field | Type | Limit | Notes |
| ------------- | ------ | ------------------------- | ---------------------------- |
| `name` | string | 1-100 chars, **required** | Display name |
| `description` | string | ≤ 10000 chars | Personality / role |
| `vibe` | string | ≤ 200 chars | One-line tagline |
| `emoji` | string | ≤ 32 chars | Visible in lists and avatars |
## `model`
A single default model identifier in `/` form:
```json theme={null}
"model": "anthropic/claude-sonnet-4-6"
```
Provider must match a connected provider in the [Secrets Vault](/agents/secrets). If a task or session specifies a model that isn't enabled on the agent, the request falls back to this default.
## `secrets`
Declares the secrets this agent needs. These are env-var names - the actual values come from the [Secrets Vault](/agents/secrets) at attach time.
```json theme={null}
"secrets": [
{ "name": "OPENROUTER_API_KEY" },
{ "name": "TELEGRAM_BOT_TOKEN", "description": "BotFather token", "required": false }
]
```
| Field | Type | Notes |
| ------------- | ------- | --------------------------------------------------------------------- |
| `name` | string | Environment variable name (e.g. `ANTHROPIC_API_KEY`) |
| `description` | string | Shown on the deploy form |
| `required` | boolean | Default `true`. `false` makes the field optional in the deploy wizard |
## `skills`
Up to 10 skills. Each entry is an object with a `name` plus either a `clawhub_slug` (resolves to the latest published version) or a `cid` (byte-stable, pinned to a specific upload).
```json theme={null}
"skills": [
{ "clawhub_slug": "@pinata/api", "name": "Pinata API" },
{ "clawhub_slug": "@pinata/memory-salience", "name": "Memory Salience" },
{ "cid": "bafybeicglyjdb6wrrcbfyu6i2fe4lpxdxgvfvlht7yzdim7cvwt656whue", "name": "My Custom Skill" }
]
```
| Field | Type | Notes |
| -------------- | ------ | ---------------------------------------------------------------------- |
| `name` | string | Display name shown in the UI. Required. |
| `clawhub_slug` | string | ClawHub slug like `@pinata/api`. Mutually exclusive with `cid`. |
| `cid` | string | IPFS CID of an uploaded skill. Mutually exclusive with `clawhub_slug`. |
Each attached skill is unpacked under `workspace/skills//`. See [Skills](/agents/skills).
## `tasks`
Scheduled prompts. Up to 20 per agent. Full reference in [Tasks](/agents/tasks).
```json theme={null}
"tasks": [
{
"name": "daily-check-in",
"schedule": { "kind": "cron", "expr": "0 9 * * *", "tz": "America/Los_Angeles" },
"payload": { "kind": "agentTurn", "text": "Summarize yesterday." },
"delivery": { "mode": "announce", "channel": "telegram", "to": "123" }
}
]
```
Schedule kinds: `at` (one-shot ISO timestamp), `every` (`everyMs` interval, optional `staggerMs`), `cron` (`expr` with optional `tz`).
Payload kinds: `agentTurn` (chat message; supports `model`, `thinking`, `timeoutSeconds`) or `systemEvent` (system trigger; provide `message`).
Delivery modes: `none` (default), `announce` (to a channel - set `channel` and `to`), or `webhook` (set `to` to a URL). `bestEffort: true` swallows delivery failures.
`sessionTarget` is `main` or `isolated`. `wakeMode` is `now` or `next-heartbeat`.
## `scripts`
Lifecycle hooks. Both fields are shell commands run by the agent's runner.
```json theme={null}
"scripts": {
"build": "cd workspace/projects/app && npm install --include=dev",
"start": "cd workspace/projects/app && npx vite --host 0.0.0.0"
}
```
| Hook | When it runs | Working directory | Output log | Timeout |
| ------- | --------------------------------------------------------- | ------------------ | --------------------- | -------------------- |
| `build` | After deploy, after each `git push`, on **Retry Scripts** | `/home/node/clawd` | `/tmp/user-build.log` | 5 min |
| `start` | After a successful `build`, on agent boot | `/home/node/clawd` | `/tmp/user-start.log` | None - runs detached |
If `build` fails, `start` does not run. If `start` crashes, the agent is still healthy - only the user-defined process exits.
**Retry the lifecycle:** `POST /v0/agents/{agentId}/scripts/retry` (or the action on the Danger tab).
**Bind servers to `0.0.0.0`**, not `localhost`, so the gateway can reach them. See [Routes](/agents/routes).
## `routes`
Port-forwarding rules. Up to 10. Each entry maps an external path prefix to a container port.
```json theme={null}
"routes": [
{ "port": 5173, "path": "/app", "protected": false },
{ "port": 3000, "path": "/api", "protected": true }
]
```
| Field | Type | Notes |
| ----------- | ------- | ------------------------------------------------------------------------ |
| `port` | integer | Container port. 1025-65535. `18789` is reserved. |
| `path` | string | URL path prefix. Stripped from the request before reaching your service. |
| `protected` | boolean | `true` requires a gateway token. Defaults to `false`. |
For custom domains, register them through the UI or the [Domains API](/agents/api#custom-domains) - they aren't declared in `manifest.json`.
## `channels`
Configures the messaging channels for this agent. Tokens are usually injected from secrets to avoid leaking into the manifest.
```json theme={null}
"channels": {
"telegram": {
"botToken": "env:TELEGRAM_BOT_TOKEN",
"dmPolicy": "pairing",
"allowFrom": ["123456789"]
},
"slack": {
"botToken": "env:SLACK_BOT_TOKEN",
"appToken": "env:SLACK_APP_TOKEN"
},
"discord": {
"botToken": "env:DISCORD_BOT_TOKEN"
}
}
```
| Channel | Required fields | Notes |
| ---------- | ----------------------- | ----------------------------------------------------------- |
| `telegram` | `botToken` | `dmPolicy` (`open` / `pairing`), `allowFrom` (user IDs) |
| `slack` | `botToken`, `appToken` | Socket Mode + scopes per [Channels](/agents/channels#slack) |
| `discord` | `botToken` | |
| `whatsapp` | `dmPolicy`, `allowFrom` | Linking happens on the agent. Coming soon. |
Use `env:VAR_NAME` to read from an environment variable instead of embedding a literal token.
## `template`
Only used when the manifest is the source for a marketplace template. Ignored for direct deploys.
```json theme={null}
"template": {
"slug": "useful-assistant",
"category": "general",
"partnerName": "Pinata",
"tags": ["assistant", "personal", "productivity"]
}
```
| Field | Notes |
| ------------- | -------------------------------------------------------------------------------- |
| `slug` | Marketplace URL slug. Lowercase, hyphens. |
| `category` | One of the marketplace categories (e.g. `general`, `defi`, `social`) |
| `partnerName` | Display name shown on the template card |
| `tags` | Array of free-text tags for filtering |
| `paid` | Optional. Set `{ "amount": "1.00", "currency": "USDC" }` for x402 paid templates |
## Validation
`manifest.json` is different from engine runtime config - see [Concepts → manifest vs runtime config](/agents/concepts#manifest-json-vs-openclaw-json). The `/v0/agents/{agentId}/config/validate` endpoint validates runtime config, not `manifest.json`.
To validate `manifest.json` ahead of committing, run it through the template validator (which checks `manifest.json` + `README.md` + `workspace/`):
```bash theme={null}
# CLI
pinata agents templates validate https://github.com/user/my-template
```
```bash theme={null}
# Or hit the API directly with the repo URL + ref
curl -X POST \
-H "Authorization: Bearer $PINATA_JWT" \
-H "Content-Type: application/json" \
-d '{"gitUrl":"https://github.com/user/my-template","ref":"refs/heads/main"}' \
https://agents.pinata.cloud/v0/templates/validate
```
The response is `{ valid: boolean, errors: string[], manifest, readme, files }` — any problems with the manifest show up in the `errors` array.
Schema constraints to keep in mind while authoring:
| Field | Constraint |
| --------------------- | ---------------------------------------------------------- |
| `version` | Must be `1` |
| `agent` | Required; `agent.name` is required and ≤ 100 chars |
| `agent.description` | ≤ 10000 chars |
| `agent.vibe` | ≤ 200 chars |
| `agent.emoji` | ≤ 32 chars |
| `skills` | ≤ 10 entries |
| `routes` | ≤ 10 entries; ports `1025`–`65535`, excluding `18789` |
| `tasks` | ≤ 20 entries; minimum interval 1 minute |
| `channels.*.botToken` | Required on initial setup (Slack also requires `appToken`) |
See [Errors](/agents/errors) for the full HTTP status code reference.
## Minimal Example
The smallest valid manifest:
```json theme={null}
{
"version": 1,
"agent": { "name": "Hello" }
}
```
This boots the default `openclaw` engine with no skills, no scripts, and no routes - just a workspace and a chat interface.
# Models
Source: https://docs.pinata.cloud/agents/models
Pick which AI models this agent can use
Each agent has its own list of allowed models, grouped by provider. The default model is what the agent reaches for when nothing else says otherwise; you can also swap models in the middle of a conversation if you want a faster (or smarter) one for a specific turn.
## What you see
Open your agent → **Models**. The page lists each connected provider as a separate section. Only providers you've connected in the [Secrets Vault](/agents/secrets) show up here — if you don't see OpenAI, for example, it's because you haven't connected an OpenAI key.
### Free-tier agents
If the agent was created on the **Free tier** (no provider key), the Models page shows a single "Running on Pinata's free tier" state instead of provider sections. The agent uses a free, rate-limited model from OpenRouter's free pool (`openrouter/free`); there's nothing to configure. Add your own provider key in Secrets — the **Add a provider key →** link takes you there — and the full provider/model UI appears for this agent.
Inside each provider section:
* One row per model that's currently enabled
* A **DEFAULT** badge marks the agent's default model
* An **×** on a row removes that model from this agent
* **+ ADD** at the top right of each section lets you enable more models from that provider
## Enable a model
Click **+ ADD** in the provider section and pick a model from the list. It's now available to this agent — you can call it from chat or set it as default. Removing one with **×** doesn't disconnect the provider, it just narrows the menu.
## Set the default
The default is what gets used when you don't specify a model. Click a model row to set it as default; the **DEFAULT** badge moves.
## Switch models mid-conversation
On the [Chat](/agents/chat) tab, the **MODEL** dropdown next to the message input lets you pick a model for the next turn. You'd typically reach for this to:
* Use a fast/cheap model for routine questions
* Bump up to a more capable model for a hard one
* Compare answers from two models on the same prompt
Each response is tagged with the model that produced it, so the conversation stays readable when you switch.
## What models look like in configs
When you reference a model in code, in `manifest.json`, or in a task payload, the convention is `provider/model`:
```text theme={null}
anthropic/claude-sonnet-4-6
openrouter/tencent/hy3-preview
openai/gpt-5.4
```
The provider prefix tells the agent engine which connected provider to use. If you give it a model that isn't enabled on this agent, the request falls back to the default.
Provider availability and default enabled models can vary by engine. For example, fresh OpenClaw and Hermes agents can start with different Anthropic defaults.
## What's available today
The exact list updates as providers ship. A current snapshot:
* **Anthropic** — `claude-opus-4-6`, `claude-sonnet-4-6`, `claude-haiku-4-5`
* **OpenAI Codex** (subscription) — `gpt-5.4`
* **OpenRouter** — `auto` (lets OpenRouter pick), plus any specific model on the platform (e.g. `tencent/hy3-preview`)
* **Free tier** — `openrouter/free` (shared pool, rate-limited, no key needed)
* **Venice / Pinata / Custom** — whatever the provider exposes
Provider availability also varies by engine — for example, Super Builder agents offer a narrower provider list at creation than OpenClaw agents.
When you select `auto` on OpenRouter, OpenRouter picks the underlying model for each request. Handy if you don't want to micromanage which model handles what.
# Overview
Source: https://docs.pinata.cloud/agents/overview
Hosted AI agents that can run code, manage files, and connect to other services
Pinata Agents gives you a hosted AI agent in its own sandboxed container. The agent has a workspace it can read and write to, a terminal it can run commands in, and connectors for the outside world — chat apps, web servers, scheduled jobs. You talk to it through the dashboard, the CLI, or whichever messaging platform you connect it to.
Each agent runs on an **Agent Engine** — `openclaw` (default) for full configurability, `hermes` for an opinionated smoother out-of-the-box experience, or `super-builder` (beta), a headless coding agent built for [issue-board work](/agents/issues). You pick one when you create the agent. The default OpenClaw engine is documented at [openclaw.org](https://openclaw.org); for the differences see [Concepts → Engine](/agents/concepts#engine).
New accounts get a **10-hour free trial** of agents — no payment and no LLM key required, thanks to the free-tier model available throughout your account. After the trial, agents require a paid plan. [Upgrade here](https://app.pinata.cloud/billing).
## Get your first agent running
It takes a couple of minutes. You'll pick an LLM provider, create the agent, and start chatting.
### 1. Pick an LLM provider
Your agent needs an LLM to think. You have two options:
* **Free tier — no key, zero config.** Select the **Free tier** card in the Create Agent wizard and skip provider setup entirely. Your agent runs on a shared, rate-limited model (OpenRouter's free pool, e.g. `openrouter/free`) that's available throughout your account. Expect lower quality, smaller context, and occasional rate limits compared with a paid provider — but it's a real agent, free, today.
* **Bring your own key.** Go to the [Secrets Vault](https://agents.pinata.cloud/secrets). At the top of that page you'll see a row of provider cards: **Anthropic**, **OpenAI**, **OpenRouter**, **Pinata**, **Venice**, and **Custom**. Click **Connect** on whichever one you use, paste your API key (or run through OAuth if you're using an OpenAI Codex subscription), and save.
Start free, upgrade whenever — adding a provider key in Secrets later unlocks full model capabilities for the same agent, no re-create needed.
You can connect more than one provider — useful so you have a fallback if one is down.
### 2. Create an agent
Head to [My Agents](https://agents.pinata.cloud/agents) and click **Create Agent**.
You have two paths:
* **Start from a template** — fastest. Templates come pre-wired with skills, settings, and a personality. Pick one from the [Marketplace](https://agents.pinata.cloud/marketplace) (others' templates) or [My Templates](https://agents.pinata.cloud/templates) (your own). Add the secrets it needs, deploy.
* **Build from scratch** — full control. The wizard walks you through naming the agent, choosing an **Agent Engine** (OpenClaw, Hermes, or Super Builder), picking an AI provider (including the free tier), a personality preset, skills, and optionally channels before deploy.
Either way, the agent takes about 30 seconds to provision. When it's ready you land on its Chat tab.
Plans cap how many agents you can run at once. If a deploy fails with "Agent limit reached", delete an agent you're not using or upgrade your plan.
### 3. Start a conversation
Say hello. Ask it to write some code, summarize a webpage, or set up a workflow. It can use a terminal, edit files, search the web, and call any skills you've attached.
## Finding your way around
The sidebar on the left is the same on every page. Top half is the workspace itself; bottom half is account and support.
| Section | What's in it |
| ------------------ | -------------------------------------------------------------------------------------------------------------------------------------------------------------------------------------------------------------------------------------------------------------------------- |
| **My Agents** | Every agent you've created. Click one to expand its tabs (Chat, Channels, Files, Skills, etc.). The **ⓘ** on each agent card opens a floating info peek — live status, the default-model picker, skill/secret/task counts, and live CPU, memory, disk, and network meters. |
| **My Issues** | Kanban boards for assigning work to agents — file an issue, the agent runs it, you review the diff. See [Issues & Boards](/agents/issues). |
| **Skills Library** | Skills you've installed, plus a community catalog under **Browse ClawHub**. |
| **Secrets Vault** | All your encrypted credentials, in one place, shared across agents. |
| **My Templates** | Templates you've created or imported. |
| **Marketplace** | Published templates from Pinata and other builders, ready to deploy in one click. |
| **Account** | **Workspaces** (switch teams), **Integrations** (e.g. GitHub OAuth), **Activity** (audit log). |
| **Support** | Docs, the OpenAPI reference, changelog, and a way to chat with the Pinata team. |
**⌘K** (or **Ctrl+K**) opens a command palette for jumping to any agent, page, or action.
## The agent dashboard
Click any agent and you'll see tabs across the top of the page. Each tab is a slice of how the agent works:
* **Chat** — your conversation with the agent
* **Channels** — wire it up to Telegram, Slack, or Discord
* **Files** — a file browser for the agent's container, workspace snapshot history, content diffs, git URL
* **Skills** — capabilities attached to this specific agent (pulled from your Skills Library)
* **Secrets** — provider connections and env vars this agent can see
* **Models** — which models from your providers it's allowed to use, and which is the default
* **Routes** — path routes and custom domains for any web service it runs
* **Tasks** — cron jobs and one-off scheduled prompts
* **Console** — a terminal inside the container
* **Logs** — real-time log stream
* **Danger** — full configuration overview, plus restart and delete
That last one is named "Danger" deliberately — restart and delete live there, but so does most of the inventory data, so it's also the page you'll open when you need to know exactly how an agent is configured.
## Editing the workspace locally
Your agent's workspace is a git repo you can clone and push to.
```bash theme={null}
git clone https://agents.pinata.cloud/v0/agents/{agentId}/git my-agent
```
On the Files tab, **Copy with Token** gives you a URL with authentication built in so you don't have to manage credentials. Edit locally, push, and the agent picks up your changes — the build script (if you've defined one) runs automatically.
See [Files & Snapshots](/agents/snapshots) for the full flow.
## Working from the terminal
Everything in the dashboard is in the CLI too:
```bash theme={null}
pinata agents list # See your agents
pinata agents create # Create a new agent
pinata agents get # Get agent details
pinata agents chat # Talk to it from your terminal
```
Full reference: [Agents CLI](/tools/cli/agents).
## Going deeper
Glossary, file layout, and how the pieces relate
Every field in `manifest.json`, the source of truth for an agent's config
Auth model and endpoint reference for building against the platform
What to do when something doesn't work
Assign work on a kanban board and review the diff
Deploy a pre-built agent in one click
Let people talk to your agent on Telegram, Slack, or Discord
Add capabilities — IPFS storage, memory, on-chain identity, more
Expose a web app or API from inside the agent
# Domains & Routes
Source: https://docs.pinata.cloud/agents/routes
Expose web services from inside your agent to the internet
By default, anything your agent runs on a port stays inside the container — nobody on the outside can reach it. Routes punch a hole through so the outside can.
You'd want this if your agent is hosting a web app, an API, or a dev server you want to view in a browser. If your agent just chats and runs scripts, you don't need any of this.
## Two kinds of route
Open your agent → **Routes**. There are two sections:
* **Path routes** — your service is reachable on the agent's own subdomain, under a path prefix you choose. No DNS work; works immediately.
* **Custom domains** — your service is reachable on a Pinata-provided subdomain (`name-name-NN.apps.pinata.cloud`) or on your own domain.
Click **+ ADD** to add either.
## Path routes
This is the simplest option. Pick a port and a path; the route becomes available at:
```text theme={null}
https://{agentId}.agents.pinata.cloud//...
```
Click **+ ADD** → **Path Route**, then fill in:
1. **Container port** — the port your service is listening on inside the agent (e.g. `5173`)
2. **Path prefix** — the URL path (e.g. `/app`, or `/` for everything)
3. **Public** or **Protected** access — see below
One thing to know: the path prefix is **stripped** before the request hits your service. If someone visits `/app/users/123`, your service sees `/users/123`. Most frameworks let you configure a base path to match — for Vite that's `base: "/app"`.
## Custom domains
Custom domains are currently in beta.
There are two flavors.
### Pinata-provided subdomain
Easiest. You get a random `name-name-NN.apps.pinata.cloud` subdomain that points at your agent.
1. **+ ADD** → **Subdomain** tab
2. Optionally rename the auto-generated subdomain (you can also accept the default)
3. Set the container port and Public/Protected
4. **Register** — it's live immediately
### Bring your own domain
1. **+ ADD** → **Custom Domain** tab
2. Type your domain (e.g. `app.example.com`)
3. Pinata gives you a TXT record value — add it as `_pinata-verify.app.example.com` at your DNS provider
4. Submit the registration
5. Pinata gives you a CNAME target — add a CNAME from `app.example.com` to that target
6. Click **Verify**
After Verify, Pinata checks your TXT record, then provisions an SSL certificate through Cloudflare. The domain shows up in the list with a status; once it reads **active**, traffic is flowing.
DNS propagation and SSL provisioning typically take a few minutes. If your domain stays in a pending state, see [Troubleshooting → Custom domain stuck pending](/agents/troubleshooting#custom-domain-stuck-pending).
### Editing a custom domain
Once registered, you can change the **target port** and the **Protected** flag. You can't rename the domain — to switch, delete and recreate.
## Public vs Protected
Every route, path or domain, is one or the other.
* **Public** — anyone on the internet can reach it. Use this if your service handles its own auth, or you genuinely want it open.
* **Protected** — requests must include the agent's gateway token. The token can be in the `Authorization: Bearer` header, a `?token=...` query string, or a `gw_token` cookie. Use this when you want the route locked down with no extra work.
Public means *public*. Think before flipping that switch.
## Building a web app that works behind a route
Two things have to be true or it won't work, and the fix is almost always one of them:
1. **Your server has to bind to `0.0.0.0`**, not `localhost`. The gateway can't reach `localhost` from outside the process.
2. **Your dev server has to allow the agent's host**. Vite, Next, etc. check `Host` and reject unknowns by default.
Use the placeholder `__AGENT_HOST__` in config files — it's replaced at runtime with the agent's public hostname. Example for Vite:
```ts theme={null}
export default defineConfig({
base: "/app",
server: {
host: "0.0.0.0",
allowedHosts: ["__AGENT_HOST__"],
hmr: {
host: "__AGENT_HOST__",
protocol: "wss",
clientPort: 443,
},
},
});
```
If a route 404s or 502s after you've set everything up, [Troubleshooting → Routes not working](/agents/troubleshooting#routes) covers the common causes.
## Limits and reserved values
* Up to **10 path routes** per agent
* Up to **5 custom domains** per agent
* Container ports must be between `1025` and `65535`. Port `18789` is reserved for the gateway.
* Subdomains containing the word "pinata" or using reserved suffixes are rejected.
# Secrets
Source: https://docs.pinata.cloud/agents/secrets
Where API keys and credentials live
Your agent needs credentials — an LLM key, sometimes a bot token or two, maybe a database password. The Secrets Vault is where those live. They're encrypted at rest, never returned by the API after you save them, and injected into the agent as environment variables when its container starts.
You can't read a secret's value back once it's saved. Make sure you have it stored somewhere safe before you paste it in here.
## Connect a provider
You don't strictly need one — the Create Agent wizard offers a **Free tier** option that runs your agent on a shared, rate-limited model with no key at all. But connecting your own provider unlocks full model quality, context, and rate limits, and it's how a free-tier agent upgrades later.
Open the [Secrets Vault](https://agents.pinata.cloud/secrets). The row at the top — **AI PROVIDERS** — has a card for each supported provider:
| Provider | How it connects |
| -------------- | ------------------------------------------------------------ |
| **Anthropic** | API key |
| **OpenAI** | API key, or OAuth into a Codex subscription |
| **OpenRouter** | API key |
| **Pinata** | Pinata-hosted inference |
| **Venice** | API key (privacy-focused) |
| **Custom** | Any OpenAI-compatible endpoint |
| **Free tier** | Nothing — selected in the Create Agent wizard, no key needed |
Cards that aren't connected show a **CONNECT** button. Click it, follow the prompts, save. The card flips to **Connected**.
You can connect more than one provider — useful for fallbacks, or for routing different agents to different LLMs.
## Add other secrets
For everything that isn't a provider key — bot tokens, third-party API keys, database URLs — use **New Secret** at the top right of the Vault.
The dialog asks for:
1. A **name** (this is the environment variable, like `TELEGRAM_BOT_TOKEN`)
2. A **value**
3. A **type** — `secret` or `variable`
Save. Your agent will see it as `process.env.TELEGRAM_BOT_TOKEN` (or the equivalent in Python, Bash, etc.) on next restart.
### Secret vs variable
Both become env vars. The difference is encryption:
* **Secret** — encrypted at rest, never returned in API responses. Use for anything sensitive: keys, tokens, passwords.
* **Variable** — stored as plaintext, value returned in listings. Use for non-sensitive config — public URLs, feature flags.
If you're unsure, choose **secret**. There's no downside.
### Importing a `.env`
Have a `.env` file already? The New Secret menu has an **Import .env** option that adds every line in one go.
## Make a secret available to an agent
Saving a secret in the Vault doesn't automatically give it to every agent. You attach secrets per-agent — that way you can give different agents different credentials.
* **When creating an agent**: step 3 of the wizard ("Connect") lets you pick which secrets to attach.
* **For an existing agent**: open the agent → **Secrets** → **+ ADD** and pick from your Vault.
On the agent's Secrets tab you'll see two sections:
1. **AI Providers** — the providers you've connected. Each card shows whether it's an `API KEY` connection or a `CODEX SUBSCRIPTION`.
2. **Variables and Secrets** — the non-provider secrets you've attached.
At the bottom of the same page is the **Gateway Token** — the credential other tools use to talk to *this specific agent*. See [HTTP API → Gateway token](/agents/api#gateway-token) for what to do with it.
When you add or update a secret on a running agent, restart the gateway so the agent picks up the new value. The Danger tab shows a per-secret **Synced** indicator so you can tell whether you've already done that.
## Updating, removing, and edge cases
* Click the **⋯** menu on any secret to update its value or delete it.
* You can't delete a secret that's still attached to an agent — detach it first, or you'll get a `409 Conflict`.
* Updating a value doesn't roll out automatically — restart the gateway.
* Attaching two credentials for the same provider (say, an OpenAI API key *and* a Codex subscription) returns a `409 Conflict`. Pick one.
## From the CLI
```bash theme={null}
pinata agents secrets list # See your secrets
pinata agents secrets add # Add one
pinata agents secrets delete # Remove one
```
## How secrets are protected
* Encrypted with AES-GCM using a key derived per user
* Values are never returned by the API after creation
* Injected as environment variables at container start, never written to disk
* The per-agent gateway token is generated automatically and can be rotated from the Danger tab
# Skills
Source: https://docs.pinata.cloud/agents/skills
Reusable capability packages you can attach to an agent
Skills are how you teach an agent new tricks without rewriting it. A skill is a folder of files — code, instructions, sometimes a `.env.example` listing what credentials it needs. When you attach a skill to an agent, those files land in the agent's workspace and the agent can use them.
There are two views to keep separate in your head:
* The **Skills Library** in the sidebar — the catalog of skills installed in your account. This includes the ones Pinata publishes and any you've added from the community or your own folder.
* A specific agent's **Skills tab** — which subset of the library is actually attached to *this* agent. Installing a skill in the Library doesn't attach it; attachment happens per-agent.
## Find a skill
Open the **Skills Library** in the sidebar.
Two tabs at the top:
* **All | Installed** — skills already in your library
* **Browse ClawHub** — the community catalog
Search by name in either tab. Each card shows the skill name, author, install count, version, and a CID prefix. Pinata-built skills (like `@pinata/api`) carry a verified badge and show up in both tabs.
### Skills Pinata maintains
* **`@pinata/api`** — store and retrieve files on IPFS, use gateways, run vector searches, sign x402 payments
* **`@pinata/erc-8004`** — register your agent on-chain and verify other agents (ERC-8004)
* **`@pinata/memory-salience`** — let your agent remember what matters across conversations
* **`@pinata/paraspace`** — organize the workspace with the PARA method
* **`@pinata/sqlite-sync`** — a SQLite database with automatic Pinata backup and CID-chained history
* **`@pinata/platform`** — the agent can call back into the platform (install skills, set secrets, manage tasks) without ever seeing your Pinata JWT. Bundled by default.
## Install a skill
Click a card to see its description, files, and required env vars. **Install** adds it to your library. From there, you can attach it to as many agents as you like.
Installing alone doesn't change anything about your running agents — you still need to attach it.
## Attach a skill to an agent
* **When creating a new agent**: step 2 of the wizard lets you pick skills from your library.
* **For an existing agent**: open the agent → **Skills** → **+ ADD** and pick from your library.
Attaching copies the skill's files into the agent's workspace under `workspace/skills//`. The agent reads from there.
If the skill declares required env vars in a `.env.example`, the Skills tab flags any that aren't set on the agent. Add the missing values in the [Secrets Vault](/agents/secrets) and attach them, then restart the gateway.
Detaching a skill removes its files from the agent's workspace but keeps the skill installed in your library. You can re-attach later.
## Slugs vs CIDs
Anywhere you reference a skill — in the CLI, in [`manifest.json`](/agents/manifest), in API calls — you have two ways to identify it:
* **ClawHub slug** (`@pinata/api`) — always resolves to the latest published version. Easiest for templates and shared configs.
* **IPFS CID** (`bafybeicglyjdb6w...`) — pins one specific version. Use when you want byte-stable behavior or you're using a self-hosted skill not on ClawHub.
In `manifest.json` each skill is an object with `name` plus either `clawhub_slug` or `cid`:
```json theme={null}
"skills": [
{ "clawhub_slug": "@pinata/api", "name": "Pinata API" },
{ "clawhub_slug": "@pinata/memory-salience", "name": "Memory Salience" }
]
```
See the [manifest reference](/agents/manifest#skills) for the full schema.
## Versions and updates
Skills follow semver. Each card shows the current version (`v1.0.0`, etc.).
* **Update** — if a newer version exists, the Skills tab will show an update available. Update from there. For ClawHub skills, this pulls the latest published version.
* **Roll back** — open a skill's version history and pick an earlier version. Internally that re-pins to that version's CID.
If you're building automation, you can also check for updates via the API: `GET /v0/agents/{agentId}/skills/updates`.
## Publishing your own
Have something useful? Package it as a skill.
1. Put your files in a folder
2. Add a `SKILL.md` with YAML frontmatter — at minimum, `name` and `description`
3. Optional: a `.env.example` declaring required env vars (the UI will read this and flag missing values when someone attaches it)
```markdown theme={null}
---
name: my-skill
description: What this skill does
---
# My Skill
Instructions the agent should follow when using this skill.
```
In the Skills Library, click **Upload Skill**, choose your folder, give it a name and description, then **Upload & Register**.
Skill folders are pinned to public IPFS. Don't include secrets or anything you wouldn't paste into a Gist.
## From the CLI
```bash theme={null}
pinata agents skills list # See your library
pinata agents skills create # Upload a new skill
pinata agents clawhub list # Browse the community catalog
pinata agents clawhub install # Install a community skill
```
## Limits
* Up to **10 skills** attached per agent
* Skill names: letters, numbers, hyphens, underscores
* Folder size limits follow Pinata's IPFS upload limits
# Files & Snapshots
Source: https://docs.pinata.cloud/agents/snapshots
Browse, version, and edit your agent's workspace
The Files tab gives you four things: a snapshot history of the agent's workspace, content diffs so you can see what changed between snapshots, a file browser for the agent's container, and a git URL so you can clone the workspace locally and edit it like any other repo.
## Workspace Snapshots
Every minute or so, when the workspace has changed, Pinata captures a snapshot. Each snapshot is the entire workspace pinned to IPFS as a single CID — your full file tree at that point in time, immutable.
The summary card at the top shows:
* **Status** — `Live`, plus how long ago the workspace last synced
* **Lifecycle Scripts** — whether `build` and `start` are configured (and their run state if they are)
* **Scheduled Tasks** — whether any tasks are set up
* **Files** — total file count and the current snapshot CID
Below the summary is the snapshot list — newest at the top, labeled `LATEST`, `V9`, `V8`, and so on. Click any version to expand its **Content Diff** — a file-by-file view of what changed since the previous snapshot, rendered as either a unified or side-by-side diff.
Common file you'll see diffs for: `manifest.json`. See the [manifest reference](/agents/manifest) for what every field means.
## Restore an older snapshot
If a recent change broke something, you can roll back.
1. Find the snapshot you want in the list
2. Open it
3. **Restore**
Under the hood this runs a `git --hard` reset to the commit associated with that snapshot. The current workspace is replaced — anything that hadn't been captured into a snapshot yet is lost.
Restore is destructive. Snapshot the current state first if you might want to come back to it.
## Force a snapshot now
Snapshots run on their own, but you can trigger one immediately:
```bash theme={null}
curl -X POST \
-H "Authorization: Bearer $PINATA_JWT" \
https://agents.pinata.cloud/v0/agents/$AGENT_ID/snapshots/sync
```
The same endpoint with `GET` returns sync status — whether storage is configured, when it last synced, and a human-readable message.
## Workspace Files — browse the container
Below the snapshot list, the **Workspace Files** panel is a live file browser for the agent's pod filesystem — not just the workspace, the whole container.
* **Navigate** — click a folder to enter it, use the breadcrumb or **← Up** to go back, **Workspace** to jump straight to the workspace root, **Refresh** to re-read the current directory
* **View a file** — click it. Text and markdown files preview inline with size and MIME type; binary files offer a **Download** instead
* **Upload** — drop files onto the listing or click **Upload** to put files into the current directory
Handy for checking what an agent actually wrote, reading logs in place (e.g. `/home/hermes/data/logs/` on a Hermes agent), or dropping in a config file without opening the [Console](/agents/console).
## Editing the workspace locally
The workspace is a git repo, served by Pinata. Clone, edit in your IDE, commit, push.
```bash theme={null}
git clone https://agents.pinata.cloud/v0/agents/{agentId}/git my-agent
```
Click **Copy with Token** in the Files tab and you get a URL with the gateway token already baked in as HTTP Basic auth — no credential setup, just clone and go.
### Pushing changes
```bash theme={null}
# edit files in workspace/ or skills/
git add -A
git commit -m "tweak the workspace"
git push
```
When you push, the server commits any pending agent-side changes first, then applies your push on top. That means your push automatically picks up anything the agent has been writing.
After a push, the agent's `build` script (if you've set one) runs automatically. Check the **Lifecycle Scripts** row to watch its status. Details: [Manifest → Scripts](/agents/manifest#scripts).
### Pulling agent-side changes
Your agent writes to the same workspace as it works. To sync that locally:
```bash theme={null}
git pull
```
### Persistent credentials
Copying the tokened URL every time gets old. Expand **Setup Persistent Credentials** in the Files tab and follow the instructions — git stores the credentials, future operations authenticate automatically.
## Reading or uploading files programmatically
Two endpoints, both on the agent's subdomain:
* `GET /v0/agents/{agentId}/files?path=` — read any file inside the container
* `POST /v0/agents/{agentId}/files/upload` — upload a base64-encoded file into `/uploads/`
Both require auth (Pinata JWT or gateway token). See [API → Files](/agents/api#files).
# Tasks
Source: https://docs.pinata.cloud/agents/tasks
Run prompts on a schedule
Tasks are scheduled prompts. The agent runs them automatically — every Monday morning, every six hours, once next Tuesday at 2pm, whatever you set. Use them for daily check-ins, periodic reports, automation triggered by time rather than by a message.
## Create a task
Open your agent → **Tasks** → **+ ADD**.
The dialog asks for:
1. **Name** — anything readable, e.g. `daily-check-in`
2. **Schedule** — when it runs
3. **Prompt or system event** — what gets delivered to the agent
4. **Delivery (optional)** — where the response goes if you want it to leave the agent
That's it. Save and the task starts running on the schedule.
## Schedule types
You have three choices for `schedule.kind`:
* **Cron** — standard cron expression. Most flexible.
```text theme={null}
0 9 * * * # Every day at 9am
0 */6 * * * # Every six hours
0 9 * * 1-5 # Weekdays at 9am
```
* **Every** — run every N milliseconds. Set `staggerMs` if you want to randomize the start offset so multiple tasks don't fire at the same instant.
* **At** — run once at a specific ISO timestamp.
You can set a timezone (`tz`) so cron respects DST and local time. Minimum interval across all kinds is 1 minute — anything tighter is rejected.
## What gets delivered
Two payload kinds:
* **`agentTurn`** (default) — your task fires a chat message. The agent treats it like a regular conversation turn. You can pin a specific `model`, toggle reasoning on or off via `thinking`, and set a `timeoutSeconds`.
Good prompts to schedule:
> "Check my portfolio and summarize anything that moved more than 5% today."
>
> "Generate the weekly status report from the work log."
* **`systemEvent`** — fires a system event instead. The agent sees it as a non-conversational trigger. Useful for heartbeats, periodic maintenance, or anything you don't want polluting the chat history.
## Where the response goes
By default, the response lands back in the agent's main conversation. If you want it to go somewhere else:
* **Announce to a channel** — send the response to Telegram, Slack, or Discord. Set `delivery.mode` to `announce`, plus a channel and recipient. Good for alerts or daily standups.
```json theme={null}
"delivery": { "mode": "announce", "channel": "telegram", "to": "123456789" }
```
* **Webhook** — POST it to a URL. Good for hooking into other services.
```json theme={null}
"delivery": { "mode": "webhook", "to": "https://example.com/hook" }
```
Set `bestEffort: true` in delivery if you'd rather swallow a delivery failure than mark the whole run as failed.
## Sessions: main vs isolated
A task can run in the agent's main conversation (so its output is part of the running chat history) or in an isolated session of its own. Pick one with `sessionTarget`:
* `main` — output joins the live conversation
* `isolated` — one-off session that doesn't touch the main thread. Good for batch jobs and webhook-style work.
## Wake mode
`wakeMode` controls timing:
* `now` (default) — fire the task at the scheduled time, even if the agent is busy
* `next-heartbeat` — wait for the next heartbeat tick. Useful for low-priority background work.
## Managing tasks
Each task in the list has:
* **Run now** — fire it immediately, doesn't affect the schedule
* **Enable / disable** — pause without deleting
* **Edit** — change schedule, prompt, or delivery
* **Delete** — remove it
* **Runs** — open the run history
Run history shows what fired and when, and whether each run succeeded.
## From the CLI
```bash theme={null}
pinata agents tasks list
pinata agents tasks create
pinata agents tasks run
pinata agents tasks delete
```
## Limits and gotchas
* **20 tasks** per agent
* Minimum interval **1 minute**
* A task that runs longer than `timeoutSeconds` (or 5 minutes if unset) is cancelled and marked failed
* Tasks survive agent restarts. Schedules that would have fired during downtime are skipped, not queued.
# Creating Templates
Source: https://docs.pinata.cloud/agents/templates/creating
Share your agent configuration as a template
Templates let you package an agent configuration for reuse or sharing. This guide walks through the workflow: clone the starter, customize files, deploy from your template to test, and (optionally) submit it to the marketplace.
For the full `manifest.json` field reference, see the [manifest reference](/agents/manifest).
Clone this starter repo to create your own template.
## Clone the Starter
Fork or clone the [reference template](https://github.com/PinataCloud/agent-template) to get started:
```bash theme={null}
git clone https://github.com/PinataCloud/agent-template my-template
cd my-template
```
Your repository should have this structure:
```text theme={null}
manifest.json # Agent config - see /agents/manifest
README.md # Description shown in marketplace listing
workspace/
BOOTSTRAP.md # First-run conversation guide (self-deletes after setup)
SOUL.md # Agent personality and principles
AGENTS.md # Workspace conventions, memory system, safety rules
IDENTITY.md # Agent name, vibe, emoji (filled in during bootstrap)
USER.md # Notes about the human (learned over time)
TOOLS.md # Environment-specific notes
HEARTBEAT.md # Periodic tasks (empty by default)
```
## Configure `manifest.json`
The manifest defines your agent's identity, required secrets, skills, scripts, routes, channels, tasks, and marketplace metadata. The starter ships with a `_docs` block documenting every field inline.
| Section | What it does |
| ---------- | -------------------------------------------------------------------------------------- |
| `agent` | Name, description, vibe, emoji |
| `model` | Default AI model |
| `secrets` | Encrypted API keys and credentials |
| `skills` | Attachable skill packages — objects with `clawhub_slug` or `cid` and a `name` (max 10) |
| `tasks` | Cron-scheduled prompts (max 20) |
| `scripts` | Lifecycle hooks - `build` runs after deploy/push, `start` runs on agent boot |
| `routes` | Port forwarding for web apps/APIs (max 10) |
| `channels` | Telegram, Discord, Slack configuration |
| `template` | Marketplace listing metadata |
See the [manifest reference](/agents/manifest) for every field's type, defaults, and limits.
Remove the `_docs` block before submitting to the marketplace.
### Skills
Skills are objects with a `name` and either a `clawhub_slug` or a `cid`. Use `clawhub_slug` for marketplace skills — they'll automatically resolve to the latest published version when someone deploys your template. Use `cid` to pin a specific uploaded skill by its IPFS CID for byte-stable behavior.
```json theme={null}
// ClawHub marketplace skill
{
"clawhub_slug": "@pinata/api",
"name": "Pinata API"
}
// Uploaded skill pinned by CID
{
"cid": "bafkreiexample...",
"name": "My Custom Skill"
}
```
### Example
A complete manifest that includes secrets, skills, lifecycle scripts, a web route, and a daily scheduled task:
```json theme={null}
{
"$schema": "https://agents.pinata.cloud/schemas/manifest.v1.json",
"version": 1,
"engine": "openclaw",
"agent": {
"name": "Useful Assistant",
"description": "Personal AI helper with file reading, web search, and memory management",
"emoji": "🧠",
"vibe": "Resourceful and opinionated"
},
"template": {
"slug": "useful-assistant",
"category": "general",
"partnerName": "Pinata",
"tags": ["assistant", "personal", "productivity"]
},
"secrets": [
{
"name": "EXAMPLE_API_KEY",
"description": "Optional API key for external service",
"required": false
}
],
"scripts": {
"build": "cd workspace/projects/hello-test && npm install --include=dev",
"start": "cd workspace/projects/hello-test && npx vite --host 0.0.0.0"
},
"skills": [
{ "clawhub_slug": "@pinata/api", "name": "Pinata API" }
],
"routes": [
{ "port": 5173, "path": "/app", "protected": false }
],
"tasks": [
{
"name": "daily-check-in",
"schedule": { "kind": "cron", "expr": "0 9 * * *" },
"payload": { "kind": "agentTurn", "text": "Good morning! Review my workspace and suggest priorities for today." }
}
]
}
```
## Customize Workspace Files
Files in `workspace/` are copied to the agent's workspace on deploy. Customize these to define your agent's personality and behavior:
| File | Purpose |
| -------------- | ------------------------------------------------------- |
| `BOOTSTRAP.md` | First-run conversation guide (self-deletes after setup) |
| `SOUL.md` | Agent personality and principles - **customize this** |
| `AGENTS.md` | Workspace conventions, memory system, safety rules |
| `IDENTITY.md` | Agent name, vibe, emoji (filled in during bootstrap) |
| `USER.md` | Notes about the human (learned over time) |
| `TOOLS.md` | Environment-specific notes |
| `HEARTBEAT.md` | Periodic tasks (empty by default) |
Focus on `SOUL.md` to give your agent a distinct personality, and `BOOTSTRAP.md` if you want a custom onboarding flow.
## Add Web App Support (Optional)
If your agent runs a server, API, or frontend dev server, add two things to `manifest.json`:
1. **`scripts`** - lifecycle hooks that install deps and start the server
2. **`routes`** - port forwarding rules that expose the server to the internet
Example from a Vite + React agent:
```json theme={null}
{
"scripts": {
"build": "cd workspace/projects/myapp && npm install --include=dev",
"start": "cd workspace/projects/myapp && npx vite --host 0.0.0.0"
},
"routes": [
{ "port": 5173, "path": "/app", "protected": false }
]
}
```
**Important details:**
* **`build`** - Runs once after deploy or git push (e.g. `npm install`, compile). Executes from `/home/node/clawd`. Output logged to `/tmp/user-build.log`. 5 min timeout. If build fails, start does not run.
* **`start`** - Launches a long-running background process after build completes (e.g. a web server). Executes from `/home/node/clawd`. Output logged to `/tmp/user-start.log`. Runs detached so it survives the runner exiting.
* **Retry scripts** - To re-run the build/start lifecycle (e.g. after pushing changes that didn't trigger a build), use the **Retry Scripts** action on the Danger tab or call `POST /v0/agents/{agentId}/scripts/retry`.
* Your server **must bind to `0.0.0.0`**, not `localhost`, or it won't be reachable
* Set `protected: false` for public routes, or `true` to require a gateway token
* Use `__AGENT_HOST__` as a placeholder in config files - replaced at runtime with the agent's public hostname
* For WebSocket/HMR setups (e.g. Vite), connect via WSS on port 443 through `__AGENT_HOST__`
Example Vite config using the host placeholder:
```ts theme={null}
export default defineConfig({
base: "/app",
server: {
host: "0.0.0.0",
allowedHosts: ["__AGENT_HOST__"],
hmr: {
host: "__AGENT_HOST__",
protocol: "wss",
clientPort: 443,
},
},
});
```
## Deploy From Your Template
You can deploy an agent from your template before submitting it to the marketplace. This is the fastest way to iterate.
**Via the UI:**
1. Go to [agents.pinata.cloud/agents](https://agents.pinata.cloud/agents) and click **Create Agent**
2. Select **Start from a Template**
3. Paste your public repository URL (GitHub or GitLab)
4. Complete the setup flow and deploy
**Via the CLI:**
```bash theme={null}
pinata agents create --template https://github.com/you/my-template
```
Push changes to your repo and redeploy to test updates. Once you're happy with your template, you can optionally submit it to the marketplace.
## Submit to Marketplace (Optional)
Share your template with the community by submitting it for review.
**Via the UI:**
1. Go to [My Templates](https://agents.pinata.cloud/templates) → **+ New Template**
2. Enter your public repository URL
3. Click **Validate** to check for required files
4. Review the parsed manifest and workspace files
5. Click **Submit** to send for review
**Via the CLI:**
```bash theme={null}
# Validate your repo
pinata agents templates validate https://github.com/user/my-template
# Submit for review
pinata agents templates submit https://github.com/user/my-template
# Submit from a specific branch
pinata agents templates submit https://github.com/user/my-template --branch develop
```
Template status progression:
* **draft** → **pending\_review** → **published** (or **rejected**)
* Published templates can be **archived** (soft-deleted) and resubmitted later
## Managing Submissions
Track and update your templates in [**My Templates**](https://agents.pinata.cloud/templates) or via CLI:
```bash theme={null}
# List your submissions
pinata agents templates mine
# Update (re-pull from repo)
pinata agents templates update
# Archive a submission
pinata agents templates delete
```
## Paid Templates
Templates submitted with a paid tier use x402 micropayments for one-time purchase. Buyers pay before deploy; once paid, the template behaves like any other in their account.
Mark a template as paid in the `template` block of `manifest.json` - see the [manifest reference](/agents/manifest#template) for the full schema.
# Templates
Source: https://docs.pinata.cloud/agents/templates/overview
Deploy pre-configured agents in one click
Templates are currently in beta.
Templates are the fastest path to a working agent. Instead of configuring everything yourself, you pick a template that does what you need — it ships with the right skills, settings, and personality already in place. You add your API keys, and you deploy.
## Where to look
Two places, depending on what you're after:
* [**Marketplace**](https://agents.pinata.cloud/marketplace) — every published template, from Pinata and from other builders. Filter by category, engine, or tags. Featured templates float to the top. Some are paid; those use x402 micropayments and you complete the purchase in flow.
* [**My Templates**](https://agents.pinata.cloud/templates) — templates you've created, submitted, or imported. The **New Template** card at the top-left lets you import one from a public GitHub or GitLab repo.
Click any template card to open its details — description, skills it bundles, secrets it'll ask you for, and any scheduled tasks it sets up.
## Deploying
Once you've found one you like:
1. Click **Deploy This Agent**
2. Name your agent
3. Provide whatever secrets the template asks for (usually just your LLM key)
4. **Deploy**
Provisioning takes about 30 seconds. You'll land on the agent's Chat tab, ready to talk to it.
### A note on secrets
Every template needs at least an LLM provider key (`ANTHROPIC_API_KEY`, `OPENAI_API_KEY`, etc.). Many need more — a Telegram template needs a bot token, a trading template might need exchange credentials.
The template card spells out exactly what it needs. You can add the secrets ahead of time in the [Secrets Vault](/agents/secrets), or wait — the deploy flow prompts you for anything missing.
## Using the CLI
```bash theme={null}
pinata agents templates list # Browse templates
pinata agents create --template # Deploy one
```
## Create Your Own
Built something useful? Package it as a template and share it with others - or just use it to quickly spin up copies of your own agents.
Walk through packaging your agent as a reusable template
Full reference for every field in `manifest.json`
Clone this starter repo - it includes working examples of routes, tasks, lifecycle scripts, and secrets.
# Troubleshooting
Source: https://docs.pinata.cloud/agents/troubleshooting
What to check when your agent isn't behaving
Most problems with an agent fall into a small number of buckets, and the answer is almost always in one of five places. Before you scroll through symptoms, walk these in order — you'll often find it on step one.
1. **Logs** — open the [Logs](/agents/logs) tab, uncheck everything except WARN and ERROR, and scroll up to the most recent red line. That's usually the answer.
2. **Danger tab** — the [Danger](/agents/devtools) tab is the inventory page. Check status, last sync, the lifecycle-script state, and whether your secrets show as `Synced`.
3. **Console** — the [Console](/agents/console) is a shell. `tail /tmp/user-build.log`, `env`, `ps aux` answer about 80% of "why doesn't my service work" questions.
4. **Files** — if something used to work and broke after a recent change, restore an earlier snapshot from the [Files](/agents/snapshots) tab.
5. **Validate config** — `POST /v0/templates/validate` checks `manifest.json`; `POST /v0/agents/{agentId}/config/validate` checks the engine runtime config shown on the Danger tab. These are different files, see [Concepts](/agents/concepts#manifest-json-vs-openclaw-json) for the difference.
If you're staring at an HTTP error code, the [Error reference](/agents/errors) goes status-by-status with the common responses.
The rest of this page is symptom-first. Find what's happening, jump there.
## Agent won't start / stays in `starting`
Symptom: status badge stuck on `starting`, no logs appearing, chat won't connect.
**Check:**
```bash theme={null}
# Are we still spinning up the container?
curl -H "Authorization: Bearer $PINATA_JWT" \
https://agents.pinata.cloud/v0/agents/$AGENT_ID | jq '.processStatus'
# Did the build script blow up?
# Console → tail -n 200 /tmp/user-build.log
```
**Common causes:**
| Cause | Fix |
| ----------------------------------------- | --------------------------------------------------------------------------------------------------------------- |
| `build` script failed | Fix the script, then **Retry Scripts** on the Danger tab (or `POST /v0/agents/{agentId}/scripts/retry`) |
| Missing required secret | The Danger page flags missing secrets. Attach in the [Secrets Vault](/agents/secrets), then restart the gateway |
| Container OOM | A heavy `npm install` or model load can hit the memory ceiling. Slim dependencies or break up the script |
| Engine version pinned to a broken release | Danger → **Change** to update to latest, when the engine exposes version changes |
## Gateway won't connect / chat is offline
Symptom: chat shows "disconnected" or fails to reconnect.
**Check:** the agent is `running` on the Danger tab, then look at Logs filtered to `gateway/ws`.
**Common causes:**
| Cause | Fix |
| ------------------------------------------------------------- | -------------------------------------------------------------------------- |
| Gateway crashed | Danger → **Restart Gateway** |
| Gateway token rotated and your client cached the old one | Copy the latest token from Danger, update your client |
| Network/route returning 502 | Hard-refresh the page; if it persists, restart the gateway |
| Browser blocked third-party cookies for `agents.pinata.cloud` | Pass the token via header or query string instead of relying on the cookie |
## Build script failed
Symptom: Danger → **Lifecycle Scripts** shows `build` failed; `start` never ran.
**Read the log:**
```bash theme={null}
# Console
tail -n 200 /tmp/user-build.log
```
**Common causes:**
* Wrong working directory - `build` runs from `/home/node/clawd`, not the workspace
* Missing tooling (`pnpm`, `yarn`) - install in the build script first, or use a tool that ships with the image (`npm`)
* `package.json` not found - `cd` into the right project subfolder
* 5-minute timeout - split the work or pre-install in a snapshot
Fix the script, then `POST /v0/agents/{agentId}/scripts/retry` (or click **Retry Scripts**).
## Start script crashes immediately
Symptom: `start` finishes seconds after launching - service is unreachable.
```bash theme={null}
tail -n 200 /tmp/user-start.log
ss -tlnp
```
**Common causes:**
| Cause | Fix | |
| ---------------------------------------------------- | -------------------------------------------------------------------------------------- | -------------- |
| Bound to `127.0.0.1` / `localhost` | Bind to `0.0.0.0` so the gateway can reach it | |
| Port mismatch with `routes` entry | Make sure `manifest.json` `routes[i].port` matches what the server actually listens on | |
| Missing env var | `start` runs after `build` with the agent's full env - confirm with \`env | grep MY\_VAR\` |
| Process exits because it expected an interactive TTY | Add `--no-color`/`--no-progress` flags, or daemonize properly | |
## Routes not working / 404 / 502
Symptom: the URL for your path route or custom domain doesn't load.
**Walk through:**
```bash theme={null}
# Is your service even listening?
ss -tlnp
# Hit it from inside the container
curl -i http://localhost:5173/
# Does the route show up in the API?
curl -H "Authorization: Bearer $PINATA_JWT" \
https://agents.pinata.cloud/v0/agents/$AGENT_ID/port-forwarding
```
**Common causes:**
| Cause | Fix |
| --------------------------------------- | ------------------------------------------------------------------------------------------------------------------------------------------------- |
| Service bound to `localhost` | Bind to `0.0.0.0` |
| Wrong port | Match the listener's port in the route definition |
| Path prefix mismatch | The prefix is stripped before reaching your service - `/app/foo` becomes `/foo`. Set your framework `base` accordingly (e.g. Vite `base: "/app"`) |
| Allowed-hosts not configured | Vite/Next dev servers reject unknown hosts - add `__AGENT_HOST__` to the allow-list |
| Custom domain stuck `pending_ownership` | TXT record not visible yet. Wait for DNS propagation or `dig TXT _pinata-verify.` |
| Custom domain stuck `pending` | Cloudflare is still provisioning - usually clears in a few minutes |
See [Routes & Domains](/agents/routes) for the full domain status table.
## Secret update didn't apply
Symptom: you updated a secret in the Vault but the agent still uses the old value.
**Check:** Danger → **Secrets** → the per-secret **Synced** indicator. Out of sync means the running gateway hasn't been restarted since the update.
**Fix:** Danger → **Restart Gateway**, or `POST /v0/agents/{agentId}/restart`.
Secrets are injected at process start - they are not hot-reloaded.
## Skill missing / not loading
Symptom: agent doesn't seem to know about a skill you attached.
**Check:**
```bash theme={null}
# Is it actually attached?
curl -H "Authorization: Bearer $PINATA_JWT" \
https://agents.pinata.cloud/v0/agents/$AGENT_ID | jq '.skills'
# Are the files in the workspace?
# Console: ls workspace/skills/
```
**Common causes:**
| Cause | Fix |
| -------------------------------------------------------------- | ----------------------------------------------------------------------------------------------------------- |
| Skill attached but agent not restarted | Restart the gateway |
| Required env var declared in `.env.example` is missing | The Skills tab flags missing vars when you open the skill. Add the value to the Secrets Vault and attach it |
| Skill version is out of date | Skills tab → click the skill → **Update** |
| Skill installed from CID, not slug, and a newer version exists | Switch to the slug to track latest, or pin to a newer CID |
## Custom domain stuck pending
See [Routes → Custom domains](/agents/routes#custom-domains) - statuses are `pending_ownership` (TXT record), `pending` (Cloudflare provisioning), then `active`.
```bash theme={null}
# Confirm DNS
dig TXT _pinata-verify.app.example.com +short
# Re-trigger verification
curl -X POST \
-H "Authorization: Bearer $PINATA_JWT" \
https://agents.pinata.cloud/v0/agents/$AGENT_ID/domains/$DOMAIN_ID/verify
```
## Device pairing rejects / stuck pending
Symptom: a paired client (CLI, mobile) can't connect, or stays pending forever.
```bash theme={null}
curl -H "Authorization: Bearer $PINATA_JWT" \
https://agents.pinata.cloud/v0/agents/$AGENT_ID/devices
```
**Common causes:**
* The device never sent an approval request - re-pair from the client
* You're on a different workspace than the one you approved from - check **Account → Workspaces**
* The agent is `not_running` - pairing requires the gateway to be up
**Fix:** approve the request from the Danger page or `POST /v0/agents/{agentId}/devices/approve-all`.
## Git push rejected
Symptom: `git push` to your agent's workspace fails.
**Common causes:**
| Cause | Fix |
| ----------------------------- | ---------------------------------------------------------------------------------------------------- |
| Authentication failed | Copy a fresh URL with **Copy with Token** from the Files tab |
| Local branch diverged | `git pull --rebase` first - the server commits the agent's pending changes before applying your push |
| Pre-receive validation failed | Look at the rejected output - often a manifest validation error. Validate locally before pushing |
## Tasks aren't firing
Symptom: a scheduled task isn't running.
**Check:**
* Is the task enabled? `GET /v0/agents/{agentId}/tasks` with `includeDisabled=true`
* Is the agent running? Tasks fire only while the gateway is up; missed runs during downtime are skipped
* Check `cron/runner` lines in Logs around the expected time
* Trigger manually: `POST /v0/agents/{agentId}/tasks/{jobId}/run` - if that works, the schedule is wrong
## Costs / model usage looks off
Switch the agent's model dropdown in chat to see what model is actually being used, or run `/status`. Tasks can specify their own `model` - re-check `payload.model` if a scheduled run looks unexpected.
## Still stuck?
Open a ticket from **Support → Chat with us** in the sidebar, or email `team@pinata.cloud`. Useful info to include:
* Agent ID (Danger → Agent → Agent ID)
* Engine and version, if shown on the Danger tab
* A recent `EXPORT VISIBLE` from the Logs tab (filter to `ERROR` first)
* The relevant section of `manifest.json` if config-related
* What you expected vs. what happened
For HTTP errors, the [Error reference](/agents/errors) often has the answer faster than a support round-trip.
# Deleting Files
Source: https://docs.pinata.cloud/files/deleting-files
Deleting files from Pinata is simple and easy!
## Deleting Programatically
The SDK has a very simple [delete](/sdk/files/public/delete) method that will allow you to delete an array of files by `id`. Alternatively you can delete a single file with the [API](/api-reference/introduction).
```typescript SDK theme={null}
import { PinataSDK } from "pinata";
const pinata = new PinataSDK({
pinataJwt: process.env.PINATA_JWT!,
pinataGateway: "example-gateway.mypinata.cloud",
});
const unpin = await pinata.files.public.delete([
"3c52f1b8-11b1-40d9-849d-5f05a4bbd76d",
"b72886db-9dd4-434c-a1b2-f9d36781ecee"
])
```
```typescript API {6,9,11} theme={null}
const JWT = "YOUR_PINATA_JWT";
async function delete() {
try {
const fileId = "e0b102e9-d481-4192-ab44-b8f7ff010e9a"
const request = await fetch(
`https://api.pinata.cloud/v3/files/public/${fileId}`,
{
method: "DELETE",
headers: {
Authorization: `Bearer ${JWT}`,
}
});
const response = await request.json();
console.log(response);
} catch (error) {
console.log(error);
}
}
```
### Deleting All Files
If you find yourself in a position where you need to delete most or all of your files you can use the [Auto Paginate](/sdk/files/public/list#auto-paginate) feature on the SDK to fetch all the IDs of your files and delete them in a few lines of code!
```typescript theme={null}
import { PinataSDK } from "pinata";
const pinata = new PinataSDK({
pinataJwt: process.env.PINATA_JWT!,
pinataGateway: "dweb.mypinata.cloud",
});
async function main() {
try {
let files = [];
for await (const item of pinata.files.public.list()) {
files.push(item.id);
}
const res = await pinata.files.public.delete(files);
} catch (error) {
console.log(error);
}
}
main();
```
## Deleting by Web App
If you are trying to delete files, then you can do so by clicking on the on the 3 dots at the end of the row and selecting "Delete"
Additionally, with our Bulk File Actions tool, you can select and manage multiple files at once - up to 100!
# Groups
Source: https://docs.pinata.cloud/files/file-groups
Private Groups allow you to organize your Pinata content through the Pinata App, SDK, or API, giving you a clearer picture of what your files are being used for.
## SDK and API
With the [SDK](/sdk/groups/public), you can create groups, add files to groups, list details about a group, and more! You can also manage groups using the [API](/api-reference/endpoint/create-group).
### Create a Group
To create a group you can use the [create](/sdk/groups/public/create) method and passing in the `name` you want to give a group.
```typescript SDK theme={null}
import { PinataSDK } from "pinata";
const pinata = new PinataSDK({
pinataJwt: process.env.PINATA_JWT!,
pinataGateway: "example-gateway.mypinata.cloud",
});
const group = await pinata.groups.public.create({
name: "My New Group",
});
```
```typescript API theme={null}
const JWT = "YOUR_PINATA_JWT";
async function group() {
try {
const payload = JSON.stringify({
name: "My New Group",
})
const request = await fetch("https://api.pinata.cloud/v3/groups/public", {
method: "POST",
headers: {
"Content-Type": "application/json",
Authorization: `Bearer ${JWT}`,
},
body: payload,
});
const response = await request.json();
console.log(response);
} catch (error) {
console.log(error);
}
}
```
This will return the Group info
```typescript SDK theme={null}
{
id: "01919976-955f-7d06-bd59-72e80743fb95",
name: "Test Private Group",
created_at: "2024-08-28T14:49:31.246596Z"
}
```
```json API theme={null}
{
"data": {
"id": "01919976-955f-7d06-bd59-72e80743fb95",
"name": "Test Private Group",
"created_at": "2024-08-28T14:49:31.246596Z"
}
}
```
### Add or Remove Files from a Group
There are two ways you can add files to a group. The first is to add the file to a group on [upload](/sdk/upload/public/file).
```typescript SDK {3} theme={null}
const upload = await pinata.upload.public
.file(file)
.group("b07da1ff-efa4-49af-bdea-9d95d8881103")
```
```typescript API {13} theme={null}
const JWT = "YOUR_PINATA_JWT";
async function upload() {
try {
const formData = new FormData();
const file = new File(["hello"], "Testing.txt", { type: "text/plain" });
formData.append("file", file);
formData.append("network", "public")
formData.append("group", "b07da1ff-efa4-49af-bdea-9d95d8881103")
const request = await fetch("https://uploads.pinata.cloud/v3/files", {
method: "POST",
headers: {
Authorization: `Bearer ${JWT}`,
},
body: formData,
});
const response = await request.json();
console.log(response);
} catch (error) {
console.log(error);
}
}
```
Another option is to add files after the fact using the [addFiles](/sdk/groups/public/add-files) method.
```typescript SDK theme={null}
const upload = await pinata.groups.public.addFiles({
groupId: "b07da1ff-efa4-49af-bdea-9d95d8881103",
files: [
"0ed5738f-07e7-4587-81fb-f04f8be15d77",
"a277dc29-2ca3-4dfb-aeb9-3f2b23e956f7"
]
})
```
```typescript API {6,8,11} theme={null}
const JWT = "YOUR_PINATA_JWT";
async function group() {
try {
const groupId = "e0b102e9-d481-4192-ab44-b8f7ff010e9a"
const fileId = "521f23f3-2749-4611-b757-3155b40ff570"
const request = await fetch(
`https://api.pinata.cloud/v3/groups/public/${groupId}/ids/${fileId}`,
{
method: "PUT",
headers: {
Authorization: `Bearer ${JWT}`,
}
});
const response = await request.json();
console.log(response);
} catch (error) {
console.log(error);
}
}
```
Removing files can be done the exact same way with the [removeFiles](/sdk/groups/public/remove-files) method.
```typescript SDK theme={null}
const upload = await pinata.groups.public.removeFiles({
groupId: "b07da1ff-efa4-49af-bdea-9d95d8881103",
files: [
"0ed5738f-07e7-4587-81fb-f04f8be15d77",
"a277dc29-2ca3-4dfb-aeb9-3f2b23e956f7"
]
})
```
```typescript API {6,8,11} theme={null}
const JWT = "YOUR_PINATA_JWT";
async function group() {
try {
const groupId = "e0b102e9-d481-4192-ab44-b8f7ff010e9a"
const fileId = "521f23f3-2749-4611-b757-3155b40ff570"
const request = await fetch(
`https://api.pinata.cloud/v3/groups/public/${groupId}/ids/${fileId}`,
{
method: "DELETE",
headers: {
Authorization: `Bearer ${JWT}`,
}
});
const response = await request.json();
console.log(response);
} catch (error) {
console.log(error);
}
}
```
### Get a Group
To fetch details of an already existing group you can use the [get](/sdk/groups/public/get) and pass in the `groupId`.
```typescript SDK theme={null}
const groups = await pinata.groups.public.get({
groupId: "3778c10d-452e-4def-8299-ee6bc548bdb0",
});
```
```typescript API {6,8,11} theme={null}
const JWT = "YOUR_PINATA_JWT";
async function group() {
try {
const groupId = "e0b102e9-d481-4192-ab44-b8f7ff010e9a"
const request = await fetch(
`https://api.pinata.cloud/v3/groups/public/${groupId}`,
{
method: "GET",
headers: {
Authorization: `Bearer ${JWT}`,
}
});
const response = await request.json();
console.log(response);
} catch (error) {
console.log(error);
}
}
```
This will return the same group info received upon creation.
```typescript SDK theme={null}
{
id: "0191997b-ca28-79e8-9dbc-a8044ad3e547",
name: "My New Group 5",
created_at: "2024-08-28T14:55:12.448504Z",
}
```
```json APi theme={null}
{
"data": {
"id": "0191997b-ca28-79e8-9dbc-a8044ad3e547",
"name": "My New Group 5",
"created_at": "2024-08-28T14:55:12.448504Z"
}
}
```
### List All Groups
If you want to get all Groups or filter through them, you can use the [list](/sdk/groups/public/list) method.
```typescript SDK theme={null}
const groups = await pinata.groups.public.list()
```
```typescript API theme={null}
const JWT = "YOUR_PINATA_JWT";
async function group() {
try {
const url = "https://api.pinata.cloud/v3/groups/public"
const request = await fetch(url, {
method: "GET",
headers: {
Authorization: `Bearer ${JWT}`,
}
});
const response = await request.json();
console.log(response);
} catch (error) {
console.log(error);
}
}
```
Results can be filtered with the following queries.
#### name
* Type: `boolean`
Filters groups based on the group name
```typescript SDK theme={null}
const groups = await pinata.groups.public
.list()
.name("SDK")
```
```typescript API theme={null}
const url = "https://api.pinata.cloud/v3/groups/public?name=SDK"
```
#### limit
* Type: `number`
Limits the number of results
```typescript SDK theme={null}
const groups = await pinata.groups.public
.list()
.limit(10)
```
```typescript API theme={null}
const url = "https://api.pinata.cloud/v3/groups/public?limit=10"
```
This will return an array of Groups and their respective info:
```typescript SDK theme={null}
{
groups: [
{
id: "0191997b-ca28-79e8-9dbc-a8044ad3e547",
name: "My New Group 5",
created_at: "2024-08-28T14:55:12.448504Z",
}
],
next_page_token: "MDE5MWIzNGMtMWNmNy03MzExLThmMjYtZmZlZDMzYTVlY"
}
```
```json API theme={null}
{
"groups": [
{
"id": "0191997b-ca28-79e8-9dbc-a8044ad3e547",
"name": "My New Group 5",
"created_at": "2024-08-28T14:55:12.448504Z"
}
],
"next_page_token": "MDE5MWIzNGMtMWNmNy03MzExLThmMjYtZmZlZDMzYTVlY"
}
```
### Updating a Group
You can update the name of a group using either the SDK or the API.
```typescript SDK theme={null}
const groups = await pinata.groups.public.update({
groupId: "3778c10d-452e-4def-8299-ee6bc548bdb0",
name: "My New Group 2",
});
```
```typescript API theme={null}
const JWT = "YOUR_PINATA_JWT";
async function group() {
try {
const groupId = "e0b102e9-d481-4192-ab44-b8f7ff010e9a"
const payload = JSON.stringify({
name: "My New Group 2",
})
const request = await fetch(
`https://api.pinata.cloud/v3/groups/public/${groupId}`,
{
method: "PUT",
headers: {
"Content-Type": "application/json",
Authorization: `Bearer ${JWT}`,
},
body: payload
});
const response = await request.json();
console.log(response);
} catch (error) {
console.log(error);
}
}
```
This will return the updated Group info.
```typescript SDK theme={null}
{
id: "3778c10d-452e-4def-8299-ee6bc548bdb0",
name: "My New Group 2",
created_at: "2024-08-28T20:58:46.96779Z"
}
```
```json API theme={null}
{
"data": {
"id": "01919ac8-a6f5-7e8e-a8a2-6cfe00122b90",
"name": "Updated Name",
"created_at": "2024-08-28T20:58:46.96779Z"
}
}
```
### Delete a Group
Deleting a Group that has CIDs inside of it will not unpin/delete the files. Please use the [delete](/sdk/files/public/delete) method to actually delete a file from your account
To delete a Group you can use the [delete](/sdk/groups/public/delete) method and pass in the `groupId`.
```typescript SDK theme={null}
const groups = await pinata.groups.public.delete({
groupId: "3778c10d-452e-4def-8299-ee6bc548bdb0",
});
```
```typescript API theme={null}
const JWT = "YOUR_PINATA_JWT";
async function group() {
try {
const groupId = "e0b102e9-d481-4192-ab44-b8f7ff010e9a"
const request = await fetch(
`https://api.pinata.cloud/v3/groups/public/${groupId}`,
{
method: "DELETE",
headers: {
Authorization: `Bearer ${JWT}`,
}
});
const response = await request.json();
console.log(response);
} catch (error) {
console.log(error);
}
}
```
If successful the endpoint will return an `OK` response.
# Key-Values
Source: https://docs.pinata.cloud/files/key-values
A unique and powerful feature included with the IPFS API and Private IPFS API is the key-value store. Anytime you upload or update a file you can store up to 10 key-value pairs.
```typescript SDK {3-6} theme={null}
const upload = await pinata.upload.public
.file(file)
.keyvalues({
env: "prod",
userId: "abc123"
})
```
```typescript API {13-18,20} theme={null}
const JWT = "YOUR_PINATA_JWT";
async function upload() {
try {
const formData = new FormData();
const file = new File(["hello"], "Testing.txt", { type: "text/plain" });
formData.append("file", file);
formData.append("network", "public")
const keyvalues = JSON.stringify({
keyvalues: {
env: "prod",
userId: "abc123"
}
})
formData.append("keyvalues", keyvalues)
const request = await fetch("https://uploads.pinata.cloud/v3/files", {
method: "POST",
headers: {
Authorization: `Bearer ${JWT}`,
},
body: formData,
});
const response = await request.json();
console.log(response);
} catch (error) {
console.log(error);
}
}
```
This small yet powerful feature allows you to remove the need for an external database in most cases. We like to call this paradigm **[File-Centric Architecture](https://pinata.cloud/blog/using-file-centric-architecture-to-build-simple-and-capable-apps/)**, where apps and their structure revolves around the files themselves. This creates a molecule like structure and keeps the data related to the file close by.

## Creating
Creating a new key-value for a file can be done in two ways:
### Uploading a File
By including the key-values as part of the upload [method](/sdk/upload/public/file) or [endpoint](/api-reference/endpoint/upload-a-file) and the file and the key-values will be created at the same time.
```typescript SDK {3-8} theme={null}
const upload = await pinata.upload.public
.file(file)
.keyvalues({
env: "prod",
userId: "abc123"
})
```
```typescript API {13-18,20} theme={null}
const JWT = "YOUR_PINATA_JWT";
async function upload() {
try {
const formData = new FormData();
const file = new File(["hello"], "Testing.txt", { type: "text/plain" });
formData.append("file", file);
formData.append("network", "public");
const keyvalues = JSON.stringify({
keyvalues: {
env: "prod",
userId: "abc123"
}
})
formData.append("keyvalues", keyvalues)
const request = await fetch("https://uploads.pinata.cloud/v3/files", {
method: "POST",
headers: {
Authorization: `Bearer ${JWT}`,
},
body: formData,
});
const response = await request.json();
console.log(response);
} catch (error) {
console.log(error);
}
}
```
### Updating an Existing File
If you've already uploaded a file and want to add a key-value you can do so with the update [method](/sdk/files/public/update) or [endpoint](/api-reference/endpoint/update-file).
```typescript SDK {3-7} theme={null}
const update = await pinata.files.public.update({
id: "2b4ee88d-1032-4e4e-a373-97d1ab127f16", // Target File ID
keyvalues: {
env: "prod",
userId: "abc123"
}
})
```
```typescript API {6,8-13,15-21} theme={null}
const JWT = "YOUR_PINATA_JWT";
async function update() {
try {
const fileId = "2b4ee88d-1032-4e4e-a373-97d1ab127f16"
const data = JSON.stringify({
keyvalues: {
env: "prod",
userId: "abc123"
}
})
const request = await fetch(`https://api.pinata.cloud/v3/files/public/${fileId}`, {
method: "PUT",
headers: {
Authorization: `Bearer ${JWT}`,
},
body: data,
});
const response = await request.json();
console.log(response);
} catch (error) {
console.log(error);
}
}
```
## Retrieving
Since key-values exist with files, you can retrieve them by listing files either through the SDK [method](/sdk/files/public/list) or API [endpoint](/api-reference/endpoint/list-files), and filtering results by key-value. The operator will always be `===`.
You can chain multiple key-value queries together and it will only return files that meet both values.
```typescript SDK {3-5} theme={null}
const files = await pinata.files.public
.list()
.keyvalues({
user: "abc123"
})
```
```typescript API {5} theme={null}
const JWT = "YOUR_PINATA_JWT";
async function list() {
try {
const request = await fetch(`https://api.pinata.cloud/v3/files/public?metadata[user]=123`, {
method: "GET",
headers: {
Authorization: `Bearer ${JWT}`,
}
});
const response = await request.json();
console.log(response);
} catch (error) {
console.log(error);
}
}
```
## Updating
The key-value system will automatically detect if you are replacing an existing value for a given key. For example, if you have a key of `env` with a value of `prod`, if you make an update of `env: "dev"` it will replace the old value. If the key does not exist then it will make a new key-value entry.
```typescript SDK {4} theme={null}
const update = await pinata.files.public.update({
id: "2b4ee88d-1032-4e4e-a373-97d1ab127f16", // Target File ID
keyvalues: {
env: "dev", // Previously `prod`
}
})
```
```typescript API {10} theme={null}
const JWT = "YOUR_PINATA_JWT";
async function update() {
try {
const fileId = "2b4ee88d-1032-4e4e-a373-97d1ab127f16"
const data = JSON.stringify({
keyvalues: {
env: "dev", // Previously `prod`
}
})
const request = await fetch(`https://api.pinata.cloud/v3/files/public/${fileId}`, {
method: "PUT",
headers: {
Authorization: `Bearer ${JWT}`,
},
body: data,
});
const response = await request.json();
console.log(response);
} catch (error) {
console.log(error);
}
}
```
## Deleting
You can remove a key-value entry by making the value `null`.
```typescript SDK {4} theme={null}
const update = await pinata.files.public.update({
id: "2b4ee88d-1032-4e4e-a373-97d1ab127f16", // Target File ID
keyvalues: {
env: null, // Deletes the `env` key-value entry
}
})
```
```typescript API {6,8-13,15-21} theme={null}
const JWT = "YOUR_PINATA_JWT";
async function update() {
try {
const fileId = "2b4ee88d-1032-4e4e-a373-97d1ab127f16"
const data = JSON.stringify({
keyvalues: {
env: null, // Deletes the `env` key-value entry
}
})
const request = await fetch(`https://api.pinata.cloud/v3/files/public/${fileId}`, {
method: "PUT",
headers: {
Authorization: `Bearer ${JWT}`,
},
body: data,
});
const response = await request.json();
console.log(response);
} catch (error) {
console.log(error);
}
}
```
## Further Reading
Check out some of our reading material on some of the possibilities of key-values and file-centric architecture!
# List & Query Files
Source: https://docs.pinata.cloud/files/listing-files
Pinata gives you the ability to query uploaded files based on different filters and attributes such as name, [key-values](/files/key-values), date, and more. This is different from retrieving the actual contents of a file, which you can learn more about [here](/gateways/retrieving-files).
## Basic Usage
You can either use the [SDK](/sdk/files/public/list) or the [API](/api-reference/endpoint/list-files) as see in the examples below.
```typescript SDK theme={null}
import { PinataSDK } from "pinata";
const pinata = new PinataSDK({
pinataJwt: process.env.PINATA_JWT!,
pinataGateway: "example-gateway.mypinata.cloud",
});
const files = await pinata.files.public.list()
```
```typescript API theme={null}
const JWT = "YOUR_PINATA_JWT";
async function files() {
try {
const url = "https://api.pinata.cloud/v3/files/public",
const request = await fetch(url, {
method: "GET",
headers: {
Authorization: `Bearer ${JWT}`,
}
});
const response = await request.json();
console.log(response);
} catch (error) {
console.log(error);
}
}
```
This will return an array of file objects
```typescript SDK theme={null}
{
files: [
{
id: "dd5f8888-bf15-4559-b8a2-6c626869507f",
name: "Hello Files API",
cid: "bafybeifq444z4b7yqzcyz4a5gspb2rpyfcdxp3mrfpigmllh52ld5tyzwm",
size: 4861678,
number_of_files: 1,
mime_type: "TODO",
group_id: null,
created_at: "2024-08-27T14:57:51.485934Z",
},
{
id: "e2057aa3-7b6c-4a45-b785-12ba297bcbd0",
name: "Quickstart.png",
cid: "bafkreiebavn2jzkqh3ehy4pkqkdi2otnho6gbcffkeqnunk2lw5nmnwaea",
size: 223548,
number_of_files: 1,
mime_type: "TODO",
group_id: "5f8adce6-7312-46e0-90f7-13896bed297d",
created_at: "2024-08-28T23:46:07.823118Z",
},
{
id: "ac5308a1-de49-40a3-9f5c-d20f1bb6206d",
name: "hello.txt",
cid: "bafkreiffsgtnic7uebaeuaixgph3pmmq2ywglpylzwrswv5so7m23hyuny",
size: 11,
number_of_files: 1,
mime_type: "TODO",
group_id: null,
created_at: "2024-08-29T02:23:02.735018Z",
}
],
next_page_token: "MDE5MWIzNGMtMWNmNy03MzExLThmMjYtZmZlZDMzYTVlY"
}
```
```json API theme={null}
{
"data": {
"files": [
{
"id": "dd5f8888-bf15-4559-b8a2-6c626869507f",
"name": "Hello Files API",
"cid": "bafybeifq444z4b7yqzcyz4a5gspb2rpyfcdxp3mrfpigmllh52ld5tyzwm",
"size": 4861678,
"number_of_files": 1,
"mime_type": "TODO",
"group_id": null,
"created_at": "2024-08-27T14:57:51.485934Z"
},
{
"id": "e2057aa3-7b6c-4a45-b785-12ba297bcbd0",
"name": "Quickstart.png",
"cid": "bafkreiebavn2jzkqh3ehy4pkqkdi2otnho6gbcffkeqnunk2lw5nmnwaea",
"size": 223548,
"number_of_files": 1,
"mime_type": "TODO",
"group_id": "5f8adce6-7312-46e0-90f7-13896bed297d",
"created_at": "2024-08-28T23:46:07.823118Z"
},
{
"id": "ac5308a1-de49-40a3-9f5c-d20f1bb6206d",
"name": "hello.txt",
"cid": "bafkreiffsgtnic7uebaeuaixgph3pmmq2ywglpylzwrswv5so7m23hyuny",
"size": 11,
"number_of_files": 1,
"mime_type": "TODO",
"group_id": null,
"created_at": "2024-08-29T02:23:02.735018Z"
}
],
"next_page_token": "MDE5MWIzNGMtMWNmNy03MzExLThmMjYtZmZlZDMzYTVlY"
}
}
```
## Filters
When listing files there a few ways you can filter the results
### name
* Type: `string`
Filter results based on name
```typescript SDK {3} theme={null}
const files = await pinata.files.public
.list()
.name("pinnie")
```
```typescript API theme={null}
const url = "https://api.pinata.cloud/v3/files/public?name=pinnie"
```
### group
* Type: `string`
Filter results based on group ID
```typescript SDK {3} theme={null}
const files = await pinata.files.public
.list()
.group("5b56981c-7e5b-4dff-aeca-de784728dddb")
```
```typescript API theme={null}
const url = "https://api.pinata.cloud/v3/files/public?group=5b56981c-7e5b-4dff-aeca-de784728dddb"
```
### noGroup
* Type: `boolean`
Filter results to only show files that are not part of a group
```typescript SDK {3} theme={null}
const files = await pinata.files.public
.list()
.noGroup(true)
```
```typescript API theme={null}
const url = "https://api.pinata.cloud/v3/files/public?group=null"
```
### cid
* Type: `string`
Filter results based on CID
```typescript SDK{3} theme={null}
const files = await pinata.files.public
.list()
.cid("bafkreih5aznjvttude6c3wbvqeebb6rlx5wkbzyppv7garjiubll2ceym4")
```
```typescript API theme={null}
const url = "https://api.pinata.cloud/v3/files/public?cid=bafkreih5aznjvttude6c3wbvqeebb6rlx5wkbzyppv7garjiubll2ceym4"
```
### mimeType
* Type: `string`
Filter results based on mime type
```typescript SDK {3} theme={null}
const files = await pinata.files.public
.list()
.mimeType("image/png")
```
```typescript API theme={null}
const url = "https://api.pinata.cloud/v3/files/public?mimeType=image/png"
```
### keyvalues
* Type: `Record`
Filter results based on keyvalue pairs in metadata
```typescript SDK {3} theme={null}
const files = await pinata.files.public
.list()
.keyvalues({
env: "prod"
})
```
```typescript API theme={null}
const url = "https://api.pinata.cloud/v3/files/public?keyvalues[env]=prod"
```
### order
* Type: `"ASC" | "DESC"`
Order results either ascending or descending by created date
```typescript SDK {3} theme={null}
const files = await pinata.files
.list()
.order("ASC")
```
```typescript API theme={null}
const url = "https://api.pinata.cloud/v3/files?order=ASC"
```
### limit
* Type: `number`
Limit the number of results
```typescript SDK {3} theme={null}
const files = await pinata.files
.list()
.limit(10)
```
```typescript API theme={null}
const url = "https://api.pinata.cloud/v3/files?limit=10"
```
### cidPending
* Type: `boolean`
Filters results and only returns files where `cid` is still `pending`
```typescript SDK {3} theme={null}
const files = await pinata.files
.list()
.cidPending(true)
```
```typescript API theme={null}
const url = "https://api.pinata.cloud/v3/files?cidPending=true"
```
## Auto Paginate (SDK)
The `list` method has an auto pagination feature that is triggered when used inside a `for await` iterator
```typescript theme={null}
for await (const item of pinata.files.list() {
console.log(item.id);
}
```
Works like magic ✨
# MPP Server
Source: https://docs.pinata.cloud/files/mpp/overview
Account-free IPFS uploads and downloads using crypto payments via the Machine Payments Protocol
Pinata's MPP Server enables account-free file uploads and downloads to IPFS using crypto payments. No API key or Pinata account required — just pay with USDC on Tempo and get your files stored on IPFS.
## Overview
The MPP Server is a payment-gated IPFS gateway built on the [Machine Payments Protocol (MPP)](https://docs.tempo.xyz). It uses the HTTP 402 challenge-response pattern:
1. Client makes a request to upload or download a file
2. Server responds with `402 Payment Required` and a payment challenge
3. Client pays USDC on the Tempo network
4. Client retries the request with proof of payment
5. Server verifies payment and fulfills the request
This is ideal for **machine-to-machine** workflows where agents, bots, or services need to store and retrieve files without managing API keys.
## Endpoints
| Method | Endpoint | Description |
| ------ | --------------------------------- | ----------------------- |
| `POST` | `/v1/pin/public?fileSize={bytes}` | Get a signed upload URL |
| `GET` | `/v1/pin/public/:cid` | Download a file by CID |
### Upload
Send a `POST` request with the `fileSize` query parameter (in bytes). After payment, the server returns a signed Pinata upload URL that you can use to upload your file directly.
**Pricing:** `fileSize (GB) x $0.10 x 12 months`, minimum \$0.01 USDC
| File Size | Cost |
| --------- | ---------------- |
| 1 KB | \$0.01 (minimum) |
| 1 MB | \$0.01 (minimum) |
| 1 GB | \$1.20 |
| 10 GB | \$12.00 |
The signed URL is valid for **120 seconds** after generation.
### Download
Send a `GET` request with the file's CID. After payment, the server proxies the file from Pinata's IPFS gateway with the correct `Content-Type` and `Content-Disposition` headers.
**Pricing:** Flat \$0.01 USDC per download
## Network
| Property | Value |
| -------- | --------------------------------------------------- |
| Chain | Tempo Mainnet |
| Chain ID | 4217 |
| RPC | `https://rpc.tempo.xyz` |
| Token | USDC (`0x20C000000000000000000000b9537d11c60E8b50`) |
## Production URL
The Pinata-hosted MPP Server is available at:
```
https://mpp.pinata.cloud
```
## Next Steps
Upload your first file with MPP
Deploy your own MPP Server
# Quick Start
Source: https://docs.pinata.cloud/files/mpp/quickstart
Upload and download files from IPFS using the MPP Server
Upload your first file to IPFS using MPP payments. No Pinata account required.
## Prerequisites
* A wallet with USDC on the Tempo network (chain ID 4217)
* One of the following:
* [Tempo CLI](https://docs.tempo.xyz) installed
* `mppx` client SDK (`npm install mppx viem`)
## Using the Tempo CLI
The simplest way to interact with the MPP Server.
### Upload a File
```bash theme={null}
# 1. Get a signed upload URL (pay USDC automatically)
RESPONSE=$(tempo request -X POST \
"https://mpp.pinata.cloud/v1/pin/public?fileSize=1024")
# 2. Extract the signed URL
URL=$(echo $RESPONSE | jq -r '.url')
# 3. Upload your file to the signed URL
curl -X POST "$URL" \
-F "file=@your-file.txt"
```
### Download a File
```bash theme={null}
# Download a file by CID (pay USDC automatically)
tempo request -X GET \
"https://mpp.pinata.cloud/v1/pin/public/QmYourCid" \
-o your-file.txt
```
## Using the mppx SDK
For programmatic access in TypeScript/JavaScript applications.
### Install Dependencies
```bash theme={null}
npm install mppx viem
```
### Upload a File
```typescript theme={null}
import { Mppx, tempo } from "mppx/client";
import { privateKeyToAccount } from "viem/accounts";
const account = privateKeyToAccount("0xYOUR_PRIVATE_KEY");
const mppx = Mppx.create({ methods: [tempo({ account })] });
// 1. Get a signed upload URL (handles 402 payment automatically)
const response = await mppx.fetch(
"https://mpp.pinata.cloud/v1/pin/public?fileSize=1024",
{ method: "POST" }
);
const { url } = await response.json();
// 2. Upload your file to the signed URL
const file = new File(["hello world"], "hello.txt", { type: "text/plain" });
const formData = new FormData();
formData.append("file", file);
await fetch(url, {
method: "POST",
body: formData,
});
```
### Download a File
```typescript theme={null}
import { Mppx, tempo } from "mppx/client";
import { privateKeyToAccount } from "viem/accounts";
const account = privateKeyToAccount("0xYOUR_PRIVATE_KEY");
const mppx = Mppx.create({ methods: [tempo({ account })] });
// Download a file by CID (handles 402 payment automatically)
const response = await mppx.fetch(
"https://mpp.pinata.cloud/v1/pin/public/QmYourCid"
);
const content = await response.blob();
```
## How the Payment Flow Works
When using the `mppx` SDK or Tempo CLI, the 402 payment flow is handled automatically. Here's what happens under the hood:
```
Client MPP Server Tempo Network
| | |
| POST /v1/pin/public | |
|------------------------------->| |
| | |
| 402 + Payment Challenge | |
|<-------------------------------| |
| | |
| Pay USDC | |
|-------------------------------------------------------------->|
| | |
| POST /v1/pin/public | |
| + Authorization (payment proof) |
|------------------------------->| |
| | Verify payment |
| |----------------------------->|
| | |
| 200 + { url: "signed_url" } | |
|<-------------------------------| |
```
## Error Handling
| Status | Meaning |
| ------ | ------------------------------------------------------------------ |
| `400` | Missing or invalid `fileSize` query parameter |
| `402` | Payment required — include payment proof in `Authorization` header |
| `404` | File not found on IPFS (download only) |
## Next Steps
* [Self-Hosting](/files/mpp/self-hosting) — Deploy your own MPP Server instance
* [x402 Monetization](/files/x402/intro) — Monetize private IPFS content with x402
# Self-Hosting
Source: https://docs.pinata.cloud/files/mpp/self-hosting
Deploy your own MPP Server on Cloudflare Workers
The MPP Server is open source and designed to run on Cloudflare Workers. Deploy your own instance to customize pricing, integrate with your own Pinata account, and control the payment flow.
## Prerequisites
* [Node.js](https://nodejs.org/) installed
* [Wrangler CLI](https://developers.cloudflare.com/workers/wrangler/) installed
* Cloudflare account
* Pinata account with API key
* Stripe account with crypto payments enabled
## Setup
### 1. Clone the Repository
```bash theme={null}
git clone git@github.com:PinataCloud/mpp-server.git
cd mpp-server
npm install
```
### 2. Configure Environment Variables
Copy the example environment file and fill in your values:
```bash theme={null}
cp .dev.vars.example .dev.vars
```
| Variable | Description |
| ---------------------- | --------------------------------------------------------------------------------------------- |
| `PINATA_JWT` | Your Pinata API JWT from the [Pinata dashboard](https://app.pinata.cloud/developers/api-keys) |
| `PINATA_GATEWAY_TOKEN` | Gateway authentication token |
| `PINATA_GATEWAY_URL` | Your Pinata gateway domain (e.g., `your-gateway.mypinata.cloud`) |
| `MPP_SECRET_KEY` | 32-byte hex key for signing 402 challenges |
| `STRIPE_SECRET_KEY` | Stripe API key with crypto payments preview access |
Generate an MPP secret key:
```bash theme={null}
node -e "console.log(require('crypto').randomBytes(32).toString('hex'))"
```
### 3. Local Development
```bash theme={null}
npm run dev
```
The server starts at `http://localhost:8787`.
### 4. Deploy
```bash theme={null}
# Deploy to production
npm run deploy
# Or deploy to a specific environment
npm run deploy:dev
npm run deploy:prod
```
Set your secrets in Cloudflare (alternative to `.dev.vars` for deployed environments):
```bash theme={null}
npx wrangler secret put PINATA_JWT
npx wrangler secret put PINATA_GATEWAY_TOKEN
npx wrangler secret put MPP_SECRET_KEY
npx wrangler secret put STRIPE_SECRET_KEY
```
## Architecture
The MPP Server is built with:
| Component | Technology |
| ------------------- | ---------------------------------------------- |
| Runtime | Cloudflare Workers |
| Framework | [Hono](https://hono.dev/) |
| Payments | [mppx](https://www.npmjs.com/package/mppx) SDK |
| Storage | [Pinata](https://pinata.cloud) IPFS |
| Blockchain | Tempo Mainnet (USDC) |
| Recipient Addresses | Stripe PaymentIntents API |
### Request Flow
1. **CORS middleware** handles cross-origin requests
2. **MPP middleware** intercepts `/v1/pin/*` routes, calculates pricing, and manages the 402 challenge-response flow
3. **Route handlers** create signed Pinata upload URLs or proxy file downloads
4. **Stripe** generates unique deposit addresses for each payment
### Pricing Logic
Upload pricing is calculated per request based on file size:
```
price = fileSize (GB) x $0.10 x 12 months
minimum = $0.01 USDC
```
Download pricing is a flat rate:
```
price = $0.01 USDC per download
```
You can customize these values in `src/index.ts`.
## Project Structure
```
mpp-server/
├── src/
│ ├── index.ts # App entry, middleware, pricing logic
│ ├── main.ts # Landing page HTML
│ ├── routes/
│ │ └── pin.ts # Upload and download handlers
│ └── utils/
│ └── types.ts # TypeScript types, helper functions
├── wrangler.jsonc # Cloudflare Workers configuration
├── .dev.vars.example # Environment variable template
└── package.json
```
## Resources
* [MPP Server Repository](https://github.com/PinataCloud/mpp-server)
* [Tempo Documentation](https://docs.tempo.xyz)
* [mppx SDK](https://www.npmjs.com/package/mppx)
* [Cloudflare Workers Docs](https://developers.cloudflare.com/workers/)
# Collections
Source: https://docs.pinata.cloud/files/nft-backup/collections
View your NFT collections and their IPFS CIDs
After syncing a wallet, view your NFT collections and their CIDs.
## Viewing Collections
Each collection shows:
| Field | Description |
| ---------- | --------------- |
| Name | Collection name |
| Chain | Blockchain |
| NFTs Owned | Your NFT count |
| CIDs | IPFS CIDs found |
## Collection Details
Click a collection to see:
* Collection metadata (image, description)
* List of CIDs with backup status
### CID Information
| Field | Description |
| --------- | ------------------------------ |
| CID | IPFS content identifier |
| Source | `metadata` or `image` |
| Backed Up | Whether pinned to your account |
## Filtering
Filter collections by chain using the dropdown.
## Related
* [Wallets](/files/nft-backup/wallets) - Add and sync wallets
* [Sync](/files/nft-backup/sync) - Sync CIDs
# Overview
Source: https://docs.pinata.cloud/files/nft-backup/overview
Backup your NFT collections to Pinata
Pin all IPFS content from your NFT collections to your Pinata account.
## Two Ways to Backup
Sync your wallet on-demand and choose which CIDs to backup. Best for one-time backups or when you want full control over what gets pinned.
Enable auto-backup to automatically pin new CIDs whenever you sync. Set it and forget it—your NFTs stay protected.
## How It Works
1. **Connect** - Add your wallet address
2. **Sync** - Pinata scans your wallet across supported chains and extracts IPFS CIDs
3. **Backup** - Pin CIDs to your Pinata account (manually or automatically)
Own multiple NFTs from the same collection? Shared assets are only pinned once, so you won't pay for duplicates.
## Supported Chains
| | | |
| --------- | -------- | --------- |
| Ethereum | Base | Polygon |
| Flow | Zora | Arbitrum |
| Monad | Optimism | Avalanche |
| Blast | Sei | B3 |
| Berachain | ApeChain | Ronin |
| Abstract | Shape | Unichain |
| Gunzilla | HyperEVM | Somnia |
## Next Steps
Add and sync wallets
View your collections
Sync CIDs
# Sync
Source: https://docs.pinata.cloud/files/nft-backup/sync
Pin your NFT CIDs to Pinata
After syncing a wallet, backup the IPFS CIDs to your Pinata account. Own multiple NFTs from the same collection? Shared assets are only pinned once, so you won't pay for duplicates.
## Backup All
To backup all CIDs for a wallet:
1. Go to [NFT Backup](https://app.pinata.cloud/nft-backup/wallets)
2. Select a wallet
3. Click **Backup All**
Pinata pins all CIDs in the background. This can take a few minutes.
## Auto-Backup
Enable auto-backup to automatically pin new CIDs when you sync:
1. Select a wallet
2. Toggle **Auto-Backup** on
## Related
* [Wallets](/files/nft-backup/wallets) - Add and sync wallets
* [Collections](/files/nft-backup/collections) - View collections
# Wallets
Source: https://docs.pinata.cloud/files/nft-backup/wallets
Add wallets to backup your NFT collections
Add your wallet address to Pinata, then sync to fetch your NFT collections.
## Adding a Wallet
1. Go to [NFT Backup](https://app.pinata.cloud/nft-backup/wallets)
2. Click **Add Wallet**
3. Enter your wallet address
4. Click **Register**
## Syncing a Wallet
After adding a wallet, sync it to fetch your NFT collections:
1. Select a wallet
2. Click **Sync**
Syncing scans your wallet across supported chains and extracts any IPFS CIDs from the metadata and images. This can take a few minutes depending on how many NFTs you have.
## Managing Wallets
From the wallets page you can:
* View sync status and CID counts
* Enable auto-backup
## Related
* [Collections](/files/nft-backup/collections) - View synced collections
* [Sync](/files/nft-backup/sync) - Sync CIDs
# Presigned URLs
Source: https://docs.pinata.cloud/files/presigned-urls
There are situations where you may need to upload a file client side instead of server side, but doing so might risk exposing an API key. To solve this you can create a presigned upload URL on the server and then pass it to the client for it to be consumed. Creating signed upload URLs can be done with either the [Files SDK](/sdk/upload/public/create-signed-url) or the [API](/api-reference/endpoint/create-signed-upload-url), and you can designate how long the URL is valid for, how large the file can be, the type of file allowed, or extra metadata like a name and [keyvalues](/files/key-values).
For a more robust example, check out our guides on Hono and React!
## Usage
Setting up a server side API endpoint might look something like this:
```typescript SDK theme={null}
import { type NextRequest, NextResponse } from "next/server";
import { pinata } from "@/utils/config"; // Import the Pinata SDK instance
export const dynamic = "force-dynamic";
export async function GET() {
// Handle your auth here to protect the endpoint
try {
const url = await pinata.upload.public.createSignedURL({
expires: 30, // The only required param
mimeTypes: ["text/*"], // Optional restriction for certain file types
maxFileSize: 5000000 // Optional file size limit
})
return NextResponse.json({ url: url }, { status: 200 }); // Returns the signed upload URL
} catch (error) {
console.log(error);
return NextResponse.json({ text: "Error creating signed URL:" }, { status: 500 });
}
}
```
```typescript API theme={null}
import { type NextRequest, NextResponse } from "next/server";
export const dynamic = "force-dynamic";
export async function GET() {
// Handle your auth here to protect the endpoint
try {
// Prepare payload data for request
const data = JSON.stringify({
network: "public",
expires: 30, // Number of seconds the signed url is good for
filename: "Client file", // Optional name
allow_mime_types: [ "text/*" ], // Optional array of allowed file types
max_file_size: 5000000 // optional max file size
})
// send request and parse response
const urlRequest = await fetch("https://uploads.pinata.cloud/v3/files/sign", {
method: "POST",
headers: {
"Content-Type": "application/json",
Authorization: `Bearer ${process.env.PINATA_JWT}`
},
body: data
})
const urlResponse = await urlRequest.json()
return NextResponse.json({ url: urlResponse.data }, { status: 200 }); // Returns the key data
} catch (error) {
console.log(error);
return NextResponse.json({ text: "Error creating API Key:" }, { status: 500 });
}
}
```
Then back on the client side code, you can upload using the signed URL instead of the regular upload endpoint.
If you're using the SDK you can use the `.url()` parameter on any of the upload methods and pass in the signed upload URL there. If you are using the API you can simply make the upload request using the signed URL as the endpoint.
```typescript SDK {3} theme={null}
const urlRequest = await fetch("/api/url"); // Fetches the temporary upload URL from your server
const urlResponse = await urlRequest.json(); // Parse response
const upload = await pinata.upload.public
.file(file)
.url(urlResponse.url); // Upload the file with the signed URL
```
```typescript API {1-2,13} theme={null}
const urlRequest = await fetch("/api/url"); // Fetches the temporary upload URL
const urlResponse = await urlRequest.json(); // Parse response
async function upload() {
try {
const formData = new FormData();
const file = new File(["hello"], "Testing.txt", { type: "text/plain" });
formData.append("file", file);
formData.append("network", "public")
const request = await fetch(urlResponse.url, {
method: "POST",
body: formData,
});
const response = await request.json();
console.log(response);
} catch (error) {
console.log(error);
}
}
```
## Reference
Below are the availble parameters for presigned URLs
### expires
* Type: `number`
The number of seconds the signed URL should be valid for
```typescript {2} theme={null}
const url = await pinata.upload.public.createSignedURL({
expires: 30,
});
```
### name (Optional)
* Type: `string`
Name for the file to be uploaded
```typescript {3} theme={null}
const url = await pinata.upload.public.createSignedURL({
expires: 30,
name: "My Cool File"
});
```
### mimeTypes (Optional)
* Type: `string[]`
Specify allowed file mime types and prevent uploads from files that do not match. Accepts wildcard mime types as well.
```typescript {3-6} theme={null}
const url = await pinata.upload.public.createSignedURL({
expires: 30,
mimeTypes: [
"image/*",
"application/json"
]
});
```
### maxFileSize (Optional)
* Type: `number`
Restrict upload to a specified file size in `bytes`
```typescript {3} theme={null}
const url = await pinata.upload.public.createSignedURL({
expires: 30,
maxFileSize: 50000 // 50kb
});
```
### groupId (Optional)
* Type: `string`
The target groupId the file would be uploaded to
```typescript {3} theme={null}
const url = await pinata.upload.public.createSignedURL({
expires: 30,
groupId: "ad4bc3bf-8794-49e7-94ff-fea1ce745779"
});
```
### keyvalues (Optional)
* Type: `Record`
Keyvalue pairs for the uploaded file
```typescript {3-5} theme={null}
const url = await pinata.upload.public.createSignedURL({
expires: 30,
keyvalues: {
env: "prod"
}
});
```
### date (Optional)
* Type: `number`
A UNIX timestamp of the date a URL is signed
```typescript {1-2,6} theme={null}
const date = Math.floor(new Date().getTime() / 1000);
//date: 1724943711
const url = await pinata.upload.public.createSignedURL({
expires: 30,
date: date
});
```
# Private IPFS
Source: https://docs.pinata.cloud/files/private-ipfs
Available on Enterprise plans. Contact [sales@pinata.cloud](mailto:sales@pinata.cloud) for more info.
IPFS has traditionally been a fully public network, so anything you pin can be accessed by anyone if they have the CID. While this is a benefit for a majority of blockchain applications, there are still cases where true privacy is needed. This is why Pinata has built Private IPFS, a new service that allows you to keep content private and only share when authorized.
## Private vs Public Network
Everything in the SDK and API have been separated by two networks: `public` and `private`. This means files and groups will be in separate resources and will be accessed by designating the network in either the SDK method or API route.
### Uploading
```typescript SDK theme={null}
// Uploads a file to Public IPFS
const publicUpload = await pinata.upload.public.file(file)
// Uploads a file to Private IPFS
const privateUpload = await pinata.upload.private.file(file)
```
```typescript {11} API theme={null}
const JWT = "PINATA_JWT";
async function uploadFile() {
try {
const text = "Hello World!";
const blob = new Blob([text], { type: "text/plain" });
const file = new File([blob], "hello-world.txt");
const data = new FormData();
data.append("file", file);
// Upload a file to Public IPFS
data.append("network", "public")
const request = await fetch(
"https://uploads.pinata.cloud/v3/files",
{
method: "POST",
headers: {
Authorization: `Bearer ${JWT}`,
},
body: data,
}
);
const response = await request.json();
console.log(response);
} catch (error) {
console.log(error);
}
}
```
### Listing and Querying
```typescript SDK theme={null}
// List public files
const files = await pinata.files.public.list()
// List private files
const files = await pinata.files.private.list()
```
```typescript {6,8} API theme={null}
const JWT = "YOUR_PINATA_JWT";
async function files() {
try {
// Designate network to list either public or private files
const network = "public"
const url = `https://api.pinata.cloud/v3/files/${network}`,
const request = await fetch(url, {
method: "GET",
headers: {
Authorization: `Bearer ${JWT}`,
}
});
const response = await request.json();
console.log(response);
} catch (error) {
console.log(error);
}
}
```
### Groups
```typescript SDK theme={null}
// Create a public group
const group = await pinata.groups.public.create({
name: "My Public Group",
});
// Create a private group
const group = await pinata.groups.private.create({
name: "My Private Group",
});
```
```typescript {5,7} API theme={null}
const JWT = "YOUR_PINATA_JWT";
async function group() {
try {
const network = "public"
const endpoint = `https://api.pinata.cloud/v3/groups/${network}`
const payload = JSON.stringify({
name: "My Public Group",
})
const request = await fetch(endpoint, {
method: "POST",
headers: {
"Content-Type": "application/json",
Authorization: `Bearer ${JWT}`,
},
body: payload,
});
const response = await request.json();
console.log(response);
} catch (error) {
console.log(error);
}
}
```
## Accessing Private Files
With Public IPFS you can simply access a file through an IPFS Gateway with a CID. Since Private IPFS does not announce to the public IPFS network the only way you can access them is with a temporary access link. This can be generated with either the SDK or the API and set to expire after a designated number of seconds.
```typescript SDK theme={null}
const url = await pinata.gateways.private.createAccessLink({
cid: "bafkreib4pqtikzdjlj4zigobmd63lig7u6oxlug24snlr6atjlmlza45dq", // CID of the file to access
expires: 30, // Number of seconds the link is valid for
});
```
```typescript API theme={null}
const JWT = "YOUR_PINATA_JWT";
async function createAccessLink() {
try {
// Endpoint for creating access links
const url = "https://api.pinata.cloud/v3/files/download_link"
// CID of the file you want to access
const cid = "bafkreih5aznjvttude6c3wbvqeebb6rlx5wkbzyppv7garjiubll2ceym4"
// Current Date
const date = Math.floor(new Date().getTime() / 1000);
const data = JSON.stringify({
url: `https://example.mypinata.cloud/files/${cid}`, // Gateway URL for the file using /files/ in the path
expires: 180, // Number of seconds the link will be valid for
date: date, // Current date of request
method: "GET" // GET for accessing file
})
const request = await fetch(url, {
method: "POSt",
headers: {
Authorization: `Bearer ${JWT}`,
"Content-Type": "application/json"
},
body: data
});
const response = await request.json();
return response.data
} catch (error) {
console.log(error);
}
}
```
## Monetizing Private Files
Want to get paid for access to your private content? Check out [x402 Monetization](/files/x402), which allows you to attach payment requirements to private files using USDC on Base.
## Example Apps
Pinata has built several example apps and tutorials you can reference to see how Private IPFS enables token gated experiences in blockchain and crpto contexts.
GitHub repo for [CONCEALMINT](https://concealmint.com), an app for creating and access Private NFTs
By using Private IPFS you can gate acceess to files based on NFT ownership
Sell digital content inside Farcaster frames and keeping it secure through Private IPFS
Add simple yet private logging to your crypto app using Private IPFS
See the possibilities of file management using Groups and Private IPFS
# Signatures
Source: https://docs.pinata.cloud/files/signatures
Learn how to use Pinata to cryptographically sign CIDs
In a post-AI world it will become more and more evident that every piece of content will need a cryptographic signature to verify it's authenticity. Pinata is taking steps in this direction with the [Signatures API](/sdk/signatures/public) and the [Content Addressable Gateway Plugin](/gateways/plugins/content-addressable).
## Signature Standard
Pinata is using the EIP-712 signature standard for signing CIDs with the following domain and types.
```typescript theme={null}
export const domain = {
name: "Sign Content",
version: "1.0.0",
chainId: 1,
} as const;
export const types = {
Sign: [
{ name: "address", type: "address" },
{ name: "cid", type: "string" },
{ name: "date", type: "string" },
],
EIP712Domain: [
{
name: "name",
type: "string",
},
{
name: "version",
type: "string",
},
{
name: "chainId",
type: "uint256",
},
],
};
```
### address
* Type: `address`
The wallet address of the user singing the CID
```
0xCD2a3d9F938E13CD947Ec05AbC7FE734Df8DD826
```
### cid
* Type: `string`
The target CID to be signed
```
bafkreih5aznjvttude6c3wbvqeebb6rlx5wkbzyppv7garjiubll2ceym4
```
### date
* Type: `string`
The date the target CID was first uploaded to Pinata
```
2024-07-29T18:29:47.355Z
```
## Creating a Signature
In order to sign a CID you can use any library that support EIP-712 signing, like the example below with [viem](https://viem.sh/docs/actions/wallet/signTypedData).
```typescript example.ts theme={null}
import { account, walletClient } from './config'
import { domain, types } from './data'
const signature = await walletClient.signTypedData({
account,
domain,
types,
primaryType: 'Sign',
message: {
address: '0xCD2a3d9F938E13CD947Ec05AbC7FE734Df8DD826',
cid: 'bafkreih5aznjvttude6c3wbvqeebb6rlx5wkbzyppv7garjiubll2ceym4',
date: "2024-07-29T18:29:47.355Z"
}
})
```
```typescript data.ts theme={null}
export const domain = {
name: "Sign Content",
version: "1.0.0",
chainId: 1,
} as const;
export const types = {
Sign: [
{ name: "address", type: "address" },
{ name: "cid", type: "string" },
{ name: "date", type: "string" },
],
EIP712Domain: [
{
name: "name",
type: "string",
},
{
name: "version",
type: "string",
},
{
name: "chainId",
type: "uint256",
},
],
};
```
```typescript config.ts theme={null}
import { createWalletClient, custom } from 'viem'
import { mainnet } from 'viem/chains'
export const walletClient = createWalletClient({
chain: mainnet,
transport: custom(window.ethereum!),
})
export const [account] = await walletClient.getAddresses()
↑ JSON-RPC Account
// export const account = privateKeyToAccount(...)
↑ Local Account
```
## Adding Signature to CID
In order to attach a signature to a CID the following requirements must be met:
* The CID being signed is owned by the signer
* The CID being signed was first uploaded by the signer
* The CID must not already have an existing signature with Pinata
After creating the signature with the previous step you can add it to the CID with the [add](/sdk/signatures/public/add) method in the SDK.
```typescript theme={null}
import { PinataSDK } from "pinata-web3";
const pinata = new PinataSDK({
pinataJwt: process.env.PINATA_JWT!,
pinataGateway: "example-gateway.mypinata.cloud",
});
const signature = await pinata.signatures.public.add({
cid: "QmXGeVy9dVwfuFJmvbzz8y4dYK1TdxXbDGzwbNuyZ5xXSU",
signature: "0x1b...911b",
address: "0xB3899AA8E13172E48D44CE411b0c4c2f08730Dc6"
});
```
## Getting a Signature for a CID
There are two ways you can an existing signature for a CID: the [get](/sdk/signatures/public/get) method in the SDK or the [Content Addressable Gateway Plugin](/gateways/plugins/content-addressable).
### Content Addressable Gateway Plugin
After [installing the plugin](/gateways/plugins/getting-started#installing-plugins) you can simply request a CID through the Dedicated Gateway and get the signature in the header `pinata-signauture`.
```typescript theme={null}
const signatureReq = await fetch(
`https://.mypinata.cloud/ipfs/`,
{
method: "HEAD",
}
);
const signature = signatureReq.headers.get("pinata-signature");
```
### SDK
You can also use the [get](/sdk/signatures/public/get) method to get a signature for a given CID.
This method will check all CIDs on Pinata and will return a signature if it exists
```typescript theme={null}
import { PinataSDK } from "pinata-web3";
const pinata = new PinataSDK({
pinataJwt: process.env.PINATA_JWT!,
pinataGateway: "example-gateway.mypinata.cloud",
});
const signature = await pinata.signatures.public.get(
"QmXGeVy9dVwfuFJmvbzz8y4dYK1TdxXbDGzwbNuyZ5xXSU"
);
```
## Verifying a Signature
Since the signatures are using the EIP-712 standard you can use a library like [Viem](https://viem.sh/docs/utilities/verifyTypedData) to verify with the same typed data used to create it.
```typescript example.ts theme={null}
import { account, walletClient } from './config'
import { domain, types } from './data'
import { verifyTypedData } from 'viem'
const CID = "bafkreih5aznjvttude6c3wbvqeebb6rlx5wkbzyppv7garjiubll2ceym4"
const signatureReq = await fetch(
`https://example-gateway.mypinata.cloud/ipfs/${CID}`,
{
method: "HEAD",
}
);
const signature = signatureReq.headers.get("pinata-signature");
const valid = await verifyTypedData({
address: account.address,
domain,
types,
primaryType: 'Sign',
message: {
address: '0xCD2a3d9F938E13CD947Ec05AbC7FE734Df8DD826',
cid: 'bafkreih5aznjvttude6c3wbvqeebb6rlx5wkbzyppv7garjiubll2ceym4',
date: "2024-07-29T18:29:47.355Z"
},
signature,
})
```
```typescript data.ts theme={null}
export const domain = {
name: "Sign Content",
version: "1.0.0",
chainId: 1,
} as const;
export const types = {
Sign: [
{ name: "address", type: "address" },
{ name: "cid", type: "string" },
{ name: "date", type: "string" },
],
EIP712Domain: [
{
name: "name",
type: "string",
},
{
name: "version",
type: "string",
},
{
name: "chainId",
type: "uint256",
},
],
};
```
```typescript config.ts theme={null}
import { createWalletClient, custom } from 'viem'
import { mainnet } from 'viem/chains'
export const walletClient = createWalletClient({
chain: mainnet,
transport: custom(window.ethereum!),
})
export const [account] = await walletClient.getAddresses()
↑ JSON-RPC Account
// export const account = privateKeyToAccount(...)
↑ Local Account
```
## Removing a Signature for a CID
To delete an existing signautre for a given CID you can use the [delete](/sdk/signatures/public/delete) method.
```typescript theme={null}
import { PinataSDK } from "pinata-web3";
const pinata = new PinataSDK({
pinataJwt: process.env.PINATA_JWT!,
pinataGateway: "example-gateway.mypinata.cloud",
});
const signature = await pinata.signatures.public.delete(
"QmXGeVy9dVwfuFJmvbzz8y4dYK1TdxXbDGzwbNuyZ5xXSU"
);
```
# Uploading Files
Source: https://docs.pinata.cloud/files/uploading-files
At the core of Pinata's services is our IPFS APIs which allow you to upload files to either public or private IPFS. You can read more about the difference between the two [here](/files/private-ipfs).
Let's look at the multiple ways you can upload files!
## How to Upload Files
Uploading files with Pinata is simple, whether you want to use the SDK or the API. Key things to know:
* Uploads are done through `multipart/form-data` requests
* The SDK and API accept File objects per the [Web API Standard for Files]()
* You can add additional info to your upload such as a custom name for the file, keyvalue metadata, and a target group destination for organization
Here is a simple example of how you might upload a file in Typescript
```typescript SDK theme={null}
import { PinataSDK } from "pinata";
const pinata = new PinataSDK({
pinataJwt: process.env.PINATA_JWT!,
pinataGateway: "example-gateway.mypinata.cloud",
});
const file = new File(["hello"], "Testing.txt", { type: "text/plain" });
const upload = await pinata.upload.public.file(file);
```
```typescript API theme={null}
const JWT = "YOUR_PINATA_JWT";
async function upload() {
try {
const formData = new FormData();
const file = new File(["hello"], "Testing.txt", { type: "text/plain" });
formData.append("file", file);
formData.append("network", "public");
const request = await fetch("https://uploads.pinata.cloud/v3/files", {
method: "POST",
headers: {
Authorization: `Bearer ${JWT}`,
},
body: formData,
});
const response = await request.json();
console.log(response);
} catch (error) {
console.log(error);
}
}
```
This will return the following response
```typescript SDK theme={null}
{
id: "349f1bb2-5d59-4cab-9966-e94c028a05b7",
name: "file.txt",
cid: "bafybeihgxdzljxb26q6nf3r3eifqeedsvt2eubqtskghpme66cgjyw4fra",
size: 4682779,
number_of_files: 1,
mime_type: "text/plain",
group_id: null
}
```
```JSON API theme={null}
{
"data": {
"id": "349f1bb2-5d59-4cab-9966-e94c028a05b7",
"name": "file.txt",
"cid": "bafybeihgxdzljxb26q6nf3r3eifqeedsvt2eubqtskghpme66cgjyw4fra",
"size": 4682779,
"number_of_files": 1,
"mime_type": "text/plain",
"group_id": null
}
}
```
* `id`: The ID of the file used for getting info, updating, or deleting
* `name`: The name of the file or the provided name in the `addMetadata` method
* `cid`: A cryptographic hash based on the contents of the file
* `size`: The size of the file in bytes
* `number_of_files`: The number of files in a reference
* `mime_type`: The mime type of the uploaded file
* `group_id`: The group the file was uploaded to if applicable
### Metadata
When uploading a file you can add additional metadata using the `name` or `keyvalues` methods after the selected upload method. This can include an optional `name` override or `keyvalue` pairs that can be used to searching the file later on
[Check out the Key-Values doc for more info](/files/key-values)
```typescript SDK {3-8} theme={null}
const upload = await pinata.upload.public
.file(file)
.name("hello.txt")
.keyvalues({
env: "prod"
})
```
```typescript API {13,15-19, 21} theme={null}
const JWT = "YOUR_PINATA_JWT";
async function upload() {
try {
const formData = new FormData();
const file = new File(["hello"], "Testing.txt", { type: "text/plain" });
formData.append("file", file);
formData.append("network", "public");
formData.append("name", "hello.txt");
const keyvalues = JSON.stringify({
keyvalues: {
env: "prod"
}
})
formData.append("keyvalues", keyvalues);
const request = await fetch("https://uploads.pinata.cloud/v3/files", {
method: "POST",
headers: {
Authorization: `Bearer ${JWT}`,
},
body: formData,
});
const response = await request.json();
console.log(response);
} catch (error) {
console.log(error);
}
}
```
### Groups
Pinata offers Private IPFS Groups to organize your content. You can upload a file to a group by using the `group` method.
[Check out the Groups doc for more info](/files/file-groups)
```typescript SDK {3} theme={null}
const upload = await pinata.upload.public
.file(file)
.group("b07da1ff-efa4-49af-bdea-9d95d8881103")
```
```typescript API {13} theme={null}
const JWT = "YOUR_PINATA_JWT";
async function upload() {
try {
const formData = new FormData();
const file = new File(["hello"], "Testing.txt", { type: "text/plain" });
formData.append("file", file);
formData.append("network", "public");
formData.append("group", "b07da1ff-efa4-49af-bdea-9d95d8881103");
const request = await fetch("https://uploads.pinata.cloud/v3/files", {
method: "POST",
headers: {
Authorization: `Bearer ${JWT}`,
},
body: formData,
});
const response = await request.json();
console.log(response);
} catch (error) {
console.log(error);
}
}
```
### Expiration
You can set an expiration date on files by using the `expires_at` option. The timestamp must be a Unix timestamp in the future. Once the expiration time is reached, the file will be automatically deleted.
```typescript SDK {3} theme={null}
const upload = await pinata.upload.public
.file(file)
.expires(1735689600) // Unix timestamp in the future
```
```typescript API {13} theme={null}
const JWT = "YOUR_PINATA_JWT";
async function upload() {
try {
const formData = new FormData();
const file = new File(["hello"], "Testing.txt", { type: "text/plain" });
formData.append("file", file);
formData.append("network", "public");
formData.append("expires_at", "1735689600"); // Unix timestamp in the future
const request = await fetch("https://uploads.pinata.cloud/v3/files", {
method: "POST",
headers: {
Authorization: `Bearer ${JWT}`,
},
body: formData,
});
const response = await request.json();
console.log(response);
} catch (error) {
console.log(error);
}
}
```
You can also set or update the expiration on an existing file using the update method or endpoint:
```typescript SDK {3} theme={null}
const update = await pinata.files.public.update({
id: "2b4ee88d-1032-4e4e-a373-97d1ab127f16",
expires_at: 1735689600 // Unix timestamp in the future
})
```
```typescript API theme={null}
const JWT = "YOUR_PINATA_JWT";
async function update() {
try {
const fileId = "2b4ee88d-1032-4e4e-a373-97d1ab127f16";
const data = JSON.stringify({
expires_at: 1735689600 // Unix timestamp in the future
});
const request = await fetch(`https://api.pinata.cloud/v3/files/public/${fileId}`, {
method: "PUT",
headers: {
"Content-Type": "application/json",
Authorization: `Bearer ${JWT}`,
},
body: data,
});
const response = await request.json();
console.log(response);
} catch (error) {
console.log(error);
}
}
```
### Client Side Uploads
There are situations where you may need to upload a file client side instead of server side. A great example is in Next.js where there is a 4MB file size restriction for files passed through Next's API routes. To solve this you can create a signed upload URL on the server and then pass it to the client for it to be consumed. This way your admin API key stays safe behind a server. Creating signed upload URLs can be done with either the [SDK](/sdk/upload/public/create-signed-url) or the [API](/api-reference/endpoint/create-signed-upload-url), and you can designate how long the URL is valid for or if there is other infromation you want to include such as metadata or a group ID.
Setting up a server side API endpoint might look something like this:
```typescript SDK theme={null}
import { type NextRequest, NextResponse } from "next/server";
import { pinata } from "@/utils/config"; // Import the Files SDK instance
export const dynamic = "force-dynamic";
export async function GET() {
// Handle your auth here to protect the endpoint
try {
const url = await pinata.upload.public.createSignedURL({
expires: 30, // The only required param
name: "Client File",
group: "my-group-id"
})
return NextResponse.json({ url: url }, { status: 200 }); // Returns the signed upload URL
} catch (error) {
console.log(error);
return NextResponse.json({ text: "Error creating signed URL:" }, { status: 500 });
}
}
```
```typescript API theme={null}
import { type NextRequest, NextResponse } from "next/server";
export const dynamic = "force-dynamic";
export async function GET() {
// Handle your auth here to protect the endpoint
try {
// Prepare payload data for request
const data = JSON.stringify({
network: "public",
expires: 30,
filename: "Client file",
group_id: "my-group-id"
})
// send request and parse response
const urlRequest = await fetch("https://uploads.pinata.cloud/v3/files/sign", {
method: "POST",
headers: {
"Content-Type": "application/json",
Authorization: `Bearer ${process.env.PINATA_JWT}`
},
body: data
})
const urlResponse = await urlRequest.json()
return NextResponse.json({ url: urlResponse.data }, { status: 200 }); // Returns the key data
} catch (error) {
console.log(error);
return NextResponse.json({ text: "Error creating API Key:" }, { status: 500 });
}
}
```
Then back on the client side code, you can upload using the signed URL instead of the regular upload endpoint.
If you're using the SDK you can use the `.url()` parameter on any of the upload methods and pass in the signed upload URL there. If you are using the API you can simply make the upload request using the signed URL as the endpoint.
```typescript SDK {3} theme={null}
const urlRequest = await fetch("/api/url"); // Fetches the temporary upload URL
const urlResponse = await urlRequest.json(); // Parse response
const upload = await pinata.upload.public
.file(file)
.url(urlResponse.url); // Upload the file with the signed URL
```
```typescript API {1-2,13} theme={null}
const urlRequest = await fetch("/api/url"); // Fetches the temporary upload URL
const urlResponse = await urlRequest.json(); // Parse response
async function upload() {
try {
const formData = new FormData();
const file = new File(["hello"], "Testing.txt", { type: "text/plain" });
formData.append("file", file);
formData.append("network", "public")
const request = await fetch(urlResponse.url, {
method: "POST",
body: formData,
});
const response = await request.json();
console.log(response);
} catch (error) {
console.log(error);
}
}
```
For more information on client side uploads check out our [Presigned URLs Guide](/files/presigned-urls)
### Upload Progress
If you happen to use the API as well as local files you can also track the progress of the upload using a library like `got`. Better support for upload progress will come in later versions of the SDK!
```typescript theme={null}
import fs from "fs";
import FormData from "form-data";
import got from "got";
async function upload() {
const url = `https://uploads.pinata.cloud/v3/files`;
try {
let data = new FormData();
data.append(`file`, fs.createReadStream("path/to/file"));
const response = await got(url, {
method: "POST",
headers: {
Authorization: `Bearer ${process.env.PINATA_JWT}`,
},
body: data,
}).on("uploadProgress", (progress) => {
console.log(progress);
});
console.log(JSON.parse(response.body));
} catch (error) {
console.log(error);
}
}
```
If your file is larger than 100MB then a better approach is to follow the [Resumable Upload Guide](#resumable-uploads)
## Common File Recipes
Below are some common recipes for uploading a file.
### Blob
Usually you can pass a Blob directly into the request but to help guarantee success we recommend passing it into a `File` object.
```typescript SDK {8-10} theme={null}
import { PinataSDK } from "pinata";
const pinata = new PinataSDK({
pinataJwt: process.env.PINATA_JWT!,
pinataGateway: "example-gateway.mypinata.cloud",
});
const text = "Hello World!";
const blob = new Blob([text]);
const file = new File([blob], "hello.txt", { type: "text/plain" });
const upload = await pinata.upload.public.file(file);
```
```typescript API {7-9} theme={null}
const JWT = "YOUR_PINATA_JWT";
async function upload() {
try {
const formData = new FormData();
const text = "Hello World!";
const blob = new Blob([text]);
const file = new File([blob], "Testing.txt", { type: "text/plain" });
formData.append("file", file);
formData.append("network", "public");
const request = await fetch("https://uploads.pinata.cloud/v3/files", {
method: "POST",
headers: {
Authorization: `Bearer ${JWT}`,
},
body: formData,
});
const response = await request.json();
console.log(response);
} catch (error) {
console.log(error);
}
}
```
### JSON
Pinata makes it easy to upload JSON objects using the [json](/sdk/upload/public/json) method.
```typescript SDK {8-15} theme={null}
import { PinataSDK } from "pinata";
const pinata = new PinataSDK({
pinataJwt: process.env.PINATA_JWT!,
pinataGateway: "example-gateway.mypinata.cloud",
});
const upload = await pinata.upload.public.json({
id: 2,
name: "Bob Smith",
email: "bob.smith@example.com",
age: 34,
isActive: false,
roles: ["user"],
});
```
```typescript API {7-16} theme={null}
const JWT = "YOUR_PINATA_JWT";
async function upload() {
try {
const formData = new FormData();
const json = JSON.stringify({
id: 2,
name: "Bob Smith",
email: "bob.smith@example.com",
age: 34,
isActive: false,
roles: ["user"],
})
const blob = new Blob([json]);
const file = new File([blob], "bob.json", { type: "application/json" });
formData.append("file", file);
formData.append("network", "public");
const request = await fetch("https://uploads.pinata.cloud/v3/files", {
method: "POST",
headers: {
Authorization: `Bearer ${JWT}`,
},
body: formData,
});
const response = await request.json();
console.log(response);
} catch (error) {
console.log(error);
}
}
```
### Local Files
If you need to upload files from a local file source you can use `fs` to feed a file into a `blob`, then turn that `blob` into a `File`. Due to the buffer limit in Node.js you may have issues going beyond 2GB with this approach. Using [Resumable Uploads](#resumable-uploads) with a client side file picker will help increase this.
Support for file streams will be coming in a later version of the SDK.
```typescript SDK {10-11} theme={null}
const { PinataSDK } = require("pinata");
const fs = require("fs");
const { Blob } = require("buffer");
const pinata = new PinataSDK({
pinataJwt: process.env.PINATA_JWT!,
pinataGateway: "example-gateway.mypinata.cloud",
});
const blob = new Blob([fs.readFileSync("./hello-world.txt")]);
const file = new File([blob], "hello-world.txt", { type: "text/plain" });
const upload = await pinata.upload.public.file(file);
```
```typescript API {9} theme={null}
const JWT = "YOUR_PINATA_JWT";
const fs = require("fs");
const { Blob } = require("buffer");
async function upload() {
try {
const formData = new FormData();
formData.append("file", fs.createReadStream("./hello-world.txt"));
formData.append("network", "public")
const request = await fetch("https://uploads.pinata.cloud/v3/files", {
method: "POST",
headers: {
Authorization: `Bearer ${JWT}`,
},
body: formData,
});
const response = await request.json();
console.log(response);
} catch (error) {
console.log(error);
}
}
```
### Folders
The SDK can accept an array of files using the [fileArray](/sdk/upload/public/file-array) method. Folders can also be uploaded via the API by creating an array of files and mapping over them to add them to the form data. This is different then having a single `file` entry and having multiple files for that one entry, which does not work.
Folder uploads are currently only supported on Public IPFS
```typescript SDK theme={null}
import { PinataSDK } from "pinata-web3";
const pinata = new PinataSDK({
pinataJwt: process.env.PINATA_JWT!,
pinataGateway: "example-gateway.mypinata.cloud",
});
const file1 = new File(["hello world!"], "hello.txt", { type: "text/plain" })
const file2 = new File(["hello world again!"], "hello2.txt", { type: "text/plain" })
const upload = await pinata.upload.public.fileArray([file1, file2])
```
```javascript Node.js theme={null}
import fs from "fs"
import FormData from "form-data"
import rfs from "recursive-fs"
import basePathConverter from "base-path-converter"
import got from 'got'
const pinDirectoryToPinata = async () => {
const url = `https://api.pinata.cloud/pinning/pinFileToIPFS`;
const src = "PATH_TO_FOLDER";
var status = 0;
try {
const { dirs, files } = await rfs.read(src);
let data = new FormData();
for (const file of files) {
data.append(`file`, fs.createReadStream(file), {
filepath: basePathConverter(src, file),
});
}
const response = await got(url, {
method: 'POST',
headers: {
"Authorization": "Bearer PINATA_API_JWT"
},
body: data
})
.on('uploadProgress', progress => {
console.log(progress);
});
console.log(JSON.parse(response.body));
} catch (error) {
console.log(error);
}
};
pinDirectoryToPinata()
```
```javascript React theme={null}
import { useState } from "react";
import { pinata } from "./utils/config"
function App() {
const [selectedFiles, setSelectedFiles] = useState();
const changeHandler = (event: React.ChangeEvent) => {
setSelectedFiles(event.target?.files);
};
const handleSubmission = async () => {
try {
const upload = await pinata.upload.public.fileArray(selectedFiles)
console.log(upload);
} catch (error) {
console.log(error);
}
};
return (
<>
);
}
export default App;
```
```javascript Javascript theme={null}
import FormData from "form-data"
const pinDirectoryToIPFS = async () => {
try {
const folder = "json";
const json1 = { hello: "world" };
const json2 = { hello: "world2" };
const blob1 = new Blob([JSON.stringify(json1, null, 2)], {
type: "application/json",
});
const blob2 = new Blob([JSON.stringify(json2, null, 2)], {
type: "application/json",
});
const files = [
new File([blob1], "hello.json", { type: "application/json" }),
new File([blob2], "hello2.json", { type: "application/json" }),
];
const data = new FormData();
Array.from(files).forEach((file) => {
// If you are not using `fs` you might need to specify the folder path along with the filename
data.append("file", file, `${folder}/${file.name}`);
});
const pinataMetadata = JSON.stringify({
name: `${folder}`,
});
data.append("pinataMetadata", pinataMetadata);
const res = await fetch("https://api.pinata.cloud/pinning/pinFileToIPFS", {
method: "POST",
headers: {
Authorization: `Bearer ${PINATA_JWT}`,
},
body: data,
});
const resData = await res.json();
console.log(resData);
} catch (error) {
console.log(error);
}
};
pinDirectoryToIPFS();
```
We also have other tools like the [Pinata IPFS CLI](/tools/cli/ipfs) which can be used to upload using [API Keys](/account-management/api-keys)!
### URL
To upload a file from an external URL you can stream the contents into an `arrayBuffer`, which then gets passed into a new `Blob` that can then be uploaded to Pinata. This has been abstracted in the SDK using the [url](/sdk/upload/public/url) method.
```typescript SDK {8} theme={null}
import { PinataSDK } from "pinata";
const pinata = new PinataSDK({
pinataJwt: process.env.PINATA_JWT!,
pinataGateway: "example-gateway.mypinata.cloud",
});
const upload = await pinata.upload.public.url("https://i.imgur.com/u4mGk5b.gif");
```
```typescript API {7-10} theme={null}
const JWT = "YOUR_PINATA_JWT";
async function upload() {
try {
const formData = new FormData();
const stream = await fetch("https://i.imgur.com/u4mGk5b.gif")
const arrayBuffer = await stream.arrayBuffer();
const blob = new Blob([arrayBuffer]);
const file = new File([blob], "name.gif");
formData.append("file", file);
formData.append("network", "public");
const request = await fetch("https://uploads.pinata.cloud/v3/files", {
method: "POST",
headers: {
Authorization: `Bearer ${JWT}`,
},
body: formData,
});
const response = await request.json();
console.log(response);
} catch (error) {
console.log(error);
}
}
```
### base64
To upload a file in base64 simply turn the contents into a `buffer` that is passed into a `Blob`. Alternatively you can use the SDK for this as well using the [base64](/sdk/upload/public/base64) method.
```typescript SDK {8} theme={null}
import { PinataSDK } from "pinata";
const pinata = new PinataSDK({
pinataJwt: process.env.PINATA_JWT!,
pinataGateway: "example-gateway.mypinata.cloud",
});
const upload = await pinata.upload.public.base64("SGVsbG8gV29ybGQh");
```
```typescript API {7-11} theme={null}
const JWT = "YOUR_PINATA_JWT";
async function upload() {
try {
const formData = new FormData();
const buffer = Buffer.from("SGVsbG8gV29ybGQh", "base64");
const blob = new Blob([buffer]);
const file = new File([blob], "hello.txt");
formData.append("file", file);
formData.append("network", "public");
const request = await fetch("https://uploads.pinata.cloud/v3/files", {
method: "POST",
headers: {
Authorization: `Bearer ${JWT}`,
},
body: formData,
});
const response = await request.json();
console.log(response);
} catch (error) {
console.log(error);
}
}
```
## Resumable Uploads
The upload endpoint `https://uploads.pinata.cloud/v3/files` is fully [TUS](https://tus.io) compatible, so it can support larger files with the ability to resume uploads. Any file upload larger than 100MB needs to be uploaded through the TUS method, or through the legacy [/pinFileToIPFS](/api-reference/endpoint/ipfs/pin-file-to-ipfs) endpoint. The [SDK](/sdk) handles this automatically when you use `pinata.upload..file()` by checking the file size before uploading.
At this time folder uploads must go through [/pinFileToIPFS](/api-reference/endpoint/ipfs/pin-file-to-ipfs). Read the [Folder Guide](#folders) for more info!
```typescript {6} theme={null}
const pinata = new PinataSDK({
pinataJwt: process.env.PINATA_JWT!,
pinataGateway: "example-gateway.mypinata.cloud",
});
const upload = await pinata.upload.public.file(massiveFile);
```
If you want to take advantage of resumable uploads then we would recommend using one of the [TUS clients](https://tus.io/implementations) and taking note of the following:
* Upload chunk size must be smaller than 50MB
* Instead of using the form data fields for `group_id` or `keyvalues` these can be passed directly into the upload metadata (see example below)
* Headers must include the Authorization with your [Pinata JWT](/account-management/api-keys)
Here is an example of an upload to Pinata using the `tus-js-client`
```typescript tus-js-client [expandable] theme={null}
import * as tus from "tus-js-client";
async function resumeUpload(file) {
try {
const upload = new tus.Upload(file, {
endpoint: "https://uploads.pinata.cloud/v3/files",
chunkSize: 50 * 1024 * 1024, // 50MiB chunk size
retryDelays: [0, 3000, 5000, 10000, 20000],
onUploadUrlAvailable: async function () {
if (upload.url) {
console.log("Upload URL is available! URL: ", upload.url);
}
},
metadata: {
filename: "candyroad-demo.mp4", // name
filetype: "video/mp4",
group_id: "0192868e-6144-7685-9fc5-af68a1e48f29", // group ID
network: "public",
keyvalues: JSON.stringifiy({ env: "prod" }), // keyvalues
},
headers: { Authorization: `Bearer ${process.env.PINATA_JWT}` }, // auth header
uploadSize: fileStats.size,
onError: function (error) {
console.log("Failed because: " + error);
},
onProgress: function (bytesUploaded, bytesTotal) {
const percentage = ((bytesUploaded / bytesTotal) * 100).toFixed(2);
console.log(percentage + "%");
},
onSuccess: function () {
console.log("Upload completed!");
},
});
upload.start();
} catch (error) {
console.log(error);
}
}
```
## Upload by CAR File
You can upload content to Pinata using a raw CAR file. A **CAR (Content Addressed Archive)** file bundles together IPFS blocks in a portable format.
To upload a CAR file, set the `car` parameter to **true** in your upload request. CAR file uploads are supported across all Pinata upload methods.
```typescript SDK {4} theme={null}
const upload = await pinata.upload.public
.file(file)
.name("test.car")
.car()
```
```typescript API {15} theme={null}
const JWT = "YOUR_PINATA_JWT";
async function upload() {
try {
const formData = new FormData();
const file = new File(["test_car"], "test.car", { type: "application/vnd.ipld.car" });
formData.append("file", file);
formData.append("network", "public");
formData.append("name", "test.car");
formData.append("car", "true");
const request = await fetch("https://uploads.pinata.cloud/v3/files", {
method: "POST",
headers: {
Authorization: `Bearer ${JWT}`,
},
body: formData,
});
const response = await request.json();
console.log(response);
} catch (error) {
console.log(error);
}
}
```
Requirements
* Paid plan required - CAR uploads are not available on free plans
* Public network only - CAR files cannot be uploaded as private content
* Valid structure - Files must be properly formatted CAR files with valid IPFS blocks
* Single Root CID - Pinata does not support CAR files with multiple root CIDs
File Availability
CAR file processing is **asynchronous**. After a successful upload, Pinata validates the CAR file structure and IPFS blocks before preparing the file for indexing. A webhook notification is then sent to report the outcome, indicating whether the CAR file was successfully imported or if the process failed.
## Pin by CID
Another way you can upload content to Pinata is by transferring content that is already on IPFS. This could be CIDs that are on your own local IPFS node or another IPFS pinning service! You can do this with the “Import from IPFS” button in the web app, like so:
Or you can pin by CID with the SDK using the [cid](/sdk/upload/public/cid) method.
```typescript theme={null}
import { PinataSDK } from "pinata-web3";
const pinata = new PinataSDK({
pinataJwt: process.env.PINATA_JWT!,
pinataGateway: "example-gateway.mypinata.cloud",
});
const pin = await pinata.upload.public.cid("QmVLwvmGehsrNEvhcCnnsw5RQNseohgEkFNN1848zNzdng")
```
This will result in a `request_id` and Pinata will start looking for the file. Progress can be checked by using the [queue](/sdk/files/public/queue) method.
```typescript theme={null}
import { PinataSDK } from "pinata-web3";
const pinata = new PinataSDK({
pinataJwt: process.env.PINATA_JWT!,
pinataGateway: "example-gateway.mypinata.cloud",
});
const jobs = await pinata.files.public.queue().status("prechecking")
```
All possible filters are included in the API reference below, but these are the possible "status" filters:
Filter by the status of the job in the pinning queue (see potential statuses
below)
* `prechecking` Pinata is running preliminary validations on your pin request.
* `searching` Pinata is actively searching for your content on the IPFS network. This may take some time if your content is isolated.
* `retrieving` Pinata has located your content and is now in the process of retrieving it.
* `expired` Pinata wasn't able to find your content after a day of searching the IPFS network. Please make sure your content is hosted on the IPFS network before trying to pin again.
* `backfilled` Pinata can only search 250 files at a time per account, so if you have more than 250 items in your queue then the extra items will sit in a backfilled status. Once the queue goes down it will automatically start working on the next items in the backfill queue.
* `over_free_limit` Pinning this object would put you over the free tier limit. Please add a credit card to continue pinning content.
* `over_max_size` This object is too large of an item to pin. If you're seeing this, please contact us for a more custom solution.
* `invalid_object` The object you're attempting to pin isn't readable by IPFS nodes. Please contact us if you receive this, as we'd like to better understand what you're attempting to pin.
* `bad_host_node` You provided a host node that was either invalid or unreachable. Please make sure all provided host nodes are online and reachable.
## Predetermining the CID
If you find yourself in a position where you want to pre-determine the CID before uploading you can use a combination of the `ipfs-unixfx-importer` and `blockstore-core` libraries.
```typescript theme={null}
import { importer } from "ipfs-unixfs-importer";
import { MemoryBlockstore } from "blockstore-core/memory";
export const predictCID = async (file: File, version: 0 | 1 = 1) => {
try {
const arrayBuffer = await file.arrayBuffer();
const buffer = Buffer.from(arrayBuffer);
const blockstore = new MemoryBlockstore();
let rootCid: any;
for await (const result of importer([{ content: buffer }], blockstore, {
cidVersion: version,
hashAlg: "sha2-256",
rawLeaves: version === 1,
})) {
rootCid = result.cid;
}
return rootCid.toString();
} catch (err) {
return err;
}
};
```
Usage will just require passing in a file object and the version of the CID you want to predict. Here is an example using a local file.
```typescript theme={null}
import fs from "fs"
const file = new File([fs.readFileSync("path/to-file")], "filename.extension");
const cid = await predictCID(file, 1);
console.log(cid);
```
## Peering with Pinata
If you run IPFS infrastructure and would like to peer with Pinata's nodes you can do so with the [Kubo](https://docs.ipfs.tech/reference/kubo/cli/) commands listed below. Rather than using full multiaddresses for our node IDs we use a DNS setup that is more stable and allows our infrastructure to be flexible.
```bash theme={null}
ipfs swarm connect /dnsaddr/bitswap.pinata.cloud
```
```bash theme={null}
ipfs config --json Peering.Peers '[{ "ID": "Qma8ddFEQWEU8ijWvdxXm3nxU7oHsRtCykAaVz8WUYhiKn", "Addrs": ["/dnsaddr/bitswap.pinata.cloud"] }]'
```
If you have any issues feel free to [reach out](mailto:team@pinata.cloud)!
## Web App
You can also use the **[Pinata App](https://app.pinata.cloud/)** to upload files. It’s as simple as clicking the “Add” button in the top right corner of the **[files page](https://app.pinata.cloud/ipfs/files)**. Select your file, give it a name, then upload. Once it's complete you’ll see it listed in the files page.
Start uploading by [signing up for a free account](https://app.pinata.cloud/register)!
# File Vectors (Beta)
Source: https://docs.pinata.cloud/files/vectors
The file vectors feature is still in beta and is only available on Private IPFS. Please contact the team at [team@pinata.cloud](mailto:team@pinata.cloud) if you have any issues.
## Overview
A common nusance when building AI apps is context embeddings. If you use a traditional stack you generall have to store an embedding, vectorize it, store the vector, then when you query a vector you'll get another reference to the file which you then have to fetch again. Pinata's solution is much more elegant. With Pinata's file vectoring you can upload a file and vector it at the same time.
```typescript theme={null}
const upload = await pinata.upload.private
.file(file)
.group("GROUP_ID")
.vectorize()
```
When it comes time to query a vector, you have the option to either list your query results and judge the matching score, or just return the highest scoring file itself.
```typescript theme={null}
const { data, contentType } = await pinata.files.private
.queryVectors({
groupId: "GROUP_ID",
query: "Hello World!",
returnFile: true
})
```
This enables develops to build AI applications faster and with less code!
### Pinata Vector Storage: Public Beta Limits
During the public beta, Pinata Vector Storage has the following limits:
* File Vectorization Limit: You can vectorize up to 10,000 files.
* Index Limit: You can create a maximum of 5 indexes, managed using Pinata Groups.
* Results Limit: You can query a vector and get a max of 20 files returned in one request.
**What this means**
You can organize your vector embeddings into up to 5 searchable indexes using Pinata Groups. Across all these groups, you can store a total of 10,000 vector embeddings corresponding to files stored on Pinata.
## Vectorizing Files
There are two ways you can vectorize file uploads, and with both options **files must be part of a group** in order for vectors and queries to work.
### Vectorize on Upload
If you use the [Files SDK](/sdk/getting-started) you can vectorize a file on upload.
```typescript {4} theme={null}
const upload = await pinata.upload.private
.file(file)
.group("GROUP_ID")
.vectorize()
```
### Vectorize After Upload
If you already have a file that's been uploaded and it's [part of a group](/files/file-groups) then you can vectorize it.
```typescript theme={null}
const update = await pinata.files.private.vectorize("FILE_ID")
```
## Querying Vectors
After a file has been vectorized and it's part of a group, you can query vectors for a given group.
```typescript theme={null}
const results = await pinata.files.private.queryVectors({
groupId: "52681e41-86f4-407b-8f79-33a7e7e5df68",
query: "Hello World"
})
```
This will return the following type:
```typescript theme={null}
type VectorizeQueryResponse = {
count: number;
matches: VectorQueryMatch[];
};
type VectorQueryMatch = {
file_id: string;
cid: string;
score: number;
};
```
### Returning the Top Match File
A unique feature in the SDK is if you pass in the `returnFile` flag then you will get the file and it's contents rather than just the reference to the file.
```typescript {4} theme={null}
const { data, contentType } = await pinata.files.private.queryVectors({
groupId: "52681e41-86f4-407b-8f79-33a7e7e5df68",
query: "Hello World",
returnFile: true
})
```
## Deleting Vectors
If at any point you need to delete vectors for a file you can do so with the `deleteVectors` method in the SDK.
```typescript theme={null}
const update = await pinata.files.private.deleteVectors("FILE_ID")
```
# Introduction
Source: https://docs.pinata.cloud/files/x402/intro
x402 is available on paid Pinata accounts. [Upgrade your account](https://app.pinata.cloud/billing) to access x402 monetization features.
Pinata's x402 enables you to monetize your private IPFS files by receiving USDC payments directly to your wallet. You set the price, you receive the payment.
## Overview
Pinata's x402 implementation enables:
* **Monetization of private IPFS content** using Payment Instructions
* **You receive payments directly** to your wallet address. Payments go to you.
* **Flexible payment requirements** configurable per file or group of files
* **USDC payments** on Base (mainnet) and Base Sepolia (testnet). USDC is currently the only supported token.
* **Gateway-level enforcement** through the x402 protocol
## Network Configuration
| Network | USDC Token Address | Use Case |
| ---------------------- | -------------------------------------------- | ----------------------- |
| Base (Mainnet) | `0x833589fCD6eDb6E08f4c7C32D4f71b54bdA02913` | Production monetization |
| Base Sepolia (Testnet) | `0x036CbD53842c5426634e7929541eC2318f3dCF7e` | Testing payment flows |
## How It Works
1. **Upload** a private file to Pinata IPFS
2. **Create** a Payment Instruction with your desired payment requirements
3. **Attach** the CID of your private file to the Payment Instruction
4. **Share** your x402 gateway URL: `https://your-gateway.mypinata.cloud/x402/cid/{cid}`
5. **Requesters** make USDC payments through your gateway to access content
You must use your own dedicated Pinata gateway domain. Replace `your-gateway.mypinata.cloud` with your actual gateway domain throughout these examples.
## Example Workflow
```typescript theme={null}
import { PinataSDK } from "pinata";
const pinata = new PinataSDK({
pinataJwt: process.env.PINATA_JWT!,
pinataGateway: "your-gateway.mypinata.cloud",
});
// 1. Upload a private file
const file = new File(["premium content"], "content.pdf", { type: "application/pdf" });
const upload = await pinata.upload.private.file(file);
// 2. Create a payment instruction
const instruction = await pinata.x402.createPaymentInstruction({
name: "Premium Content",
payment_requirements: [
{
asset: "0x833589fCD6eDb6E08f4c7C32D4f71b54bdA02913",
pay_to: "0xYourWalletAddress", // YOU receive payments here
network: "base",
description: "Access fee",
amount: "10000", // $0.01 in USDC
},
],
});
// 3. Attach CID to payment instruction
await pinata.x402.addCid(instruction.data.id, upload.cid);
// 4. Share the x402 gateway URL
// https://your-gateway.mypinata.cloud/x402/cid/{cid}
```
## Why Use Payment Instructions
Payment Instructions enable you to monetize your private content by setting custom payment requirements and receiving payments directly to your wallet.
Key benefits:
* **You get paid** for your content. Set your own prices and receive USDC payments directly.
* **Flexible pricing** for different files or groups of files
* **Reusable payment instructions** that can be attached to multiple CIDs
* **Full control** over payment requirements, pricing, and access
## SDK Reference
Get started with x402 monetization
Create and manage payment instructions
Attach CIDs to payment instructions
TypeScript type definitions
## API Reference
For direct API access, see the [x402 API documentation](/api-reference/endpoint/x402/payment-instructions-list).
# Accessing Paid Content
Source: https://docs.pinata.cloud/files/x402/x402-accessing-paid-content
Learn how to access x402-protected content on Pinata.
## Overview
When attempting to access x402-protected content without a payment payload, the gateway returns payment requirements. After making a payment, requesters receive a payment proof that grants access to the content.
## The Payment Flow
The content creator provides their dedicated Pinata gateway URL. Replace `your-gateway.mypinata.cloud` in examples with the actual gateway domain provided.
### Step 1: Request the Content
Make a GET request to the x402 gateway URL:
```bash theme={null}
curl https://your-gateway.mypinata.cloud/x402/cid/bafkreih...
```
### Step 2: Receive Payment Requirements (402 Response)
The gateway returns HTTP 402 with payment details:
```json theme={null}
{
"x402Version": 1,
"accepts": [
{
"scheme": "exact",
"network": "base",
"maxAmountRequired": "10000",
"resource": "https://your-gateway.mypinata.cloud/x402/cid/bafkreih...",
"description": "Access fee",
"mimeType": "application/json",
"payTo": "0x6135561038E7C676473431842e586C8248276AED",
"maxTimeoutSeconds": 60,
"asset": "0x833589fCD6eDb6E08f4c7C32D4f71b54bdA02913",
"extra": {
"name": "USD Coin",
"version": "2"
}
}
],
"error": "Provide a valid X-Payment header to access this content"
}
```
**Key Fields:**
* `network`: Blockchain network (e.g., `base`)
* `asset`: Token contract address (USDC on Base)
* `payTo`: Recipient wallet address (content creator receives payment here)
* `maxAmountRequired`: Payment amount in smallest unit (e.g., `10000` = 0.01 USDC)
### Step 3: Access Content with Payment Proof
After successful payment, include the `X-Payment` header in the request:
```bash theme={null}
curl https://your-gateway.mypinata.cloud/x402/cid/bafkreih... \
-H "X-Payment: eyJ4NDAyVmVyc2lvbiI6MSwic2NoZW1lIjoiZXhhY3QiLCJuZXR3b3..."
```
The gateway will:
1. Validate the `X-Payment` header
2. Verify the payment proof
3. Check that amount, recipient, and network match
4. Serve the private content
**Successful Response:**
```
HTTP/200 OK
Content-Type: application/json
{
"your": "content"
}
```
## Using x402 Libraries
The x402 protocol has client libraries that automate the payment flow. First, set up your wallet:
## Setting Up Your Wallet
The x402 libraries require a Viem account or Coinbase Developer Platform wallet:
### Option 1: Viem Local Account
```typescript theme={null}
import { privateKeyToAccount } from "viem/accounts";
const account = privateKeyToAccount("0xYOUR_PRIVATE_KEY");
```
### Option 2: Coinbase CDP Wallet
```typescript theme={null}
import { Coinbase, Wallet } from "@coinbase/coinbase-sdk";
const coinbase = new Coinbase({
apiKeyName: "YOUR_API_KEY_NAME",
privateKey: "YOUR_PRIVATE_KEY",
});
const wallet = await Wallet.create();
const account = await wallet.getDefaultAddress();
```
## Using the Libraries
Once you have your wallet set up, use the x402 libraries to access paid content:
### @x402/fetch
```typescript theme={null}
import { wrapFetchWithPayment } from "@x402/fetch";
import { privateKeyToAccount } from "viem/accounts";
// Set up your wallet
const account = privateKeyToAccount("0xYOUR_PRIVATE_KEY");
const fetchWithPayment = wrapFetchWithPayment(fetch, account);
// Automatically handles 402 response and payment
const response = await fetchWithPayment(
"https://your-gateway.mypinata.cloud/x402/cid/bafkreih..."
);
const content = await response.json();
console.log(content);
```
### @x402/axios
```typescript theme={null}
import { wrapAxiosWithPayment } from "@x402/axios";
import axios from "axios";
import { privateKeyToAccount } from "viem/accounts";
// Set up your wallet
const account = privateKeyToAccount("0xYOUR_PRIVATE_KEY");
const axiosWithPayment = wrapAxiosWithPayment(axios, account);
// Automatically handles 402 response and payment
const response = await axiosWithPayment.get(
"https://your-gateway.mypinata.cloud/x402/cid/bafkreih..."
);
console.log(response.data);
```
## Technical Details (Optional)
Pinata uses Coinbase Facilitator to process x402 payments, which provides access to Coinbase's Discovery Bazaar network for broader content discovery.
## Understanding Payment Amounts
USDC uses 6 decimals, so amounts use the token's smallest unit:
| USD Amount | `maxAmountRequired` | Calculation |
| ---------- | ------------------- | ------------------- |
| \$0.01 | `10000` | \$0.01 × 1,000,000 |
| \$0.10 | `100000` | \$0.10 × 1,000,000 |
| \$1.00 | `1000000` | \$1.00 × 1,000,000 |
| \$10.00 | `10000000` | \$10.00 × 1,000,000 |
**Formula:** USD Amount × 1,000,000 = token amount
## Error Handling
### 402 Payment Required
Payment has not been made yet. Follow the payment flow above.
### 403 Forbidden
Payment proof is invalid or expired. Make a new payment.
### 404 Not Found
The CID doesn't exist or isn't attached to a payment instruction.
### 500 Internal Server Error
Gateway or facilitator error. Contact the content creator.
## Network Support
**USDC is currently the only supported token.**
| Network | Status | Token | Use Case |
| ---------------------- | ----------- | --------------------------------------------------- | ---------- |
| Base (Mainnet) | ✅ Available | USDC (`0x833589fCD6eDb6E08f4c7C32D4f71b54bdA02913`) | Production |
| Base Sepolia (Testnet) | ✅ Available | USDC (`0x036CbD53842c5426634e7929541eC2318f3dCF7e`) | Testing |
## Best Practices
1. **Handle 402 responses gracefully**: Display payment requirements clearly
2. **Use the x402 libraries**: They handle the complex payment flow automatically
3. **Test on Base Sepolia first**: Verify integration before using mainnet
4. **Store payment proofs**: If accessing content multiple times (check expiry)
5. **Monitor USDC balance**: Ensure sufficient funds for payments
## Example: Complete Integration
```typescript theme={null}
import { wrapFetchWithPayment } from "@x402/fetch";
import { privateKeyToAccount } from "viem/accounts";
// Set up your wallet
const account = privateKeyToAccount(process.env.PRIVATE_KEY);
const fetchWithPayment = wrapFetchWithPayment(fetch, account);
// Access paid content
async function accessPaidContent(cid: string) {
try {
const url = `https://your-gateway.mypinata.cloud/x402/cid/${cid}`;
const response = await fetchWithPayment(url);
if (!response.ok) {
throw new Error(`HTTP ${response.status}: ${response.statusText}`);
}
const content = await response.json();
console.log("Content accessed successfully:", content);
return content;
} catch (error) {
console.error("Failed to access content:", error);
throw error;
}
}
// Usage
accessPaidContent("bafkreih5aznjvttude6c3wbvqeebb6rlx5wkbzyppv7garjiubll2ceym4");
```
## Resources
* [@x402/fetch NPM Package](https://www.npmjs.com/package/@x402/fetch)
* [@x402/axios NPM Package](https://www.npmjs.com/package/@x402/axios)
* [Viem Documentation](https://viem.sh)
* [Coinbase Developer Platform](https://docs.cdp.coinbase.com/)
## Support
Need help accessing paid content? Contact the content creator or reach out to [team@pinata.cloud](mailto:team@pinata.cloud).
# Payment Instructions Guide
Source: https://docs.pinata.cloud/files/x402/x402-payment-instructions
Payment Instructions are the core mechanism for monetizing private IPFS content through the x402 protocol. You define payment requirements, attach them to your private files, and receive payments directly to your wallet when requesters access your content.
This guide covers how to create, manage, and use Payment Instructions to monetize your content.
## Prerequisites
* Paid Pinata account
* [Pinata SDK](/sdk/getting-started) installed
* Private files uploaded to Pinata IPFS
## Understanding Payment Instructions
A Payment Instruction is a reusable configuration that defines:
* **Payment requirements** - The amount, token, and recipient for payments
* **Network configuration** - Which blockchain network to use
* **Metadata** - Name and description for organization
The `payment_requirements` field is an array, allowing you to define multiple payment options. Each payment instruction can have multiple requirements, giving requesters flexibility in how they pay.
### Payment Instruction Structure
```typescript theme={null}
type PaymentInstruction = {
id: string;
version: number;
payment_requirements: PaymentRequirement[];
name: string;
description?: string;
created_at: string;
};
type PaymentRequirement = {
asset: string; // USDC token contract address
pay_to: string; // Your wallet address
network: "base" | "base-sepolia" | "eip155:8453" | "eip155:84532";
amount: string; // Amount in USDC smallest units
description?: string;
};
```
The `version` field is automatically managed by Pinata and increments with each update. You don't need to set this field when creating or updating payment instructions.
## Networks and Tokens
Currently supported configurations. **USDC is the only supported token at this time.**
### Base Mainnet (Production)
* **Network**: `base` (or `eip155:8453`)
* **USDC Token Address**: `0x833589fCD6eDb6E08f4c7C32D4f71b54bdA02913`
* **Use for**: Production monetization
### Base Sepolia (Testing)
* **Network**: `base-sepolia` (or `eip155:84532`)
* **USDC Token Address**: `0x036CbD53842c5426634e7929541eC2318f3dCF7e`
* **Use for**: Testing payment flows
## Complete Workflow
```typescript theme={null}
import { PinataSDK } from "pinata";
const pinata = new PinataSDK({
pinataJwt: process.env.PINATA_JWT!,
pinataGateway: "your-gateway.mypinata.cloud",
});
```
### Step 1: Upload Private Content
First, upload your file as private to Pinata:
```typescript theme={null}
const file = new File(["file contents"], "premium-content.pdf", {
type: "application/pdf",
});
const upload = await pinata.upload.private.file(file);
const cid = upload.cid;
```
**Important:** The file must be uploaded to the `private` network to be monetized with x402.
### Step 2: Create Payment Instruction
Create a payment instruction with your desired requirements:
```typescript theme={null}
const instruction = await pinata.x402.createPaymentInstruction({
name: "Premium PDF Access",
description: "One-time payment for PDF access",
payment_requirements: [
{
asset: "0x833589fCD6eDb6E08f4c7C32D4f71b54bdA02913", // USDC on Base
pay_to: "0x6135561038E7C676473431842e586C8248276AED", // YOU receive payments here
network: "base",
description: "Access fee",
amount: "10000", // $0.01 in USDC
},
],
});
const instructionId = instruction.data.id;
```
### Step 3: Attach CID to Payment Instruction
Link your private file to the payment instruction:
```typescript theme={null}
await pinata.x402.addCid(instructionId, cid);
```
### Step 4: Share x402 Gateway URL
Your content is now monetized and accessible at:
```
https://your-gateway.mypinata.cloud/x402/cid/{cid}
```
## Managing Payment Instructions
### Listing Instructions
View all your payment instructions with pagination:
```typescript theme={null}
const instructions = await pinata.x402.listPaymentInstructions({ limit: 20 });
```
Filter by specific criteria:
```typescript theme={null}
// Find instruction for a specific CID
const byCid = await pinata.x402.listPaymentInstructions({ cid: "bafkreih..." });
// Filter by name
const byName = await pinata.x402.listPaymentInstructions({ name: "Premium" });
// Get specific instruction by ID
const byId = await pinata.x402.listPaymentInstructions({ id: "019a2b6a..." });
```
### Getting a Single Instruction
```typescript theme={null}
const instruction = await pinata.x402.getPaymentInstruction(instructionId);
```
### Updating Instructions
Modify payment requirements for all attached CIDs:
```typescript theme={null}
const updated = await pinata.x402.updatePaymentInstruction(instructionId, {
payment_requirements: [
{
asset: "0x833589fCD6eDb6E08f4c7C32D4f71b54bdA02913",
pay_to: "0x6135561038E7C676473431842e586C8248276AED",
network: "base",
amount: "50000", // Updated to $0.05
},
],
});
```
### Deleting Instructions
Before deleting, remove all CID attachments:
```typescript theme={null}
// 1. List attached CIDs
const { data: cidData } = await pinata.x402.listCids(instructionId);
// 2. Remove each CID
for (const cid of cidData.cids) {
await pinata.x402.removeCid(instructionId, cid);
}
// 3. Delete the instruction
await pinata.x402.deletePaymentInstruction(instructionId);
```
## CID Management
### CID and Payment Instruction Relationship
* **One Payment Instruction → Multiple CIDs**: A single payment instruction can be attached to multiple CIDs
* **One CID → One Payment Instruction**: Each CID can only have one payment instruction at a time
* **Multiple Requirements**: A payment instruction can have multiple payment requirements in its `payment_requirements` array
* Updating the instruction affects all attached CIDs
### Managing CID Attachments
```typescript theme={null}
// List all CIDs for an instruction
const cids = await pinata.x402.listCids(instructionId);
// Add a CID
await pinata.x402.addCid(instructionId, cid);
// Remove a CID
await pinata.x402.removeCid(instructionId, cid);
```
## Gateway Behavior
When a requester accesses your x402 gateway URL without payment, the gateway returns payment requirements:
### Without Payment (402 Response)
```json theme={null}
{
"x402Version": 1,
"accepts": [
{
"scheme": "exact",
"network": "base",
"maxAmountRequired": "10000",
"resource": "https://gateway/x402/cid/bafkreig...",
"payTo": "0x6135561038E7C676473431842e586C8248276AED",
"asset": "0x833589fCD6eDb6E08f4c7C32D4f71b54bdA02913",
"extra": {
"name": "USD Coin",
"version": "2"
}
}
],
"error": "Provide a valid X-Payment header to access this content"
}
```
### With Valid Payment
The gateway:
1. Validates the `X-Payment` header
2. Verifies the payment proof
3. Checks amount, recipient, and network match requirements
4. Serves the private content
## Best Practices
### Payment Amounts
The `amount` uses USDC's smallest unit. USDC has 6 decimals, so to convert USD to the token amount, multiply by 1,000,000:
| USD Amount | `amount` | Calculation |
| ---------- | ------------ | ------------------- |
| \$0.01 | `"10000"` | \$0.01 × 1,000,000 |
| \$0.10 | `"100000"` | \$0.10 × 1,000,000 |
| \$1.00 | `"1000000"` | \$1.00 × 1,000,000 |
| \$5.00 | `"5000000"` | \$5.00 × 1,000,000 |
| \$10.00 | `"10000000"` | \$10.00 × 1,000,000 |
**Formula:** USD Amount × 1,000,000 = token amount
**Tips:**
* Consider transaction costs when setting minimum amounts
* Test on Base Sepolia before deploying to mainnet
### Instruction Organization
* Use descriptive names for easy management
* Group similar content under one instruction
* Document your payment requirements clearly
### Security Considerations
* Only private files can be monetized
* Ensure your `pay_to` address is correct. **You receive payments directly to this address.**
* Test payment flows on testnet first
* Monitor your gateway analytics
## Troubleshooting
### Common Issues
**409 Conflict when deleting instruction**
* Solution: Remove all CID attachments first
**400 Bad Request when creating instruction**
* Check `asset` and `pay_to` addresses start with `0x`
* Verify `network` is `base`, `base-sepolia`, `eip155:8453`, or `eip155:84532`
* Ensure `amount` is provided
**404 Not Found when accessing CID**
* Verify the CID exists and is private
* Check the CID is attached to a payment instruction
* Ensure the gateway URL format is correct
## SDK Reference
* [List Payment Instructions](/sdk/x402/payment-instructions/list)
* [Create Payment Instruction](/sdk/x402/payment-instructions/create)
* [Get Payment Instruction](/sdk/x402/payment-instructions/get)
* [Update Payment Instruction](/sdk/x402/payment-instructions/update)
* [Delete Payment Instruction](/sdk/x402/payment-instructions/delete)
* [List CIDs](/sdk/x402/cids/list)
* [Add CID](/sdk/x402/cids/add)
* [Remove CID](/sdk/x402/cids/remove)
## API Reference
For direct API access, see the [x402 API documentation](/api-reference/endpoint/x402/payment-instructions-list).
# Quick Start
Source: https://docs.pinata.cloud/files/x402/x402-quick-start
Get started monetizing your private IPFS files with x402 in just a few minutes.
With x402, you monetize your private files by setting payment requirements. Payments go directly to your wallet. You control the price and receive the funds.
x402 is available on paid Pinata accounts. [Upgrade your account](https://app.pinata.cloud/billing) to access x402 monetization features.
## Prerequisites
* Paid Pinata account
* [Pinata SDK](/sdk/getting-started) installed
* Ethereum wallet address to receive payments
## Step 1: Upload a Private File
First, upload a file to Private IPFS:
```typescript theme={null}
import { PinataSDK } from "pinata";
const pinata = new PinataSDK({
pinataJwt: process.env.PINATA_JWT!,
pinataGateway: "your-gateway.mypinata.cloud",
});
const file = new File(["file contents"], "your-file.pdf", {
type: "application/pdf",
});
const upload = await pinata.upload.private.file(file);
const cid = upload.cid;
```
Save the returned `cid` for the next step.
## Step 2: Create a Payment Instruction
Define your payment requirements:
```typescript theme={null}
const instruction = await pinata.x402.createPaymentInstruction({
name: "Premium Content Access",
description: "One-time payment for file access",
payment_requirements: [
{
asset: "0x833589fCD6eDb6E08f4c7C32D4f71b54bdA02913", // USDC on Base
pay_to: "YOUR_WALLET_ADDRESS", // YOU receive payments here
network: "base",
description: "Access fee",
amount: "10000", // $0.01 in USDC
},
],
});
const instructionId = instruction.data.id;
```
**Understanding Payment Amounts:** The `amount` uses USDC's smallest unit. USDC has 6 decimals, so to convert USD to the token amount, multiply by 1,000,000:
| USD Amount | `amount` | Calculation |
| ---------- | ------------ | ------------------- |
| \$0.01 | `"10000"` | \$0.01 × 1,000,000 |
| \$0.10 | `"100000"` | \$0.10 × 1,000,000 |
| \$1.00 | `"1000000"` | \$1.00 × 1,000,000 |
| \$5.00 | `"5000000"` | \$5.00 × 1,000,000 |
| \$10.00 | `"10000000"` | \$10.00 × 1,000,000 |
**Formula:** USD Amount × 1,000,000 = token amount
**Networks:**
* Production: Use `"base"` (or `"eip155:8453"`) with `0x833589fCD6eDb6E08f4c7C32D4f71b54bdA02913`
* Testing: Use `"base-sepolia"` (or `"eip155:84532"`) with `0x036CbD53842c5426634e7929541eC2318f3dCF7e`
Save the returned `id` for the next step.
## Step 3: Attach CID to Payment Instruction
Link your private file to the payment instruction:
```typescript theme={null}
await pinata.x402.addCid(instructionId, cid);
```
## Step 4: Share Your Monetized Content
Your file is now monetized! Share this URL with requesters:
```
https://your-gateway.mypinata.cloud/x402/cid/{cid}
```
Replace `your-gateway.mypinata.cloud` with your actual dedicated Pinata gateway domain (e.g., `my-gateway.mypinata.cloud`), and `{cid}` with your file's CID.
## Step 5: Test the Payment Flow
When a requester accesses your URL without payment, the gateway returns a 402 response with payment requirements:
```typescript theme={null}
const response = await fetch(
`https://your-gateway.mypinata.cloud/x402/cid/${cid}`
);
const paymentRequirements = await response.json();
console.log(paymentRequirements);
```
Response:
```json theme={null}
{
"x402Version": 1,
"accepts": [{
"scheme": "exact",
"network": "base",
"maxAmountRequired": "10000",
"asset": "0x833589fCD6eDb6E08f4c7C32D4f71b54bdA02913",
"payTo": "YOUR_WALLET_ADDRESS",
"resource": "https://your-gateway.mypinata.cloud/x402/cid/{cid}"
}],
"error": "Provide a valid X-Payment header to access this content"
}
```
After payment is made, requesters can access the file by including the payment proof in the `X-Payment` header.
## Next Steps
* **Manage Multiple Files**: Attach multiple CIDs to the same payment instruction
* **Update Pricing**: Use [`updatePaymentInstruction`](/sdk/x402/payment-instructions/update)
* **Monitor Access**: Check your gateway analytics to track paid downloads
* **Requester Guide**: Learn how requesters access paid content in the [Accessing Paid Content](/files/x402/x402-accessing-paid-content) guide
## Common Issues
**404 Not Found**: Verify the CID is private and correctly attached to a payment instruction
**403 Forbidden**: Check that your API key has the required permissions
**409 Conflict**: If deleting a payment instruction fails, remove all CID attachments first
Need help? Contact [team@pinata.cloud](mailto:team@pinata.cloud)
## API Reference
For direct API access, see the [x402 API documentation](/api-reference/endpoint/x402/payment-instructions-list).
# x402 Services
Source: https://docs.pinata.cloud/files/x402/x402-services
## Overview
The x402 Services provide streamlined endpoints for crypto-based content monetization using the @x402/axios or @x402/fetch libraries.
## Endpoints
For detailed API specifications, see the API Reference:
Upload files with payment
Access private files with payment
## See Also
For more granular control over payment configurations, see the [Payment Instructions API](/files/x402/x402-payment-instructions), which offers:
* **Flexible pricing** - Define custom payment requirements
* **Separate management** - Configure payments independently from files
* **One-to-many** - Attach one payment instruction to multiple files
# Astro
Source: https://docs.pinata.cloud/frameworks/astro
Get started using Pinata with Astro
This guide will walk you through setting up Pinata with Astro
## Create an API Key and get Gateway URL
To create an API key, visit the [Keys Page](https://app.pinata.cloud/developers/keys) and click the "New Key" button in the top right. Once you do that you can select if you want your key to be admin or if you want to scope the privileges of the keys to certain endpoints or limit the number of uses. Make those selections, then give the key a name at the bottom, and click create key.
If you are just getting started we recommend using Admin privileges, then move
to scope keys as you better understand your needs
Once you have created the keys you will be shown your API Key Info. This will contain your **Api Key**, **API Secret**, and your **JWT**. Click "Copy All" and save them somewhere safe!
The API keys are only shown once, be sure to copy them somewhere safe!
After you have your API key, you will want to get your Gateway domain. When you create a Pinata account, you'll automatically have a Gateway created for you! To see it, simply visit the [Gateways Page](https://app.pinata.cloud/gateway) see it listed there.
The gateway domains are randomly generated and might look something like this:
```
aquamarine-casual-tarantula-177.mypinata.cloud
```
## Setup Astro
To create a new Astro project go ahead and run this command in the terminal:
```bash theme={null}
npm create astro@latest pinata-astro
```
You can select which options you prefer, but for this exmaple we'll use the following:
```
tmpl How would you like to start your new project?
Empty
ts Do you plan to write TypeScript?
Yes
use How strict should TypeScript be?
Strict
deps Install dependencies?
Yes
git Initialize a new git repository?
Yes
```
After completing the project setup we can go ahead and `cd` into the repo and install `pinata`.
```bash theme={null}
cd pinata-astro && npm i pinata
```
Since we want to keep our API key private we will need to make sure our code is deployed server side, and we can use several different adapter options which you can view [here](https://docs.astro.build/en/guides/server-side-rendering/). We also need a UI framework to handle our upload form, and there are many to choose from [here](https://docs.astro.build/en/guides/framework-components/). We'll use `vercel` and `svelte` for this tutorial, and you can install them like so.
```bash theme={null}
npx astro add vercel svelte
```
This should install the dependencies and alter the `astro.config.mjs` for us.
## Setup Pinata
In the `src` folder make a new folder called `utils`, and inside there make a file called `pinata.ts` with the following contents:
```typescript src/utils/pinata.ts theme={null}
import { PinataSDK } from "pinata";
export const pinata = new PinataSDK({
pinataJwt: import.meta.env.PINATA_JWT,
pinataGateway: import.meta.env.GATEWAY_URL,
});
```
This will create and export an instance of the Files SDK using environment variables, and to set those up make a new file at the root of the project called `.env` with the following values:
```
PINATA_JWT= # The Pinata JWT API key we got earlier
GATEWAY_URL= # The Gateway domain we grabbed earlier, formatting just as we copied it from the app
```
## Create Client Side Form
In the `src` folder make another folder called `components`, then inside there make file called `UploadForm.svelte`.
```html src/components/UploadForm.svelte theme={null}
```
This component creates a `