This guide will walk you through setting up Pinata in a Remix app.
Create an API Key and get Gateway URL
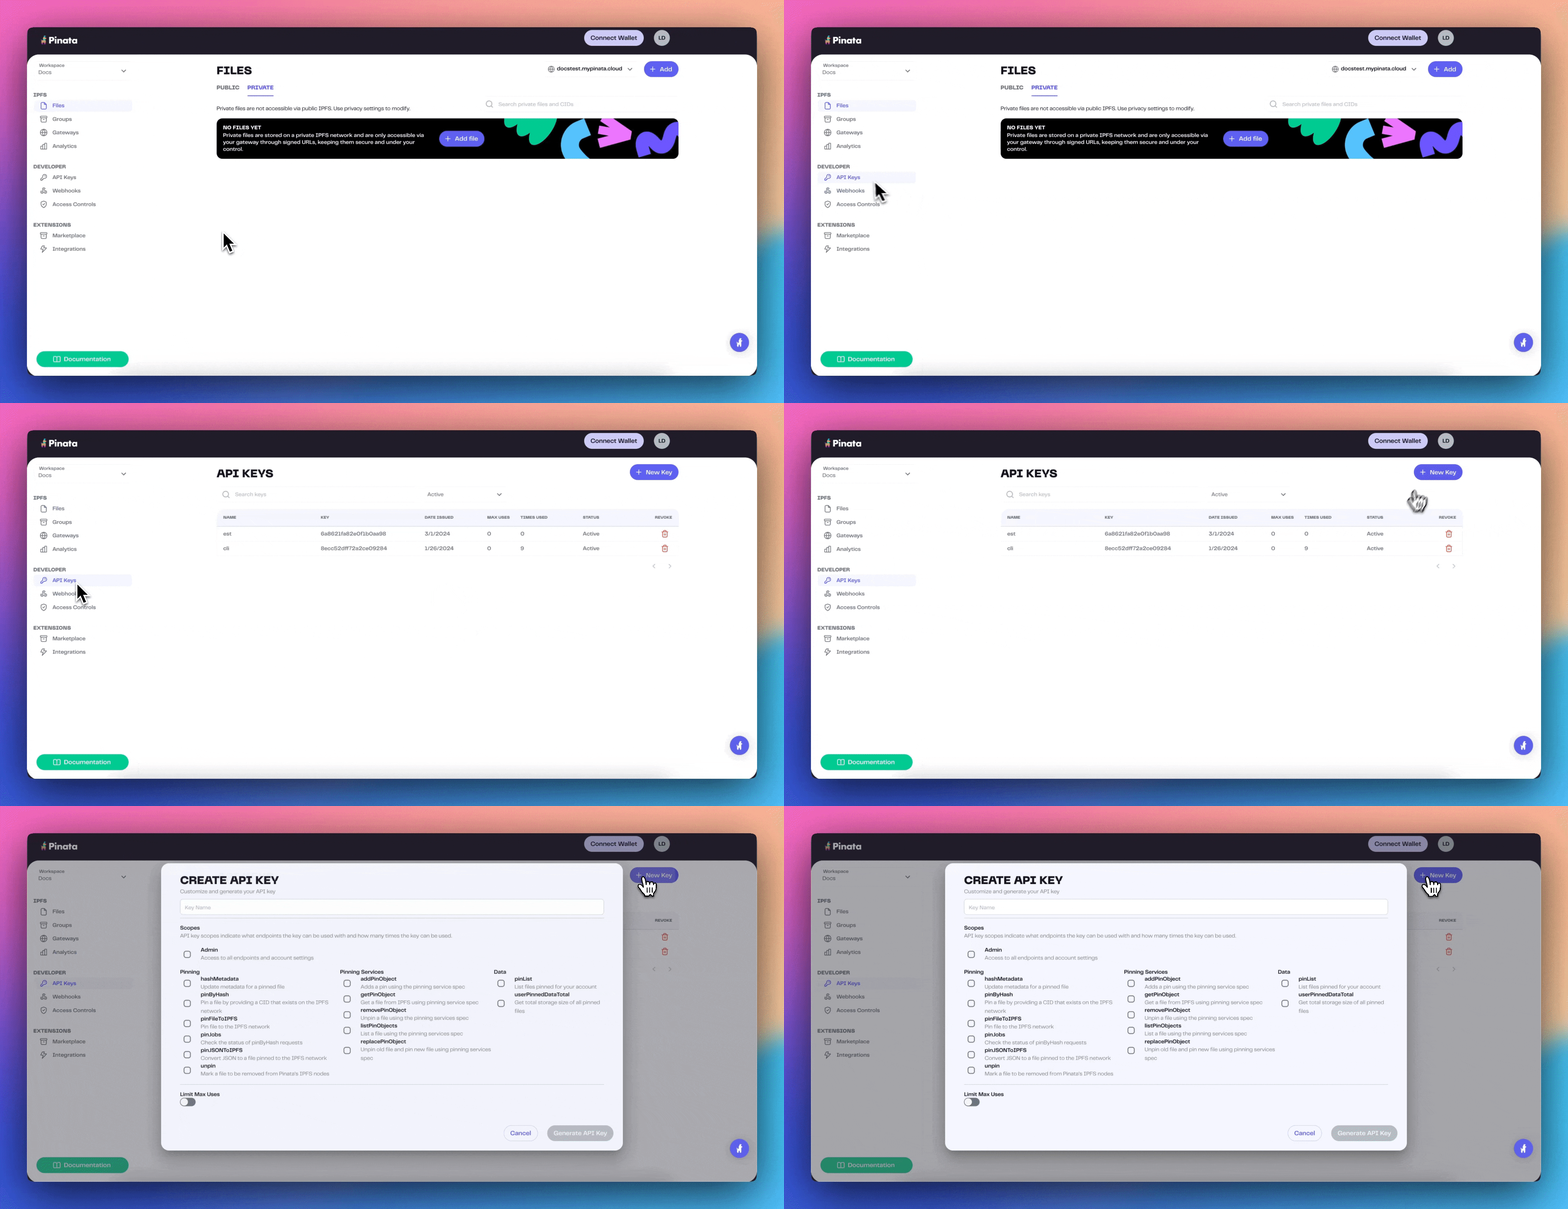
To create an API key, visit the Keys Page and click the “New Key” button in the top right. Once you do that you can select if you want your key to be admin or if you want to scope the privileges of the keys to certain endpoints or limit the number of uses. Make those selections, then give the key a name at the bottom, and click create key.
If you are just getting started we recommend using Admin privileges, then move
to scope keys as you better understand your needs
 Once you have created the keys you will be shown your API Key Info. This will contain your Api Key, API Secret, and your JWT. Click “Copy All” and save them somewhere safe!
The API keys are only shown once, be sure to copy them somewhere safe!
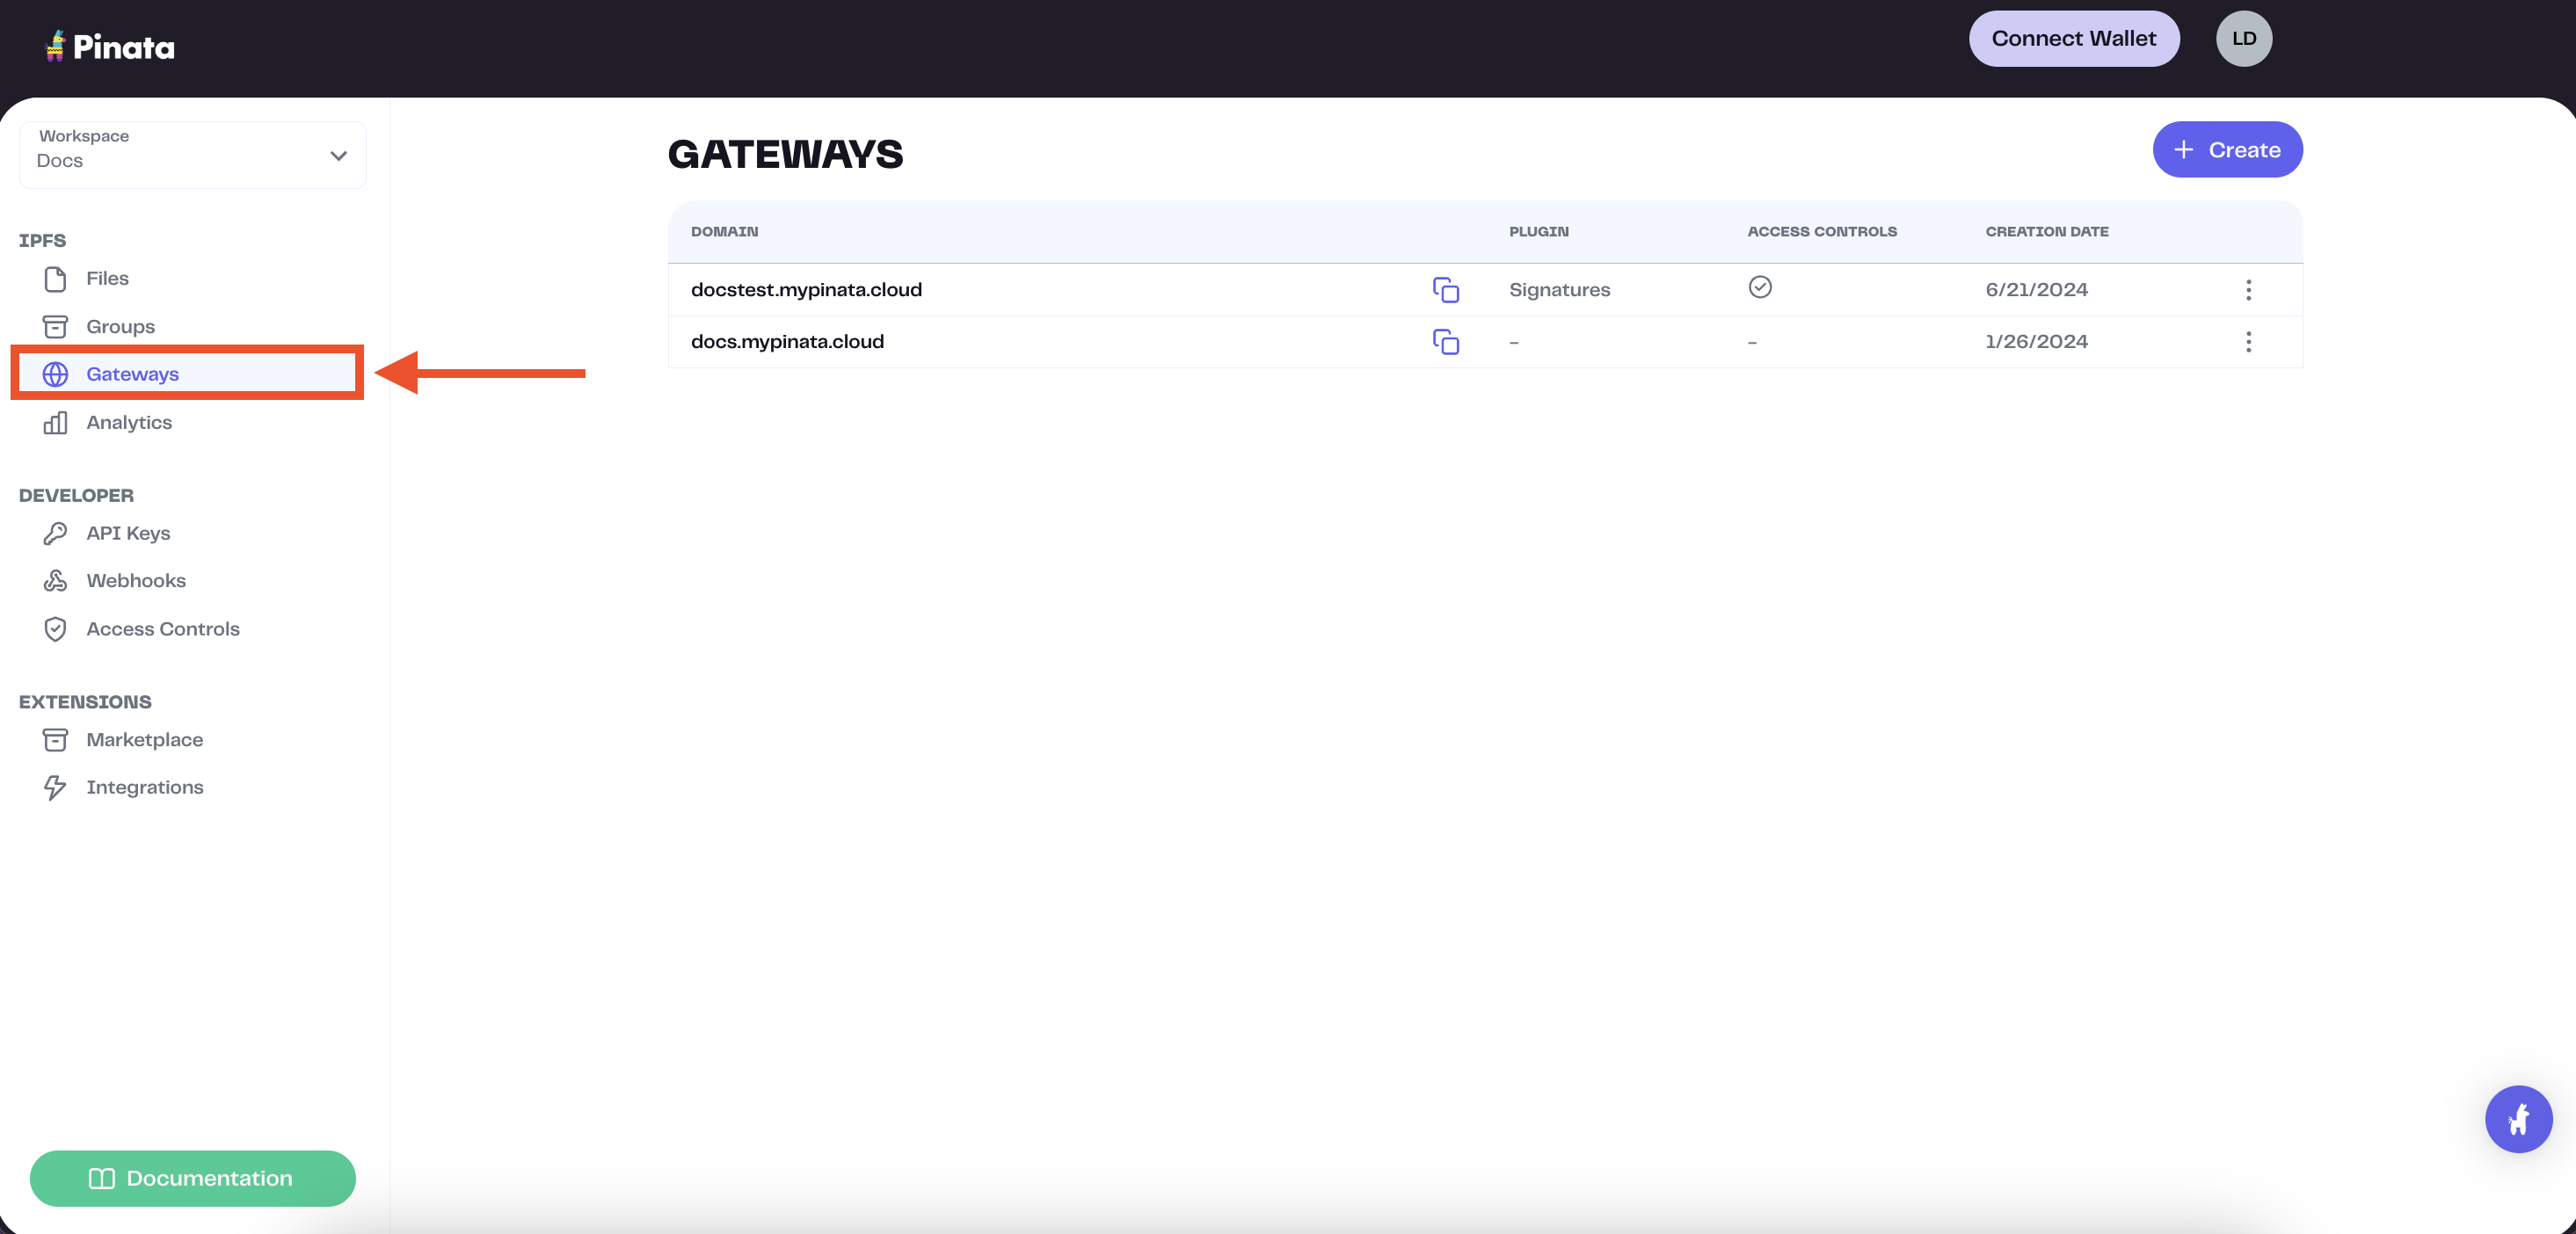
 The gateway domains are randomly generated and might look something like this:
aquamarine-casual-tarantula-177.mypinata.cloud
Startup Remix Project
We can start a Remix app by entering the command below into the terminal
npx create-remix@latest pinata-remix
cd into the project and install the pinata SDK.
cd pinata-remix && npm i pinata
.env file in the root of the project with the following variables:
PINATA_JWT= # The Pinata JWT API key we got earlier
GATEWAY_URL= # The Gateway domain we grabbed earlier, formatting just as we copied it from the app
Setup Pinata
Make a folder in the root of the project called utils, and inside make a file called pinata.ts with the following code:
import { PinataSDK } from "pinata";

export const pinata = new PinataSDK({
	pinataJwt: process.env.PINATA_JWT,
	pinataGateway: process.env.GATEWAY_URL,
});
app/routes directory we can remove the boilerplate code and replace it with the code below.
import type { ActionFunctionArgs, MetaFunction } from "@remix-run/node";
import { json } from "@remix-run/node";
import { Form, useActionData, useNavigation } from "@remix-run/react";
import { pinata } from "utils/config";

export const meta: MetaFunction = () => {
	return [
		{ title: "Remix + Pinata" },
		{ name: "description", content: "Upload files on Remix with Pinata!" },
	];
};

// Server side action to handle our upload
export const action = async ({ request }: ActionFunctionArgs) => {
	const formData = await request.formData();
	const file = formData.get("file") as File;
	const { cid } = await pinata.upload.public.file(file);
	const url = await pinata.gateways.public.convert(cid);
	return json({ url });
};

export default function Index() {
	const actionData = useActionData<typeof action>();
	const navigation = useNavigation();
	const isSubmitting = navigation.state === "submitting";

	return (
		<div className="font-sans p-4 flex flex-col gap-4 justify-center items-center min-h-screen max-w-[500px] mx-auto">
			<h1 className="text-3xl font-bold">Remix + Pinata</h1>
			<Form
				encType="multipart/form-data"
				method="post"
				className="flex flex-col gap-4"
			>
				<input type="file" name="file" className="" />
				<button
					className="bg-[#582CD6] text-white rounded-md p-2"
					type="submit"
				>
					{isSubmitting ? "Uploading..." : "Upload"}
				</button>
			</Form>
			{actionData?.url && (
				<div className="mt-4">
					<a
						href={actionData.url}
						target="_blank"
						rel="noreferrer"
						className="text-[#582CD6] underline"
					>
						{actionData.url}
					</a>
				</div>
			)}
		</div>
	);
}
<div className="font-sans p-4 flex flex-col gap-4 justify-center items-center min-h-screen max-w-[500px] mx-auto">
			<h1 className="text-3xl font-bold">Remix + Pinata</h1>
			<Form
				encType="multipart/form-data"
				method="post"
				className="flex flex-col gap-4"
			>
				<input type="file" name="file" className="" />
				<button
					className="bg-[#582CD6] text-white rounded-md p-2"
					type="submit"
				>
					{isSubmitting ? "Uploading..." : "Upload"}
				</button>
			</Form>
			{actionData?.url && (
				<div className="mt-4">
					<a
						href={actionData.url}
						target="_blank"
						rel="noreferrer"
						className="text-[#582CD6] underline"
					>
						{actionData.url}
					</a>
				</div>
			)}
		</div>
Form element provided by Remix which lets us make a submission to a server action. The most important piece to notice here is the encType="multipart/form-data", which is crucial to make file / multipart requests work in Remix!
Then we have our server action:
export const action = async ({ request }: ActionFunctionArgs) => {
	const formData = await request.formData();
	const file = formData.get("file") as File;
	const { cid } = await pinata.upload.public.file(file);
	const url = await pinata.gateways.public.convert(cid);
	return json({ url });
};
formData, get the file attached, and then we upload it to Pinata using pinata.upload.public.file(). From that method we deconstruct the result and return the cid which we can use in convert. This will make a URL we can return to the client and make accessible to the user, and in our case the <a> tag that links to the content.